Blogg
Här finns tekniska artiklar, presentationer och nyheter om arkitektur och systemutveckling. Håll dig uppdaterad, följ oss på LinkedIn
Här finns tekniska artiklar, presentationer och nyheter om arkitektur och systemutveckling. Håll dig uppdaterad, följ oss på LinkedIn

As our microservices and the landscape they operate in grows more complex, it also becomes increasingly important for our services to provide a mechanism for Docker Swarm to know if they’re feeling healthy or not. Therefore, we’ll take a look at how to add health checks in this sixth part of the blog series.
For example, our “accountservice” microservice isn’t very useful if it cannot:
The idiomatic way to handle this in a microservice is to provide an healthcheck endpoint (good article from Azure Docs) that in our case - since we’re HTTP based - should map to /health and respond with a HTTP 200 if things are OK, possibly together with some machine-parsable message explaining what’s OK. If there is a problem, a non HTTP 200 should be returned, possibly stating what’s not OK. Do note that some argue that failed checks should return 200 OK with errors specified in the response payload. I can agree with that too, but for the case of simplicity we’ll stick with non-200 for this blog post. So let’s add such an endpoint to our “account” microservice.
As always, feel free to checkout the appropriate branch from git to get all changes of this part up front:
git checkout P6
Note: Most of the Go source code for the blog series was rewritten in July 2019 to better reflect contemporary idiomatic Go coding guidelines and design patterns. However, the corresponding git branch for each part of the series remains unchanged in order to stay aligned with the content of each installment. For the latest and greatest code, look at the master branch in github.
Our service won’t be of much use if it cannot access its underlying database. Therefore, we’ll add a new function to the IBoltClient interface, Check():
type IBoltClient interface {
        OpenBoltDb()
        QueryAccount(accountId string) (model.Account, error)
        Seed()
        Check() bool              // NEW!
}
The Check method is perhaps a bit naive, but will serve its purpose for the sake of this blog. It specifies that either true or false will be returned depending on whether the BoltDB was accessible or not.
Our implementation of Check() in boltclient.go is not very realistic either, but it should explain the concept well enough:
// Naive healthcheck, just makes sure the DB connection has been initialized.
func (bc *BoltClient) Check() bool {
        return bc.boltDB != nil
}
The mocked implementation in mockclient.go follows our standard stretchr/testify pattern:
func (m *MockBoltClient) Check() bool {
        args := m.Mock.Called()
        return args.Get(0).(bool)
}
This is very straightforward. We’ll start by adding a new /health route to our /accountservice/service/routes.go file below the existing route to /accounts/{accountId}:
Route{
        "HealthCheck",
        "GET",
        "/health",
        HealthCheck,
},
We declared that the route shall be handled by a function named HealthCheck that we now will add to the /accountservice/service/handlers.go file:
func HealthCheck(w http.ResponseWriter, r *http.Request) {
        // Since we're here, we already know that HTTP service is up. Let's just check the state of the boltdb connection
        dbUp := DBClient.Check()
        if dbUp {
                data, _ := json.Marshal(healthCheckResponse{Status: "UP"})
                writeJsonResponse(w, http.StatusOK, data)
        } else {
                data, _ := json.Marshal(healthCheckResponse{Status: "Database unaccessible"})
                writeJsonResponse(w, http.StatusServiceUnavailable, data)
        }
}

func writeJsonResponse(w http.ResponseWriter, status int, data []byte) {
        w.Header().Set("Content-Type", "application/json")
        w.Header().Set("Content-Length", strconv.Itoa(len(data)))
        w.WriteHeader(status)
        w.Write(data)
}

type healthCheckResponse struct {
        Status string `json:"status"`
}
The HealthCheck function delegates the check of the DB state to the Check() function we added to the DBClient. If OK, we create an instance of the healthCheckResponse struct. Note the lower-case first character? That’s how we scope this struct to only be accessible within the service package. We also extracted the “write a http response” code into a utility method to keep ourselves DRY.
From the /goblog/accountservice folder, build and run:
> go run *.go
Starting accountservice
Seeded 100 fake accounts...
2017/03/03 21:00:31 Starting HTTP service at 6767
Open a new console window and curl the /health endpoint:
> curl localhost:6767/health
{"status":"UP"}
It works!
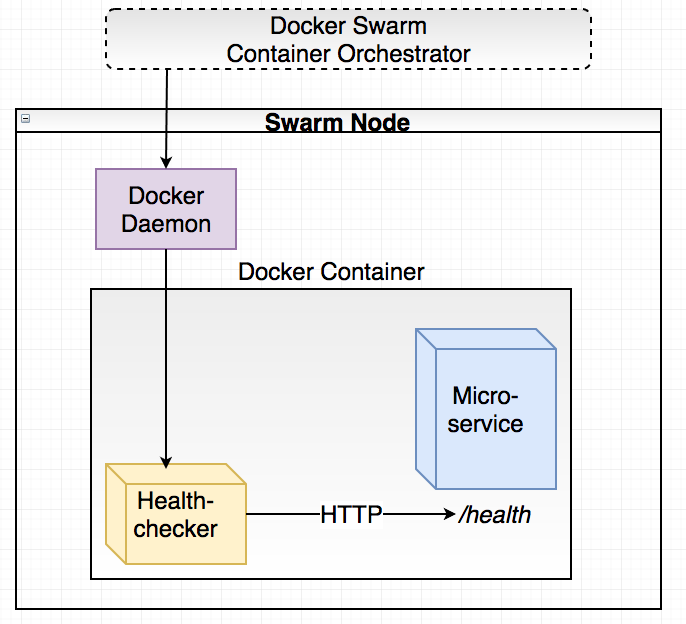
Next, we’ll use the Docker HEALTHCHECK mechanism to let Docker Swarm check our service for liveness. This is done by adding a line in the Dockerfile:
HEALTHCHECK --interval=5s --timeout=5s CMD ["./healthchecker-linux-amd64", "-port=6767"] || exit 1
What’s this “healthchecker-linux-amd64” thing? We need to help Docker a bit with these health checks as Docker itself doesn’t provide us with an HTTP client or similar to actually execute the health checks. Instead, the HEALTHCHECK directive in a Dockerfile specifies a command (CMD) that should perform the call to /health endpoint. Depending on the exit code of the program that was run, Docker will determine whether the service is healthy or not. If too many subsequent health checks fail, Docker Swarm will kill the container and start a new instance.
The most common way to do the actual healthcheck seems to be curl. However, this requires our base docker image to actually have curl (and any underlying dependencies) installed and at this moment we don’t really want to deal with that. Instead, we’ll use Go to brew our own little healthchecker program.
Time to create a new sub-project under the /src/github.com/callistaenterprise/goblog path:
mkdir healthchecker
Then, create main.go inside the /healthchecker folder:
package main

import (
	"flag"
	"net/http"
	"os"
)

func main() {
	port := flag.String("port", "80", "port on localhost to check")
	flag.Parse()

	resp, err := http.Get("http://127.0.0.1:" + *port + "/health")    // Note pointer dereference using *

	// If there is an error or non-200 status, exit with 1 signaling unsuccessful check.
	if err != nil || resp.StatusCode != 200 {
		os.Exit(1)
	}
	os.Exit(0)
}
Not an overwhelming amount of code. What it does:
Let’s try this. If you’ve stopped the “accountservice”, start it again either by go run *.go or by building it in a new console tab by going into the “/goblog/accountservice” directory and build/start it:
go build
./accountservice
Reminder: If you’re getting strange compile errors, check so the GOPATH still is set to the root folder of your Go workspace, e.g. the parent folder of /src/github.com/callistaenterprise/goblog
Then switch back to your normal console window (where you have GOPATH set as well) and run the healthchecker:
> cd $GOPATH/src/github.com/callistaenterprise/goblog/healtchecker
> go run *.go
exit status 1
Ooops! We forgot to specify the port number so it defaulted to port 80. Let’s try it again:
> go run *.go -port=6767
>
No output at all means we were successful. Good. Now, let’s build a linux/amd64 binary and add it to the “accountservice” by including the healthchecker binary in the Dockerfile. We’ll continue using the copyall.sh script to automate things a bit:
#!/bin/bash
export GOOS=linux
export CGO_ENABLED=0

cd accountservice;go get;go build -o accountservice-linux-amd64;echo built `pwd`;cd ..

// NEW, builds the healthchecker binary
cd healthchecker;go get;go build -o healthchecker-linux-amd64;echo built `pwd`;cd ..

export GOOS=darwin

// NEW, copies the healthchecker binary into the accountservice/ folder
cp healthchecker/healthchecker-linux-amd64 accountservice/

docker build -t someprefix/accountservice accountservice/
One last thing, we need to update the “accountservice” Dockerfile. It’s full content looks like this now:
FROM iron/base
EXPOSE 6767

ADD accountservice-linux-amd64 /

# NEW!!
ADD healthchecker-linux-amd64 /
HEALTHCHECK --interval=3s --timeout=3s CMD ["./healthchecker-linux-amd64", "-port=6767"] || exit 1

ENTRYPOINT ["./accountservice-linux-amd64"]
Additions:
Now we’re ready to deploy our updated “accountservice” with healthchecking. To automate things even further, add these two lines to the bottom of the copyall.sh script that will remove and re-create the accountservice inside Docker Swarm every time we run it:
docker service rm accountservice
docker service create --name=accountservice --replicas=1 --network=my_network -p=6767:6767 someprefix/accountservice
Now, run ./copyall.sh and wait a few seconds while everything builds and updates. Let’s check the state of our containers using docker ps that lists all running containers:
> docker ps
CONTAINER ID        IMAGE                             COMMAND                 CREATED        STATUS
1d9ec8122961        someprefix/accountservice:latest  "./accountservice-lin"  8 seconds ago  Up 6 seconds (healthy)
107dc2f5e3fc        manomarks/visualizer              "npm start"             7 days ago     Up 7 days
The thing we’re looking for here is the “(healthy)” text under the STATUS header. Services without a healthcheck configured doesn’t have a health indication at all.
To make things a bit more interesting, let’s add a testability API that lets us make the endpoint act unhealthy on purpose. In routes.go, declare a new endpoint:
Route{
        "Testability",
        "GET",
        "/testability/healthy/{state}",
        SetHealthyState,
},
This route (which you never should have in a production service!) provides us with a REST-ish endpoint for failing healthchecks on purpose. The SetHealthyState function goes into goblog/accountservice/handlers.go and looks like this:
var isHealthy = true // NEW

func SetHealthyState(w http.ResponseWriter, r *http.Request) {

        // Read the 'state' path parameter from the mux map and convert to a bool
        var state, err = strconv.ParseBool(mux.Vars(r)["state"])

        // If we couldn't parse the state param, return a HTTP 400
        if err != nil {
                fmt.Println("Invalid request to SetHealthyState, allowed values are true or false")
                w.WriteHeader(http.StatusBadRequest)
                return
        }

        // Otherwise, mutate the package scoped "isHealthy" variable.
        isHealthy = state
        w.WriteHeader(http.StatusOK)
}
Finally, add the isHealthy bool as a condition to the HealthCheck function:
func HealthCheck(w http.ResponseWriter, r *http.Request) {
        // Since we're here, we already know that HTTP service is up. Let's just check the state of the boltdb connection
        dbUp := DBClient.Check()

        if dbUp && isHealthy {              // NEW condition here!
                data, _ := json.Marshal(
                ...
        ...
}
Restart the accountservice:
> cd $GOPATH/src/github.com/callistaenterprise/goblog/accountservice
> go run *.go
Starting accountservice
Seeded 100 fake accounts...
2017/03/03 21:19:24 Starting HTTP service at 6767
Make a new healthcheck call from the other window:
 > cd $GOPATH/src/github.com/callistaenterprise/goblog/healthchecker
 > go run *.go -port=6767
 >
First attempt successful. Now change the state of the accountservice using a curl request to the testability endpoint:
> curl localhost:6767/testability/healthy/false
> go run *.go -port=6767
exit status 1
It’s working! Let’s try this running inside Docker Swarm. Rebuild and redeploy the “accountservice” using copyall.sh:
> cd $GOPATH/src/github.com/callistaenterprise/goblog
> ./copyall.sh
As always, wait a bit while Docker Swarm redeploys the “accountservice” service using the latest build of the “accountservice” container image. Then, run docker ps to see if we’re up and running with a healthy service:
> docker ps
CONTAINER ID    IMAGE                            COMMAND                CREATED         STATUS
8640f41f9939    someprefix/accountservice:latest "./accountservice-lin" 19 seconds ago  Up 18 seconds (healthy)
Note CONTAINER ID and the CREATED. Call the testability API on your docker swarm IP (mine is 192.168.99.100):
> curl $ManagerIP:6767/testability/healthy/false
>
Now, run docker ps again within a few seconds.
> docker ps
CONTAINER ID        IMAGE                            COMMAND                CREATED         STATUS                                                             NAMES
0a6dc695fc2d        someprefix/accountservice:latest "./accountservice-lin" 3 seconds ago  Up 2 seconds (healthy)
See - a brand new CONTAINER ID and new timestamps on CREATED and STATUS. What actually happened was that Docker Swarm detected three (default values for –retries) consecutive failed healthchecks and immediately decided the service had become unhealthy and need to be replaced with a fresh instance which is exactly what happened without any administrator intervention.
In this part we added health checks using a simple /health endpoint and a little healthchecker go program in conjunction with the Docker HEALTHCHECK mechanism, showing how that mechanism allows Docker Swarm to handle unhealthy services automatically for us.
In the next part, we’ll dive deeper into Docker Swarm mechanics as we’ll be focusing on two key areas of microservice architecture - Service Discovery and Load-balancing.