Blogg
Här finns tekniska artiklar, presentationer och nyheter om arkitektur och systemutveckling. Håll dig uppdaterad, följ oss på LinkedIn
Här finns tekniska artiklar, presentationer och nyheter om arkitektur och systemutveckling. Håll dig uppdaterad, följ oss på LinkedIn

If you tried out the earlier blog posts in our blog series regarding building microservices I guess you are tired of starting the microservices manually at the command prompt? Let’s dockerize our microservices, i.e. run them in Docker containers, to get rid of that problem!
I assume that you already heard of Docker and the container revolution? If not, there are tons of introductory material on the subject available on Internet, e.g. Understanding Docker.
This blog post covers the following parts:
Install Docker by following the instructions for your platform.
We used Boot2Docker v1.6.2 for Mac when we wrote this blog post.
First, since we will start a lot of fine grained Java based microservices we will need some more memory (4GB) than the default value in the Linux virtual server that Boot2Docker creates for us.
The simplest way to do that is to stop Boot2Docker and recreate the virtual server with new memory parameters. If you upgraded Boot2Docker from an older version you should also perform a download of the virtual server to ensure that you have the latest version.
Execute the following commands to create a new virtual server with 4GB memory:
$ boot2docker stop
$ boot2docker download
$ boot2docker delete
$ boot2docker init -m 4096
$ boot2docker info
{ ... "Memory":4096 ...}
$ boot2docker start
The start command might ask you to set a number of environment variables like:
export DOCKER_HOST=tcp://192.168.59.104:2376
export DOCKER_CERT_PATH=/Users/magnus/.boot2docker/certs/boot2docker-vm
export DOCKER_TLS_VERIFY=1
Add them to you preferred config-file, e.g. ~/.bash_profile as in my case.
Now you can try Docker by asking it to start a CentOS based Linux server:
$ docker run -it --rm centos
Docker will download the corresponding Docker image the first time it is used, so it takes some extra time depending on your Internet connection.
Just leave the server, for now, with an exit command:
[root@fd5773461402 /]# exit
If you try to start a new CentOS server with the same command as above you will experience the magic startup time of a brand new server when using Docker, typically a sub-second startup time!!!
Secondly, add a line in your /etc/hosts - file for easier access to the Docker machine. First get the IP address of the Linux server that runs all the Docker containers:
 $ boot2docker ip
192.168.59.104
Add a line in your /etc/hosts file like:
192.168.59.104 docker
Now you can, for example, ping your docker environment like:
$ ping docker
PING docker (192.168.59.103): 56 data bytes
64 bytes from 192.168.59.103: icmp_seq=0 ttl=64 time=0.822 ms
64 bytes from 192.168.59.103: icmp_seq=1 ttl=64 time=4.341 ms
64 bytes from 192.168.59.103: icmp_seq=2 ttl=64 time=1.454 ms
We have extended the Gradle build files from the earlier blog posts to be able to automatically create Docker images for each microservice. We use a Gradle plugin developed by Transmode.
As before we use Java SE 8 and Git so to get the source code perform:
$ git clone https://github.com/callistaenterprise/blog-microservices
$ cd blog-microservices
$ git checkout -b B6 M6
The most important additions to the Gradle build-files are:
buildscript {
    dependencies {
        classpath 'se.transmode.gradle:gradle-docker:1.2'

...

apply plugin: 'docker'

...

group = 'callista'
mainClassName = 'se.callista.microservises.core.review.ReviewServiceApplication'

...

distDocker {
    exposePort 8080
    setEnvironment 'JAVA_OPTS', '-Dspring.profiles.active=docker'
}

docker {
    maintainer = 'Magnus Larsson <magnus.larsson.ml@gmail.com>'
    baseImage = 'java:8'
}
Notes:
First we declare a dependency to the transmode-docker-plugin and apply the docker - plugin.
Next, we setup a variable, group, to give the Docker images a common group-name and another variable, mainClassName, to declare the main-class in the microservice.
Finally, we declare how the Docker image shall be built in the distDocker and docker declarations. See plugin documentation for details.
One detail worth some extra attention is the declaration of the JAVA_OPTS environment variable that we use to specify what Spring profile that the microservice shall use, see below for details.
We have also added the new task distDocker to the build commands in build-all.sh.
Execute the build-all.sh file and it will result in a set of Docker images like:
$ ./build-all.sh
... lots of output ...

$ docker images | grep callista
callista/turbine                     latest              8ea25912aad7        43 hours ago        794.6 MB
callista/monitor-dashboard           latest              f443c2cde704        43 hours ago        793 MB
callista/edge-server                 latest              b32bb74788ac        43 hours ago        826.6 MB
callista/discovery-server            latest              8eceaff6cc6b        43 hours ago        838.3 MB
callista/auth-server                 latest              90041b13c564        43 hours ago        766.1 MB
callista/product-api-service         latest              5081a18b9cac        44 hours ago        801.9 MB
callista/product-composite-service   latest              c200820d6cdf        44 hours ago        800.6 MB
callista/review-service              latest              1796c14c2a5a        44 hours ago        786.1 MB
callista/recommendation-service      latest              4f4e490cb409        44 hours ago        786.1 MB
callista/product-service             latest              5ed6a9620bce        44 hours ago        786.1 MB
To be able to run in a Docker environment we need to change our configuration a bit. To keep the Docker specific configuration separate from the rest we use a Spring Profile called Docker in our application.yml-files, e.g.:
---
# For deployment in Docker containers
spring:
  profiles: docker

server:
  port: 8080

eureka:
  instance:
    preferIpAddress: true
  client:
    serviceUrl:
      defaultZone: http://discovery:8761/eureka/
Notes:
Since all microservices will run in their own Docker container (e.g. in its own server with its own IP address) we don’t need to care about port collisions. Therefore we can use a fixed port, 8080, instead of dynamically assign ports as we have done until now.
Register our microservices to Eureka using hostnames in a Docker environment will not work, they will all get one and the same hostname. Instead we configure them to use its IP address during registration with Eureka.
The discovery service will be executing in a Docker container known under the name discovery, se below for details, so therefore we need to override the setting of the serviceUrl.
Docker runs the containers in a closed network. We will expose as few services outside of the internal Docker network as possible, e.g. the OAuth Authorization server and the Edge server. This means that our microservices will not be accessible directly from the outside. To protect the communication with the exposed services we will use HTTPS, i.e. use server side certificates, that will protect the OAuth communication from unwanted eavesdropping. The OAuth Authorization server and the Edge server uses a self-signed certificate that comes with the source code of this blog post.
Don’t use this self-signed certificate for anything else than trying out our blog posts, it is not secure since its private part is publicly available in the source code!
Our API - microservice needs to communicate with the OAuth Authorization server to get information regarding the user (resource owner in OAuth lingo). Therefore it needs to be able to act as a HTTPS client, validating the certificate that the OAuth Authorization service presents during the HTTPS communication. The API - microservice uses a trust store that comes with the source code of this blog post for that purpose.
For the OAuth Authorization server and the Edge server you can find the (not so) private certificate, server.jks, in the folder src/main/resources and the application.xml/.yml file in the same folder contains the SSL - configuration, e.g:
server:
  ssl:
    key-store: classpath:server.jks
    key-store-password: password
    key-password: password
The API - microservice has its trust store, truststore.jks, and its configuration file in the folder src/main/resources as well. The SSL configuration looks a bit different since it only will act as a HTTPS-client:
server:
  ssl:
    enabled: false
    # Problem with trust-store properties?
    #
    # Instead use: java -Djavax.net.debug=ssl -Djavax.net.ssl.trustStore=src/main/resources/truststore.jks -Djavax.net.ssl.trustStorePassword=password -jar build/libs/*.jar
    #
    # trust-store: classpath:truststore.jks
    trust-store: src/main/resources/truststore.jks
    trust-store-password: password
As you can see in the comment above we have experienced some problems with defining the trust store via the configuration file. Instead we use the JAVA_OPTS environment variable to specify it. If you look into the build.gradle - file of the API - microservice you will find:
distDocker {
    ...
    setEnvironment 'JAVA_OPTS', '-Dspring.profiles.active=docker -Djavax.net.ssl.trustStore=truststore.jks -Djavax.net.ssl.trustStorePassword=password'
To be able to start up and manage all our services with single commands we use Docker Compose.
We used Docker Compose v1.2.0 when we wrote this blog post.
With Docker Compose you can specify a number of containers and how they shall be executed, e.g. what Docker image to use, what ports to publish, what other Docker containers it requires to know about and so on…
For a simple container that don’t need to know anything about other containers the following is sufficient in the configuration file, docker-compose.yml:
rabbitmq:
  image: rabbitmq:3-management
  ports:
    - "5672:5672"
    - "15672:15672"

discovery:
  image: callista/discovery-server
  ports:
    - "8761:8761"

auth:
  image: callista/auth-server
  ports:
    - "9999:9999"
This will start up RabbitMQ, a discovery server and a OAuth Authorization server and publish the specified ports for external access.
To start up services that need to know about other containers we can use the links - directive. e.g. for the API microservice:
api:
  image: callista/product-api-service
  links:
    - auth
    - discovery
    - rabbitmq
This declaration will result in that the /etc/hosts file in the API container will be updated with one line per service that the API microservice depends on, e.g.:
172.17.0.23	auth
172.17.0.27	discovery
172.17.0.25	rabbitmq
Ok, we now have all the new bits and pieces in place so we are ready to give it a try!
For an overview of the microservice landscape we are about to launch see previous blog posts, specifically Part 1 but also Part 2 and Part 3.
Start the microservice landscape with the following command:
$ docker-compose up -d
Note: We have, a few times, noticed problems with downloading Docker images (unclear what triggers the problem). But after recreating the Boot2Docker virtual server as described in 1.1 Configuration when using Boot2Docker the download worked again.
This will start up all ten Docker containers. You can see its state withe the command:
$ docker-compose ps
            Name                           Command               State                        Ports
-------------------------------------------------------------------------------------------------------------------------
blogmicroservices_api_1         /product-api-service/bin/p ...   Up      8080/tcp
blogmicroservices_auth_1        /auth-server/bin/auth-server     Up      0.0.0.0:9999->9999/tcp
blogmicroservices_composite_1   /product-composite-service ...   Up      8080/tcp
blogmicroservices_discovery_1   /discovery-server/bin/disc ...   Up      0.0.0.0:8761->8761/tcp
blogmicroservices_edge_1        /edge-server/bin/edge-server     Up      0.0.0.0:443->8765/tcp
blogmicroservices_monitor_1     /monitor-dashboard/bin/mon ...   Up      0.0.0.0:7979->7979/tcp
blogmicroservices_pro_1         /product-service/bin/produ ...   Up      8080/tcp
blogmicroservices_rabbitmq_1    /docker-entrypoint.sh rabb ...   Up      0.0.0.0:15672->15672/tcp, 0.0.0.0:5672->5672/tcp
blogmicroservices_rec_1         /recommendation-service/bi ...   Up      8080/tcp
blogmicroservices_rev_1         /review-service/bin/review ...   Up      8080/tcp
You can monitor log output with the command:
$ docker-compose logs
...
rec_1       | 2015-06-01 14:20:55.295 cfbfc65f-8a5f-41cc-8710-51856105bf62 recommendation  INFO  XNIO-2 task-13 s.c.m.c.r.s.RecommendationService:53 - /recommendation called, processing time: 0
rec_1       | 2015-06-01 14:20:55.296 cfbfc65f-8a5f-41cc-8710-51856105bf62 recommendation  INFO  XNIO-2 task-13 s.c.m.c.r.s.RecommendationService:62 - /recommendation response size: 3
...
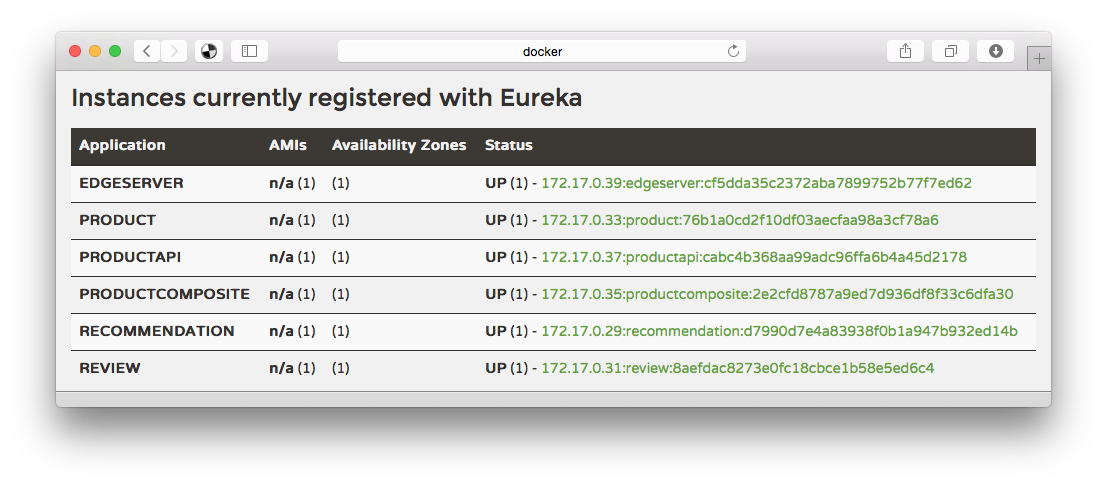
…and as usual you can see the registered microservices in our discovery service, Eureka, using the URL http://docker:8761:
Let’s try a happy days scenario, shall we?
First we need to access a OAuth Token using HTTPS (See Part 3 regarding details of the use of OAuth):
$ curl https://acme:acmesecret@docker:9999/uaa/oauth/token \
  -d grant_type=password -d client_id=acme \
  -d username=user -d password=password -ks | jq .
{
  "access_token": "d583cc8d-5431-4241-afbf-6c6e686899d8",
  "token_type": "bearer",
  "refresh_token": "cf3e2136-6fb3-4c23-b3ce-0d5118b5d538",
  "expires_in": 43199,
  "scope": "webshop"
}
Store the Access Token in an environment variable as before:
$ TOKEN=d583cc8d-5431-4241-afbf-6c6e686899d8
With the Access Token we can now access the API, again over HTTPS:
$ curl -H "Authorization: Bearer $TOKEN" \
  -ks 'https://docker/api/product/1046' | jq .
{
  "productId": 1046,
  "name": "name",
  "weight": 123,
  "recommendations": [ ... ],
  "reviews": [ ... ]
}
Great!
Ok, let’s spin up a second instance of one of the microservices. This can be done using the docker-compose scale-command:
$ docker-compose scale rec=2
Note: rec is the name we gave the recommendation microservice in the docker-compose configuration file, docker-compose.yml.
This command will start up a second instance of the recommendation microservice:
$ docker-compose ps rec
         Name                        Command               State    Ports
---------------------------------------------------------------------------
blogmicroservices_rec_1   /recommendation-service/bi ...   Up      8080/tcp
blogmicroservices_rec_2   /recommendation-service/bi ...   Up      8080/tcp
If you call the API several times with:
$ curl -H "Authorization: Bearer $TOKEN" \
  -ks 'https://docker/api/product/1046' | jq .
If you run the docker-compose logs command in a separate window, you will notice in the log-output, after a while, that the two rec-services take every second call.
rec_2       | 2015-06-01 14:20:54.357 cb6ad766-c385-442b-afbe-de9222221a23 recommendation  INFO  XNIO-2 task-2 s.c.m.c.r.s.RecommendationService:53 - /recommendation called, processing time: 0
rec_2       | 2015-06-01 14:20:54.358 cb6ad766-c385-442b-afbe-de9222221a23 recommendation  INFO  XNIO-2 task-2 s.c.m.c.r.s.RecommendationService:62 - /recommendation response size: 3

...

rec_1       | 2015-06-01 14:20:55.295 cfbfc65f-8a5f-41cc-8710-51856105bf62 recommendation  INFO  XNIO-2 task-13 s.c.m.c.r.s.RecommendationService:53 - /recommendation called, processing time: 0
rec_1       | 2015-06-01 14:20:55.296 cfbfc65f-8a5f-41cc-8710-51856105bf62 recommendation  INFO  XNIO-2 task-13 s.c.m.c.r.s.RecommendationService:62 - /recommendation response size: 3
Good, not let’s cause some problems in the microservice landscape!
Let’s wrap up the tests with introducing an error and see how our circuit breaker introduced in Part 2 acts in an Docker environment.
We have a backdoor in the review microservice that can be used to control its response times. If we increase the response time over the timeout configured in the circuit-breaker it will kick in…
The problem is that we can’t access that backdoor from the outside (on the other hand, if the backdoor was accessible from the outside we would be in really big security problems…). To access the backdoor we need access to a sever that runs inside the closed Docker container network. Let’s start one!
$ docker run -it --rm --link blogmicroservices_rev_1:rev centos
[root@bbd3e4154803 /]#
That wasn’t that hard, was it?
Ok, now we can use the backdoor to set the response time of the review microservice to 10 secs:
[root@bbd3e4154803 /]# curl "http://rev:8080/set-processing-time?minMs=10000&maxMs=10000"
Exit the container and retry the call to the API. It will respond very slowly (3 sec) and will not contain any review information:
[root@bbd3e4154803 /]# exit

$ curl -H "Authorization: Bearer $TOKEN" -ks \
  'https://docker/api/product/1046' | jq .
{
  "productId": 1046,
  "name": "name",
  "weight": 123,
  "recommendations": [ ... ],
  "reviews": null
}
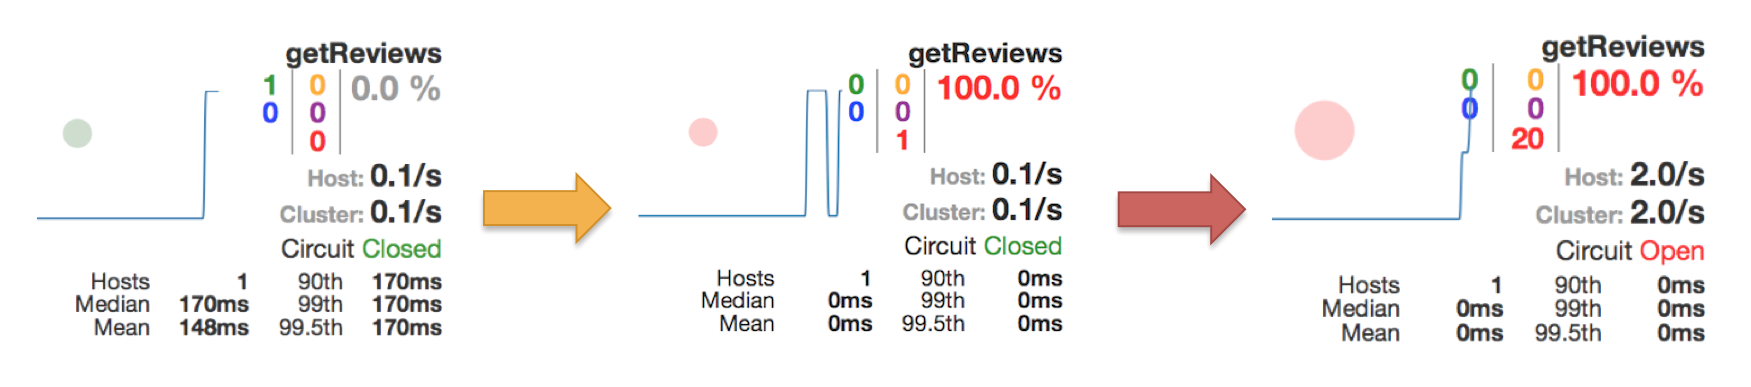
If you retry the call once more you will again see a very long response time, i.e. the circuit breaker has not opened the circuit yet. But if you perform two requests directly after each other the circuit will be opened.
We have configured the circuit breaker to be very sensitive, just for demo purposes.
This can be seen in the circuit breakers dashboard like:
Note: URL to the circuit breaker: http://docker:7979/hystrix/monitor?stream=http%3A%2F%2Fcomposite%3A8080%2Fhystrix.stream
If you retry a call you will see that you get an immediate response, still without any review information of course, i.e. the circuit breaker is now open.
Let’s heal the broken service! If you start a new container and use the backdoor to reset the response time of the review microservice to 0 sec and then retry the call to the API everything should be ok again, i.e. the system is self-healing!
$ docker run -it --rm --link blogmicroservices_rev_1:rev centos
[root@bbd3e4154803 /]# curl "http://rev:8080/set-processing-time?minMs=0&maxMs=0"
[root@bbd3e4154803 /]# exit

$ curl -H "Authorization: Bearer $TOKEN" \
  -ks 'https://docker/api/product/1046' | jq .
{
  "productId": 1046,
  "name": "name",
  "weight": 123,
  "recommendations": [ ... ],
  "reviews": [ ... ]
}
Note: The circuit breaker is configured to probe the open circuit after 30 seconds to see if the service is available again, i.e. to see if the problem is gone so it can close the circuit again. Probing is done by letting one of the incoming request through, even though that the circuit actually is open.
We have seen how we with very little effort can dockerize our microservices and run our microservices as Docker containers. Gradle can help us to automatically build Docker images, Spring profiles can help us to keep Docker specific configuration separate from other configuration. Finally Docker Compose makes it possible to start and manage all microservices, used for example by an application, with a single command.
We have already promised to demonstrate how the ELK stack can be used to provide centralized log management of our microservices. Before we demonstrate that we however need to consider how to correlate log event written by various microservices to its own log-files. So that will be the target for the next blog post in the Blog Series - Building Microservices, stay tuned…