Blogg
Här finns tekniska artiklar, presentationer och nyheter om arkitektur och systemutveckling. Håll dig uppdaterad, följ oss på LinkedIn
Här finns tekniska artiklar, presentationer och nyheter om arkitektur och systemutveckling. Håll dig uppdaterad, följ oss på LinkedIn

In this part of the Go microservices blog series, we’ll take a look at distributed data storage using CockroachDB and the GORM O/R-mapper.
The finished source can be cloned from github:
> git clone https://github.com/callistaenterprise/goblog.git
> git checkout P13
Note: Most of the Go source code for the blog series was rewritten in July 2019 to better reflect contemporary idiomatic Go coding guidelines and design patterns. However, the corresponding git branch for each part of the series remains unchanged in order to stay aligned with the content of each installment. For the latest and greatest code, look at the master branch in github.
Data consistency vs availability in distributed systems is a very interesting topic. These days, traditional ACID relational databases are often replaced by NoSQL databases operating on the principles of eventual consistency from the BASE model. BASE combined with bounded contexts often forms the basis of persistence in distributed microservice architectures.
Bounded contexts and eventual consistency can somewhat simplified be explained as:
These days, many people turn to the NoSQL database Apache Cassandra when they require horizontally scalable data storage with automatic replication and eventual consistency. However, I’m a bit curious how a cutting edge “SQL” database such as CockroachDB works in our microservice context, so that’ll be the focus of this blog post.
First, a few words about the CAP theorem.
CAP is a three-letter acronymn for database systems that claims that no distributed database may ever fulfill all these three criterias at any one time:
A distributed database may only choose two of above, making them either “CAP-Available” (AP) or “CAP-Consistent” (CP). The main advantage of an AP database is better latencies since CP databases must coordinate writes and reads across nodes, while an AP system is allowed to possibly return inconsistent or missing data which is faster. In other words - AP databases favor speed while CP databases favors robustness.
Do note that it’s fully possible to run a CAP-capable distributed database as long as there are no network or other problems. The problem is that there’s always going to be network problems at some point, see the fallacies of distributed computing. This is especially relevant for microservices given that we’re typically leaving the monolithic database of your enterprise behind, instead letting each microservice “own” their own domain of data - sometimes split over many databases, possibly even across multiple data centers.
CockroachDB is a CAP Consistent (CP) database. For a more in-depth explanation, check out this awesome article from cockroachlabs.
CockroachDB was created by ex-Google employees that used to work on Google’s Cloud Spanner. CockroachDB do - as prevoiusly stated - not claim to be a CAP-database, but claims full C and P, and a significant number of 9’s for availability.
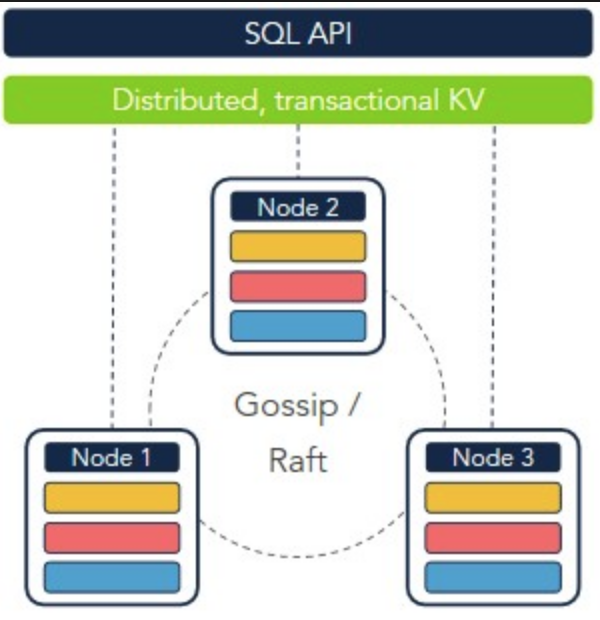
At it’s core, CockroachDB is a distributed key-value store written in Go, but differs from its peers by having an ANSI-compliant SQL interface, behaving like a relational database in most, if not all, aspects. The authors are very transparent about CockroachDB still having some issues making it unsuitable for OLAP-like workloads. Essentially, JOIN operations are continuously being optimized but they still have quite a way to go until the JOIN performance is on par with old-school databases.
 Source: Cockroachlabs
A CockroachDB cluster always consists of at least three database nodes, where the database will stay 100% operational if one node goes down. The underlying replication engine always makes sure any entry exists on at least two nodes with auto-replication if a node goes down. We’ll get back to this claimed resilience a bit later where we’ll stress test things while taking down a DB node, should be a fun exercise!
Time to get this database installed and up and running in our cluster. We’re going to pull v1.1.3 directly from Docker Hub and start three nodes, each running one instance of CockroachDB on separate ports. Since each node needs it’s own mounted storage we cannot (AFAIK) run three instances of a CockroachDB docker swarm mode service, we need three separate services.
For development purposes, this is actually very easy. I’ve prepared a bash-script to set this up:
#!/bin/bash

# CoachroachDB master, will publish admin GUI at 3030, mapped from 8080
docker service rm cockroachdb1
docker service create --name=cockroachdb1 --network=my_network -p 26257:26257 -p 3030:8080 --mount type=volume,source=cockroach-data1,target=/cockroach/cockroach-data cockroachdb/cockroach:v1.1.3 start --insecure

# CoachroachDB
docker service rm cockroachdb2
docker service create --name=cockroachdb2 --network=my_network --mount type=volume,source=cockroach-data2,target=/cockroach/cockroach-data cockroachdb/cockroach:v1.1.3 start --insecure --join=cockroachdb1

# CoachroachDB
docker service rm cockroachdb3
docker service create --name=cockroachdb3 --network=my_network --mount type=volume,source=cockroach-data3,target=/cockroach/cockroach-data cockroachdb/cockroach:v1.1.3 start --insecure --join=cockroachdb1
Let’s dissect the first docker service create a bit:
Startup may take a few minutes, after which the green and pleasant admin GUI should be available in your favorite browser at http://192.168.99.100:3030:
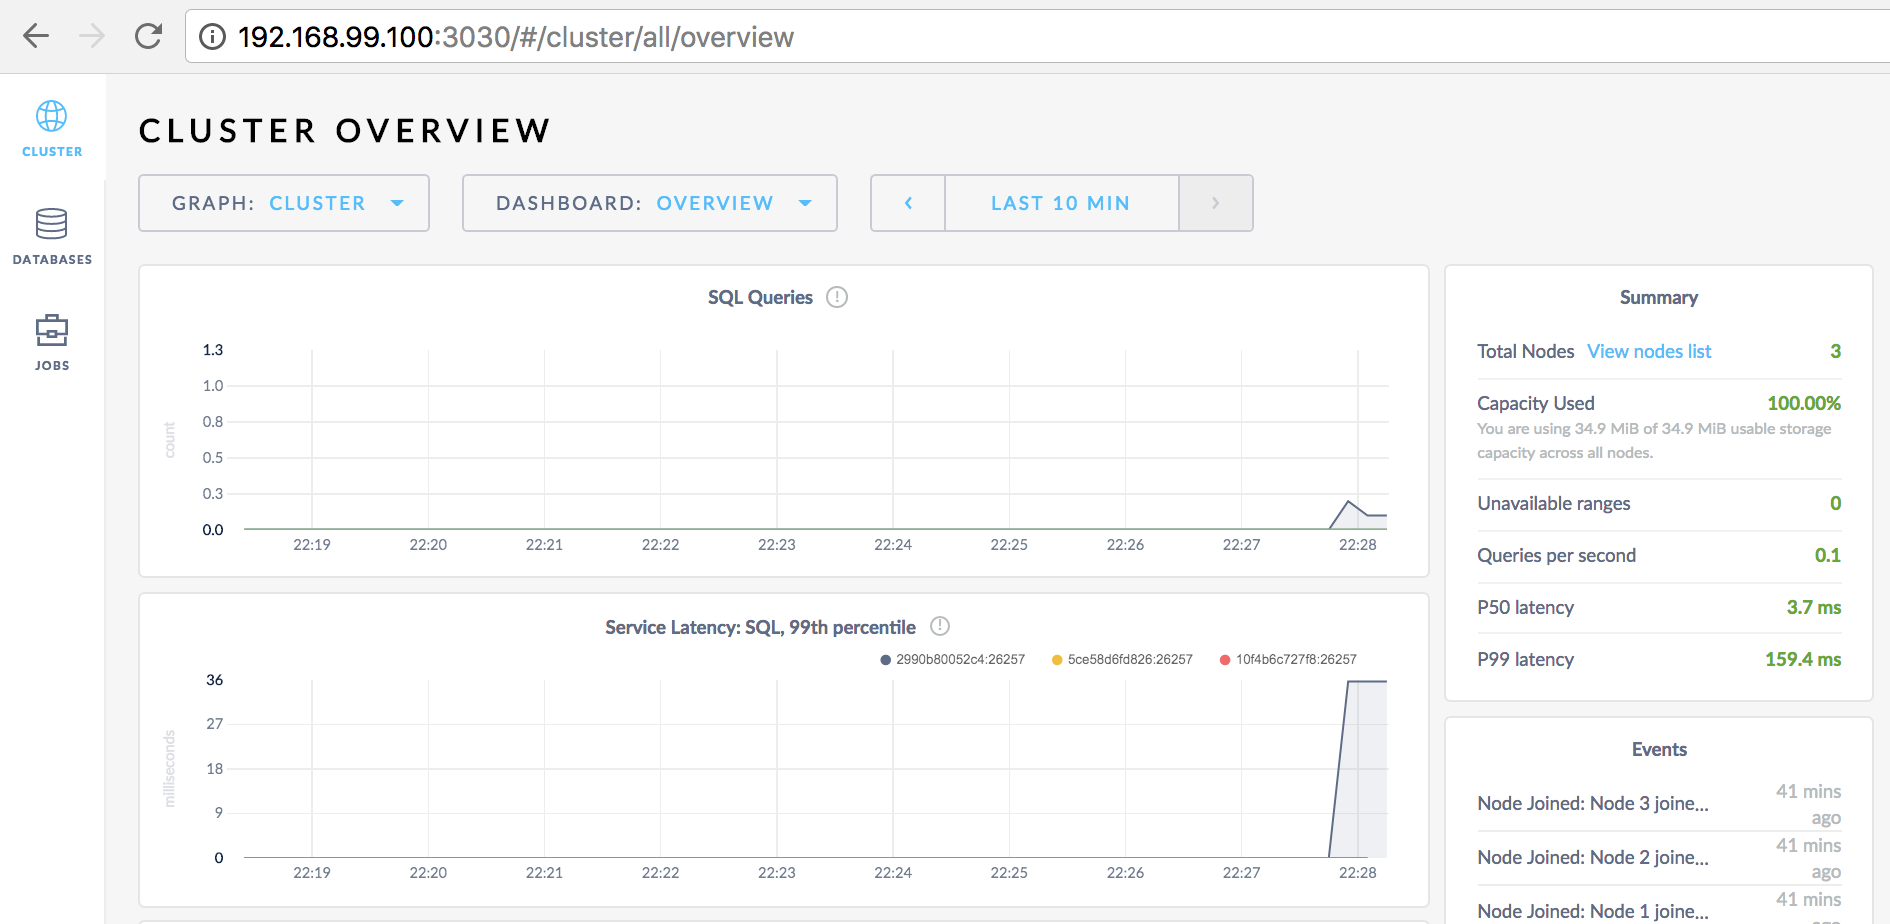 The overview
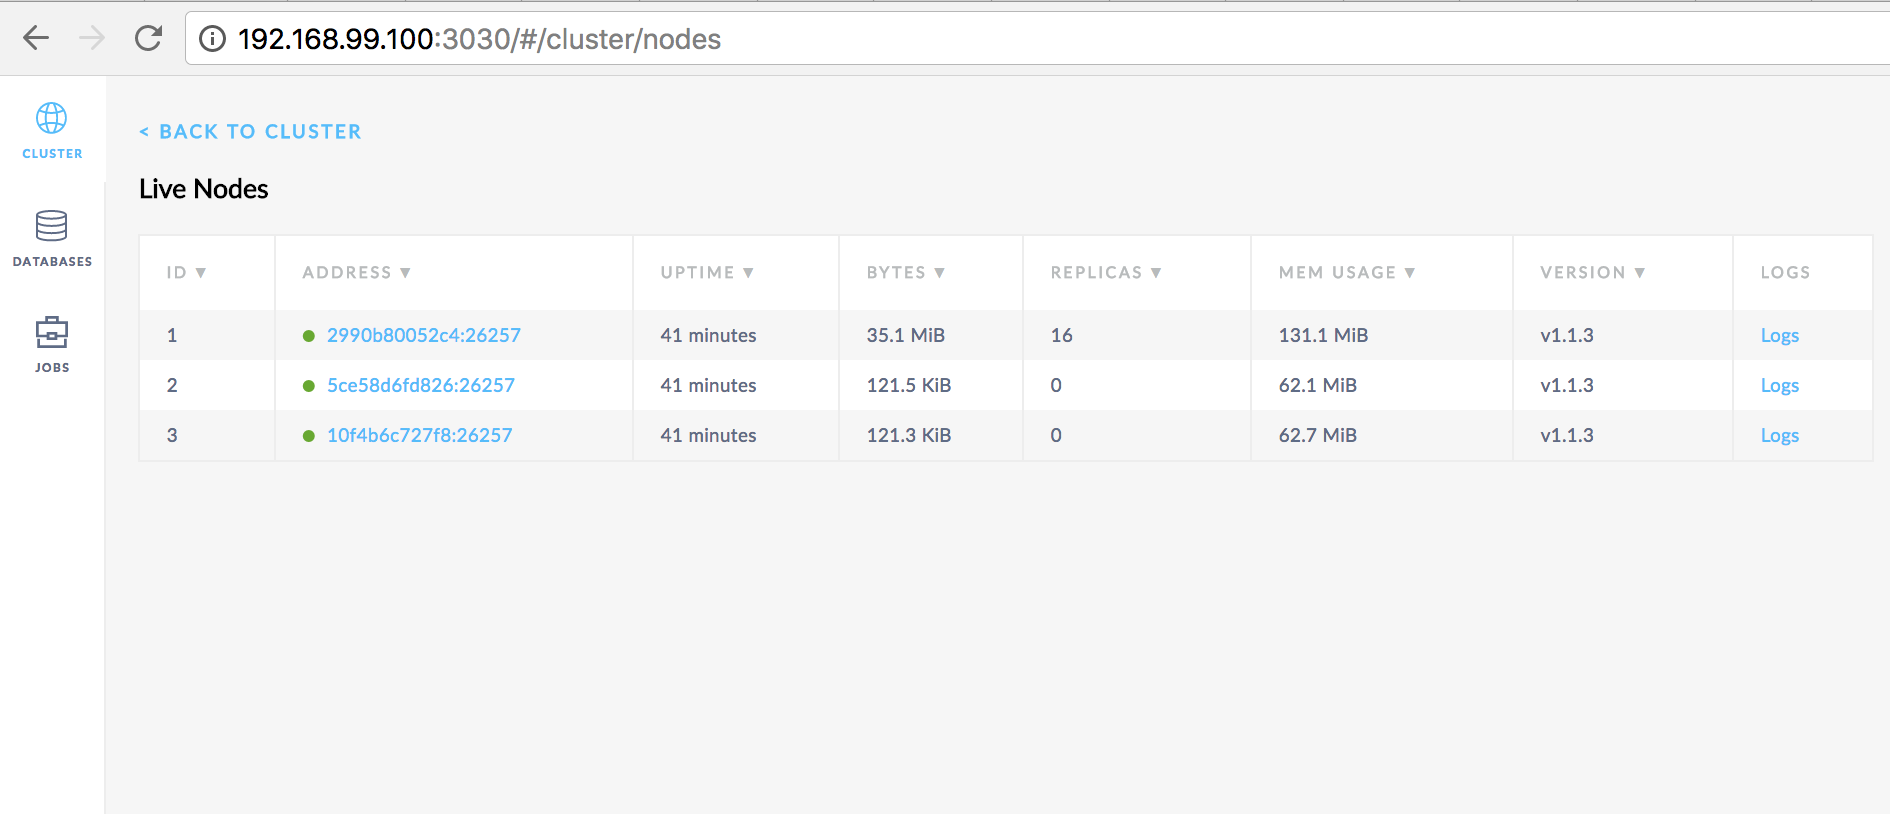 List of server nodes
Nice! Now we’re ready to create some databases and users. For more details, please check the rich documentation.
We’re going to use the built-in SQL client to create two databases and a two users - one for each of our bounded contexts. Since our CockroachDB instances are running in Docker Containers, we can’t use cockroach sql directly. We must do it by connecting to a running container using a bit of docker wizardry:
> docker ps

CONTAINER ID        IMAGE                                COMMAND
10f4b6c727f8        cockroachdb/cockroach:v1.1.3         "/cockroach/cockro..."
Find a container running the cockroachdb/cockroach container and note the container ID. Then we’ll use docker exec to launch the SQL CLI:
> docker exec -it 10f4b6c727f8 ./cockroach sql --insecure

# Welcome to the cockroach SQL interface.
# All statements must be terminated by a semicolon.
# To exit: CTRL + D.
#
# Server version: CockroachDB CCL v1.1.3 (linux amd64, built 2017/11/27 13:59:10, go1.8.3) (same version as client)
# Cluster ID: 5c317c3e-5784-4d8f-8478-ec629d8a920d
#
# Enter \? for a brief introduction.
#
root@:26257/>
We’re in!
I’ve prepared a .sql file whose contents we easily can copy-paste directly into the console. This is a one-time job for the purpose of this particular blog post. In a real-life scenario you’d obviously script this using some build automation tool.
CREATE DATABASE account;
CREATE DATABASE image;

CREATE USER account_user WITH PASSWORD 'account_password';
CREATE USER image_user WITH PASSWORD 'image_password';

GRANT ALL ON DATABASE account TO account_user;
GRANT ALL ON DATABASE image TO image_user;
Done! Now on to the wonderful world of Go and O/R-mapping!
First let’s start with a brand new overview of what the microservice landscape will look like once this part is done:
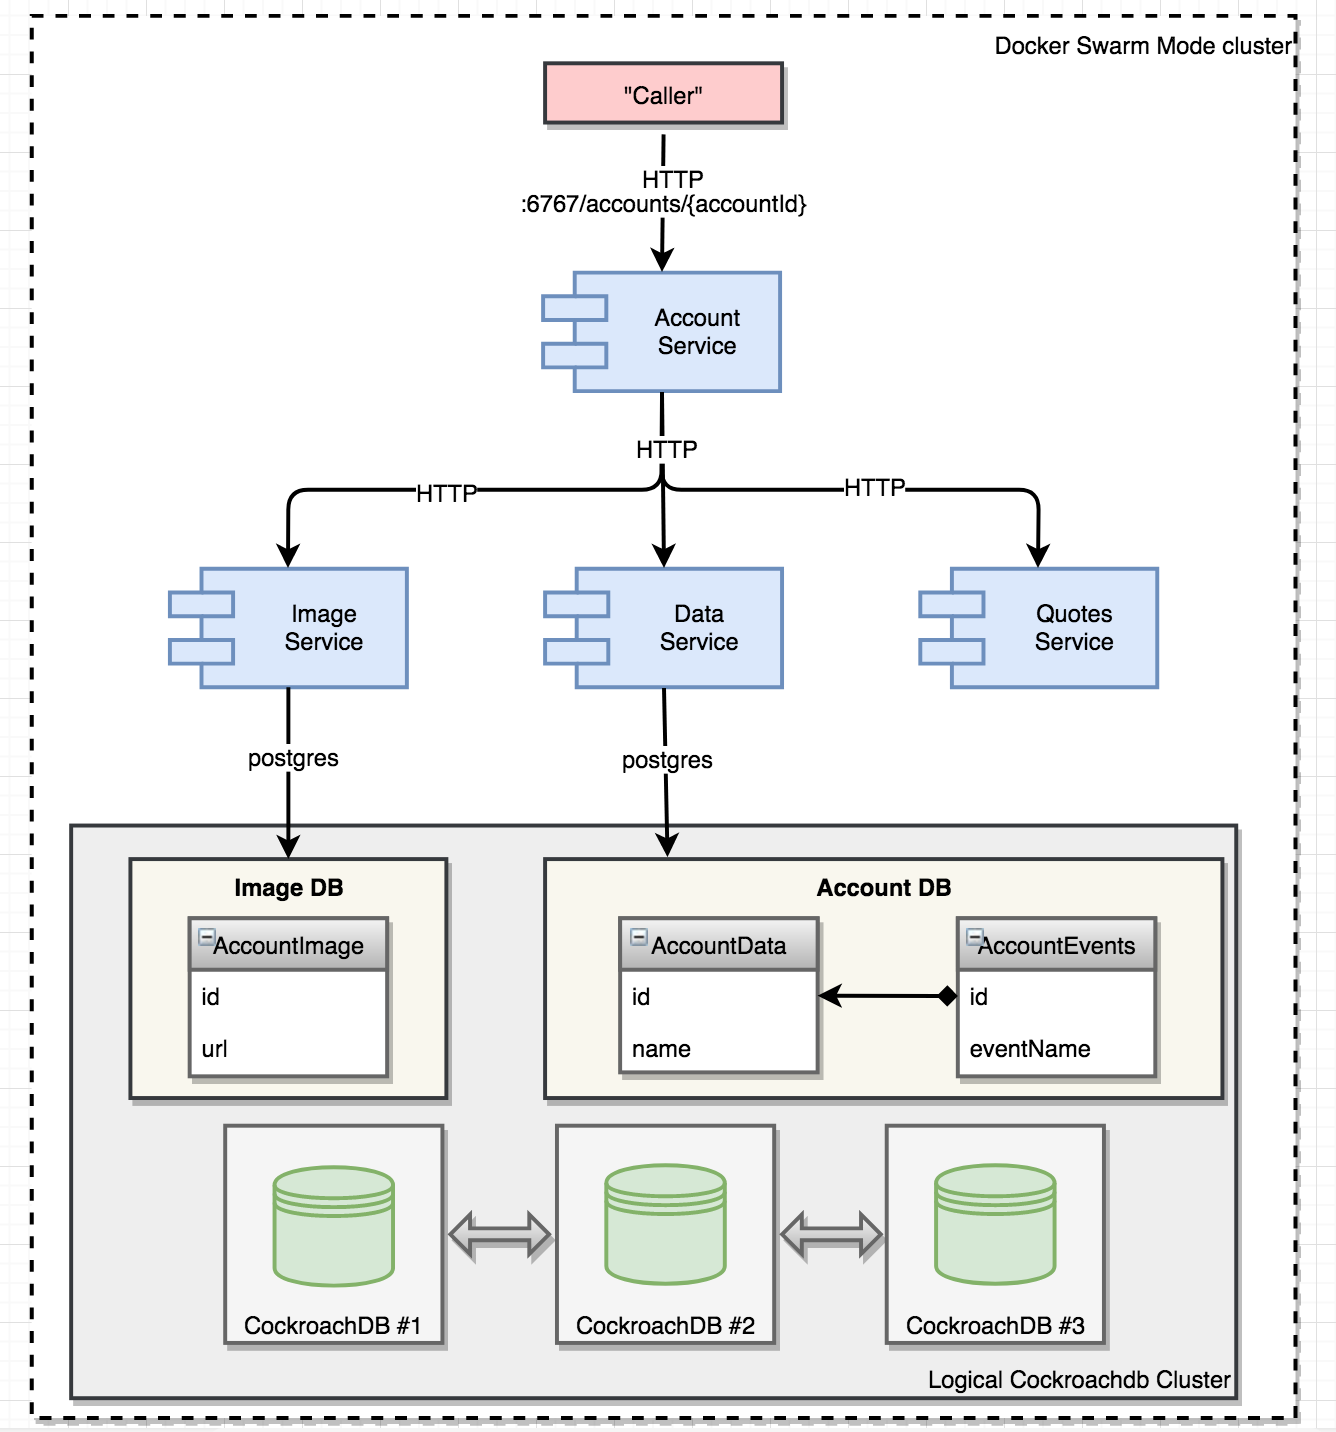
Key stuff:
GORM is an “object-relational mapper” (ORM) for Go - think of it as a rough equivalent of Hibernate or similar, although perhaps not as mature or fully-featured. Still - > 7000 stars on github and over 120 contributors gives an indication of a well-liked and commonly used library.
CockroachDB uses the postgresql wire protocol which works very nicely with GORM - GORM has support for several major SQL vendors out of the box.
What about tables where we’ll store and retrieve actual data? In this particular blog, we’ll utilize the AutoMigrate feature of GORM to create our tables.
The AutoMigrate feature introspects Go structs with ‘gorm’-tags and automatically creates tables and columns given these structs. Let’s take a closer look how we declare primary keys, foreign keys and an index directly on the structs by using gorm tags.
type AccountData struct {
    ID               string         `json:"" gorm:"primary_key"`
    Name             string         `json:"name"`
    AccountEvents    []AccountEvent `json:"events" gorm:"ForeignKey:AccountID"`
}

type AccountEvent struct {
    ID        string `json:"" gorm:"primary_key"`
    AccountID string `json:"-" gorm:"index"`
    EventName string `json:"eventName"`
    Created   string `json:"created"`
}
Most of the GORM tags should be self-explanatory for people vaguely familiar with relational databases - e.g. “primary_key”, “index” etc.
The AccountData struct has a has-many relationship with AccountEvents, mapped using the “ForeignKey:AccountID” tag. This will result in AutoMigrate creating two tables with columns appropriate for each of the struct fields, including foreign key constraints and the specified index. The two tables will be created within the same database with full referential integrity, i.e. they belong to the same “account data” bounded context that’ll be served by our new dataservice. The “image data” - consisting of a single AccountImage struct, will belong to its own bounded context and be served from the imageservice microservice.
The generated tables looks like this from the CockroachDB GUI:

(I’ve rearranged the codebase somewhat so “model” structs used by more than one service resides in _/goblog/common/model now.)_
Dealing with Gorm requires surprisingly little boilerplate on the structs, but working with its DSL for querying and mutating data may take a little while getting used to. Let’s take a look at a few basic use cases:
All interactions with the GORM API in these examples happen through “gc.crDB” which is my wrapping of a pointer to gorm.DB, i.e:
type GormClient struct {
    crDB *gorm.DB
}

var gc &GormClient{}
Below, we’re opening the connection using postgres SQL dialect and then calling the AutoMigrate function to create tables.
 var err error
 gc.crDB, err = gorm.Open("postgres", addr)    // Addr is supplied from config server, of course
 if err != nil {
     panic("failed to connect database: " + err.Error())
 }

 // Migrate the schema
 gc.crDB.AutoMigrate(&model.AccountData{}, &model.AccountEvent{})  // Note that we pass the structs we want tables for.
// Create an instance of our Account struct
acc := model.AccountData{
    ID:     key,                      // A pre-generated string id
    Name:   randomPersonName(),       // Some person name
    Events: accountEvents,            // slice of AccountEvents
}

gc.crDB.Create(&acc)                  // Persist!
The code above will write both a row to the ACCOUNT_DATA table as well as any ACCOUNT_EVENT rows present in the Events slice, including foreign keys. Using the SQL client, we can try a standard JOIN:
root@:26257> use account;
root@:26257/account> SELECT * FROM account_data AS ad INNER JOIN account_events AS ae ON ae.account_id = ad.id WHERE ad.id='10000';
+-------+----------+--------------------+------------+------------+---------------------+
|  id   |   name   |         id         | account_id | event_name |       created       |
+-------+----------+--------------------+------------+------------+---------------------+
| 10000 | Person_0 | accountEvent-10000 |      10000 | CREATED    | 2017-12-22T21:38:21 |
+-------+----------+--------------------+------------+------------+---------------------+
(1 row)
We’re seeding one AccountEvent per AccountData so the result is absolutely right!
It’s of course possible to use the postgres driver and do standard SQL queries like the one above. However, to leverage GORM appropriately, we’ll use the query DSL of GORM.
Here’s an example where we load an AccountData instance by ID, eagerly loading any AccountEvents related to it.
func (gc *GormClient) QueryAccount(ctx context.Context, accountId string) (model.AccountData, error) {
    acc := model.AccountData{}                                 // Create empty struct to store result in
    gc.crDB.Preload("Events").First(&acc, "ID = ?", accountId) // Use the Preload to eagerly fetch events for
                                                               // the account. Note use of ID = ?
    if acc.ID == "" {                                          // Not found handling...
        return acc, fmt.Errorf("Not Found")
    }
    return acc, nil                                            // Return populated struct.
}
A more complex example - find all AccountData instances having a person whose name starts with ‘Person_8’ and count the number of AccountEvents for each entry.
func (gc *GormClient) QueryAccountByNameWithCount(ctx context.Context, name string) ([]Pair, error) {

    rows, err := gc.crDB.Table("account_data as ad").             // Specify table including alias
    Select("name, count(ae.ID)").                                 // Select columns including count, see Group by
    Joins("join account_events as ae on ae.account_id = ad.id").  // Do a JOIN
    Where("name like ?", name + "%").                             // Add a where clause
    Group("name")                                                 // Group by name
    .Rows()                                                       // Call Rows() to execute the query

    result := make([]Pair, 0)                                     // Create slice for result
    for rows.Next() {                                             // Iterate over returned rows
        pair := Pair{}                                            // Pair is just a simple local struct
        rows.Scan(&pair.Name, &pair.Count)                        // Pass result into struct fields
        result = append(result, pair)                             // Add resulting pair into slice
    }
    return result, err                                            // Return slice with pairs.
}
Note the fluent DSL with Select..Joins..Where..Group which is surprisingly pleasant to work with once you get used to it. Should be familiar if you’ve worked with similar APIs in the past such as JOOQ
Calling an endpoint exposing the query above yields:
[{
    "Name": "Person_80",
    "Count": 3
  },
  {
    "Name": "Person_81",
    "Count": 6
}]
Tidied up the response JSON for the sake of readability
Regrettably, there doesn’t seem to be an idiomatic and super-simple way to unit-test GORM interactions with the database. Some strategies do however exist, such as:
In all honesty, I havn’t really examined any of the options above closely. Instead, I’ve wrapped the GORM db struct in a struct of my own, which implicitly implements this interface:
 type IGormClient interface {
     QueryAccount(ctx context.Context, accountId string) (model.AccountData, error)
     QueryAccountByNameWithCount(ctx context.Context, name string) ([]Pair, error)
     SetupDB(addr string)
     SeedAccounts() error
     Check() bool
     Close()
 }
Having an interface makes it very straightforward to use testify/mock to mock any interaction with methods on the struct wrapping the GORM db object.
If you’ve cloned the source and have installed CockroachDB, you can execute the ./copyall.sh script to build and deploy the updated microservices:
The configuration has been updated, including .yaml-files for the new “dataservice”.
Once we’re up and running, let’s do a curl request to the “accountservice” /accounts/{accountId} endpoint:
> curl http://192.168.99.100:6767/accounts/10002 -k | json_pp
{
   "imageData" : {
      "id" : "10002",
      "servedBy" : "10.0.0.26",
      "url" : "http://path.to.some.image/10002.png"
   },
   "id" : "10002",
   "servedBy" : "10.0.0.3",
   "name" : "Person_2",
   "accountEvents" : [
      {
         "ID" : "accountEvent-10002",
         "created" : "2017-12-22T22:31:06",
         "eventName" : "CREATED"
      }
   ],
   "quote" : {
      "ipAddress" : "eecd94253fcc/10.0.0.18:8080",
      "quote" : "To be or not to be",
      "language" : "en"
   }
}
Looks good to me!
Let’s get down to the business of testing whether our setup with CockroachDB is Consistent and Partition Tolerant, while providing acceptable levels of Availability.
Load- and resilience testing a microservice landscape with a distributed data store such as CockroachDB on a laptop running everything in virtualbox isn’t that realistic perhaps, but should at least provide some insights.
For this purpose, I’m going to set up a landscape with the following characteristics:
I’ve pre-seeded the “account” database with about 15000 records, including at least one “account_event” per “account”. First test runs a gatling test that bombs away at the /accounts/{accountId} microservice to fetch our account objects with a peak rate of 50 req/s.
The test runs for 75 seconds with a 5 second ramp-up time.
 Figure 7.1.1: Latencies (ms)
Overall latencies are just fine, our microservices and the CockroachDB have no issue whatsoever handling ~50 req/s.
(Why not more traffic? I ran into this bug which introduced 1 or 2 seconds of extra latency per “hop” inside the cluster when running the test for a longer time _or with more traffic - effectively making the results worthless for this test case)_
During the second run at approx. 20:10:00 in the test, I’m deliberately killing the “cockroachdb3” service. At 20:10:30, I restart the “cockroachdb3” service.
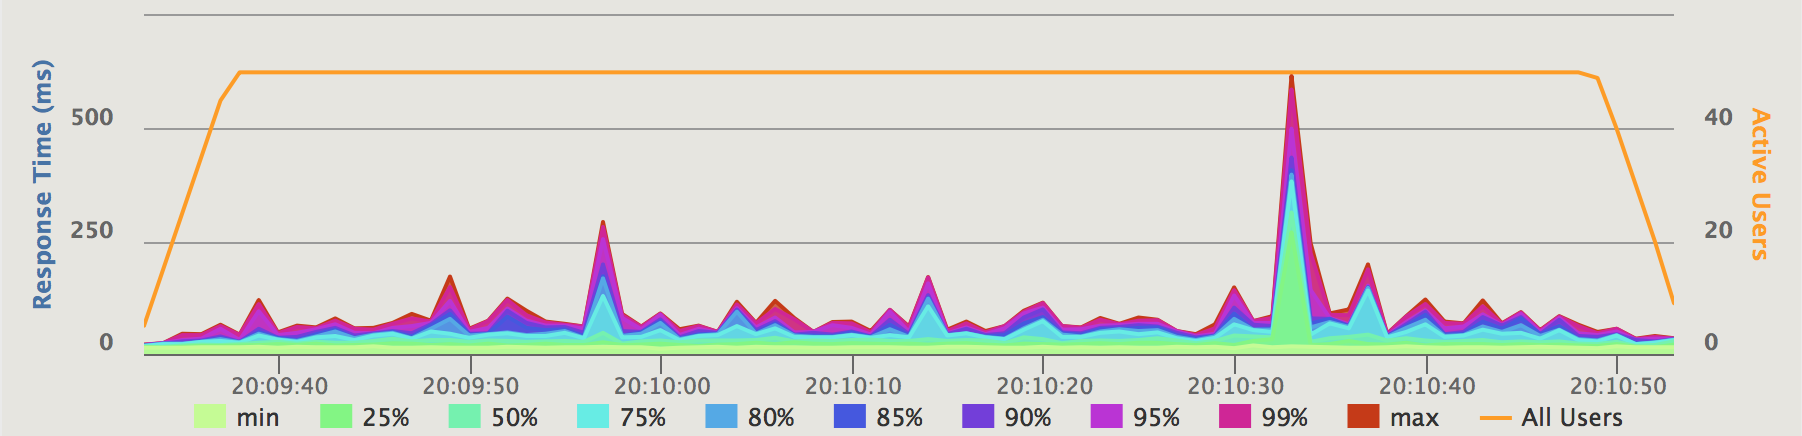 Figure 7.1.2.1: Service response time (ms)
Killing one of the three cockroachdb nodes and restarting it ~30 seconds later has the following effects:
We can look at the same scenarios from the perspective of the CockroachDB GUI where we can examine a plethora of different metrics.
In the graphs below, we see both scenarios in each graph - i.e. we first run the Gatling test without taking down a CockroachDB instance, while we do the same “kill and revive”-scenario a minute later.
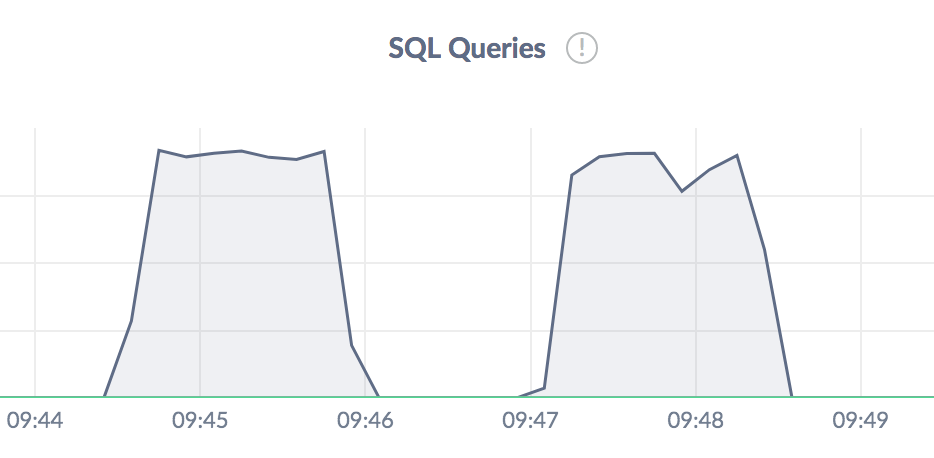 Figure 7.1.3.1: CockroachDB queries per second over the last 10 seconds
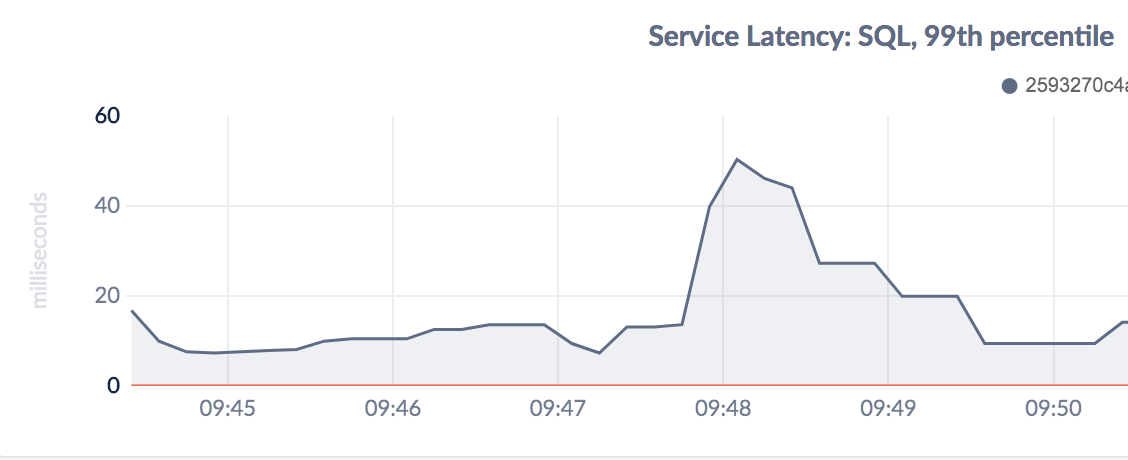 Figure 7.1.3.2: CockroachDB 99th percentile latency over the last minute
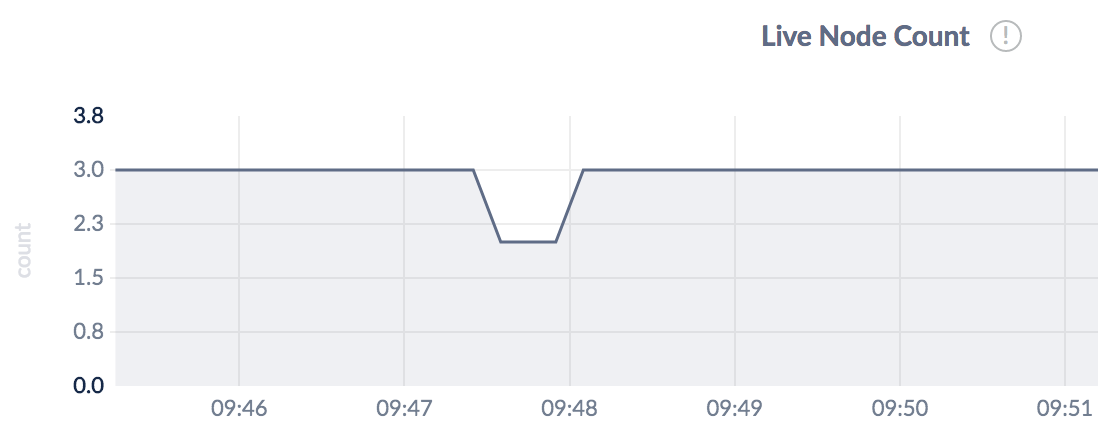 Figure 7.1.3.3: CockroachDB live node count
The graphs from CockroachDB are pretty consistent with what we saw in the Gatling tests - taking down a CockroachDB node has hardly any noticable effect on latencies or availabilty, while taking up a node actually has a rather severe - though short-lived - effect on the system.
A typical snapshot of Docker Swarm mode manager node CPU and memory utilization for a number of running containers during the first test:
CONTAINER                                    CPU %               MEM USAGE / LIMIT
cockroachdb1.1.jerstedhcv8pc7a3ec3ck9th5     33.46%              207.9MiB / 7.789GiB
cockroachdb2.1.pkhk6dn93fyr14dp8mpqwkpcx     1.30%               148.3MiB / 7.789GiB
cockroachdb3.1.2ek4eunib4horzte5l1utacc0     10.94%              193.1MiB / 7.789GiB
dataservice.1.p342v6rp7vn79qsn3dyzx0mq6      8.41%               10.52MiB / 7.789GiB
imageservice.1.o7odce6gaxet5zxrpme8oo8pr     9.81%               11.5MiB / 7.789GiB
accountservice.1.isajx2vrkgyn6qm50ntd2adja   17.44%              15.98MiB / 7.789GiB
quotes-service.2.yi0n6088226dafum8djz6u3rf   7.03%               264.5MiB / 7.789GiB
quotes-service.1.5zrjagriq6hfwom6uydlofkx1   10.16%              250.7MiB / 7.789GiB
We see that the master CockroachDB instance (#1) takes most of the load, while #2 seems to be almost unused while #3 uses ~10% CPU. Not entirely sure what’s going on under the hood among the CockroachDB nodes, probably the master node is handing off some work to the other node(s) (perhaps those requests whose data it doesn’t store itself?).
Another note is that our Go microservices - especially the “accountservice” - is using a substantial amount of CPU serving the load - in a more real-life scenario we would almost certainly have scaled the accountservice to several worker nodes as well. On a positive note - our Go-based microservices are still using very little RAM.
This test case will write random account objects through a new POST API in the accountservice to the databases while simultaneously performing a lot of reads. We’ll observe behaviour as we put the system under moderate (total ~140 DB interactions per second) load and finally see what happens when we pull the plug from one, then another, of the CockroachDB instances just like in 7.1.2 above.
This load-test that writes/reads things concurrently and acts upon newly created data is written in a simple Go program. We’ll observe the behaviour by looking at the graphs in the CockroachDB admin GUI.
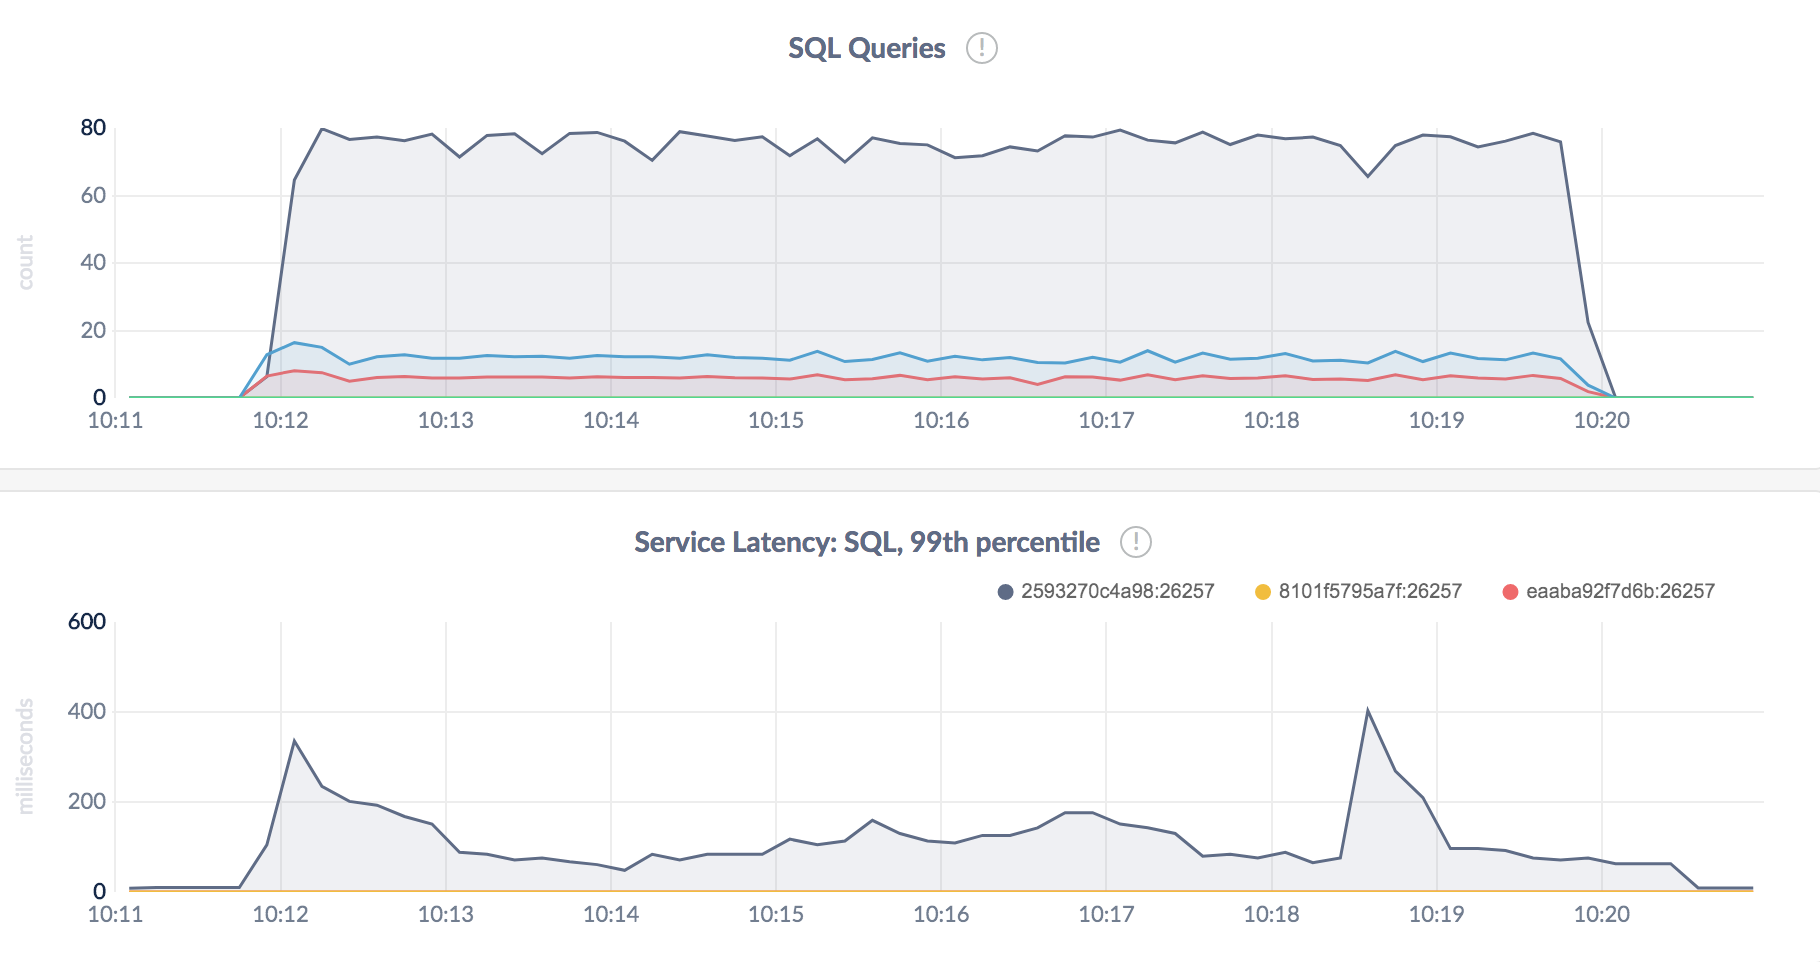 Figure 7.2.1: Queries per second and 99th percentile
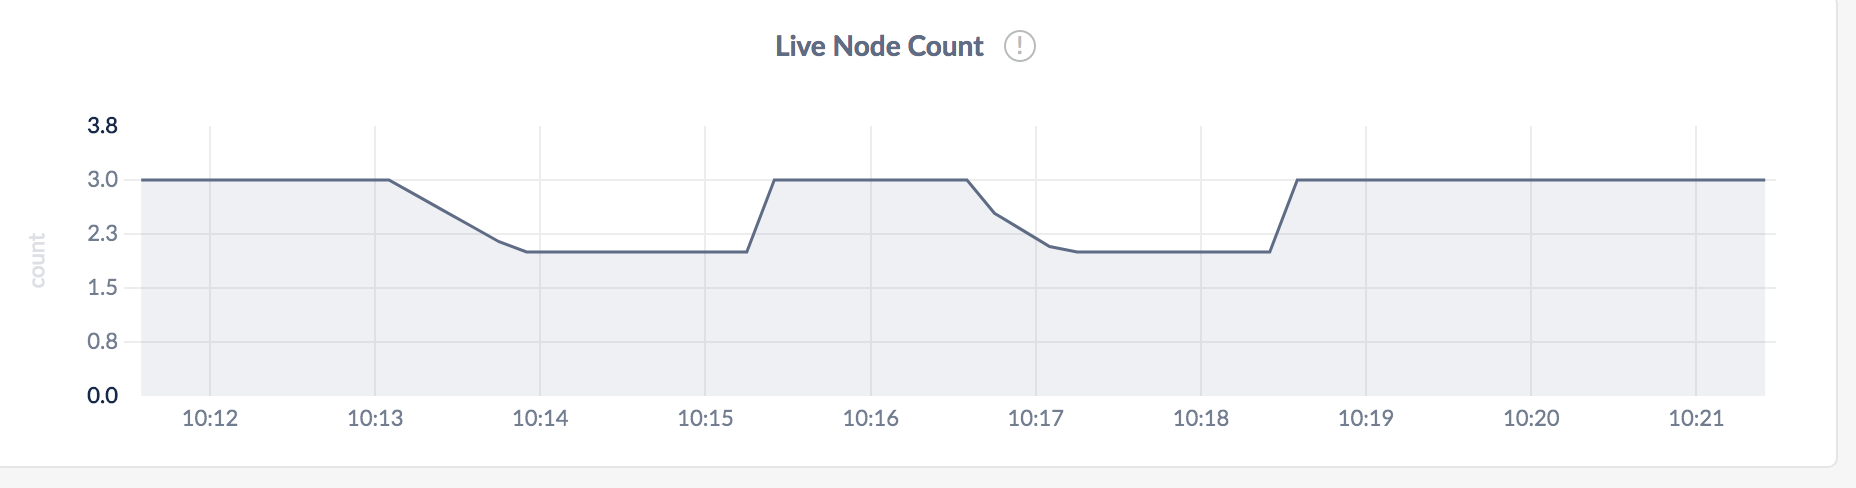 Figure 7.2.2: Node count
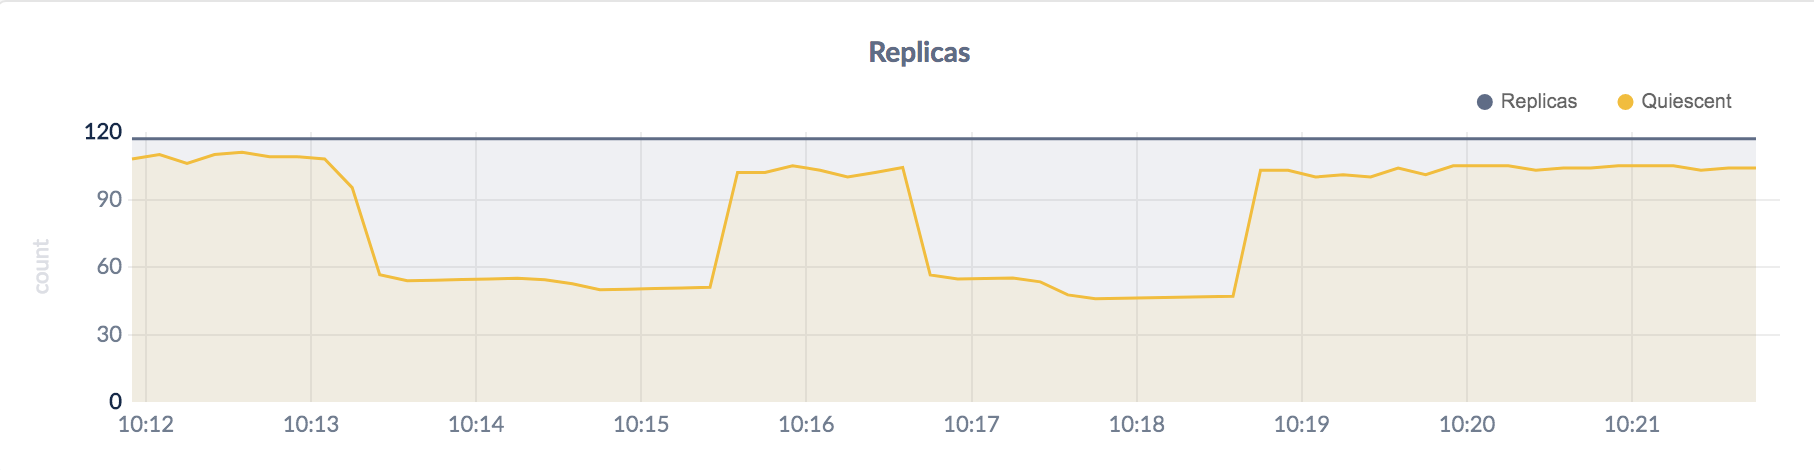 Figure 7.2.3: Replicas
What can we make of the above?
As you just saw, our cluster can handle when a CockroachDB worker node goes down, providing seamless balancing and failover mechanisms. The problem is that if we kill “cockroachdb1”, things comes abruptly to a halt. This stems from the fact that our CoackroachDB cluster is running as three separate Docker Swarm mode services - each having their own unique “cockroachdb1”, “cockroachdb2” and “cockroachdb3” service name. Our dataservice only knows about this connection URL:
 postgresql://account_user:account_password@cockroachdb1:26257/account
                                            ^  HERE!  ^
so if the service named “cockroachdb1” goes down, we’re in deep s–t. The setup with three separate Docker Swarm mode services is by the way the official way to run CockroachDB on Docker Swarm mode.
Ideally, our “dataservice” should only need to know about a single “cockroachdb” service, but at this point I havn’t figured out how to run three replicas of a CockroachDB service which would make them a single adressable entity. The main issue seems to be mounting separate persistent storage volumes for each replica, but there may be other issues.
Anyway - my interrim hacky solution would probably be based around the concept of client-side load balancing (see part 7 of the blog series), where our dataservice would have to become Docker API-aware and use the Docker Remote API to get and maintain a list of IP-addresses for containers having a given label.
If we add –label cockroachdb to our docker service create commands, we could then apply a filter predicate for that label to a “list services” Docker API call in order to get all running CockroachDB instances. Then, it’ll be straightforward to implement a simple round-robin client-side load balancing mechanism rotating connection instance(s) to the CockroachDB nodes including circuit-breaking and housekeeping.
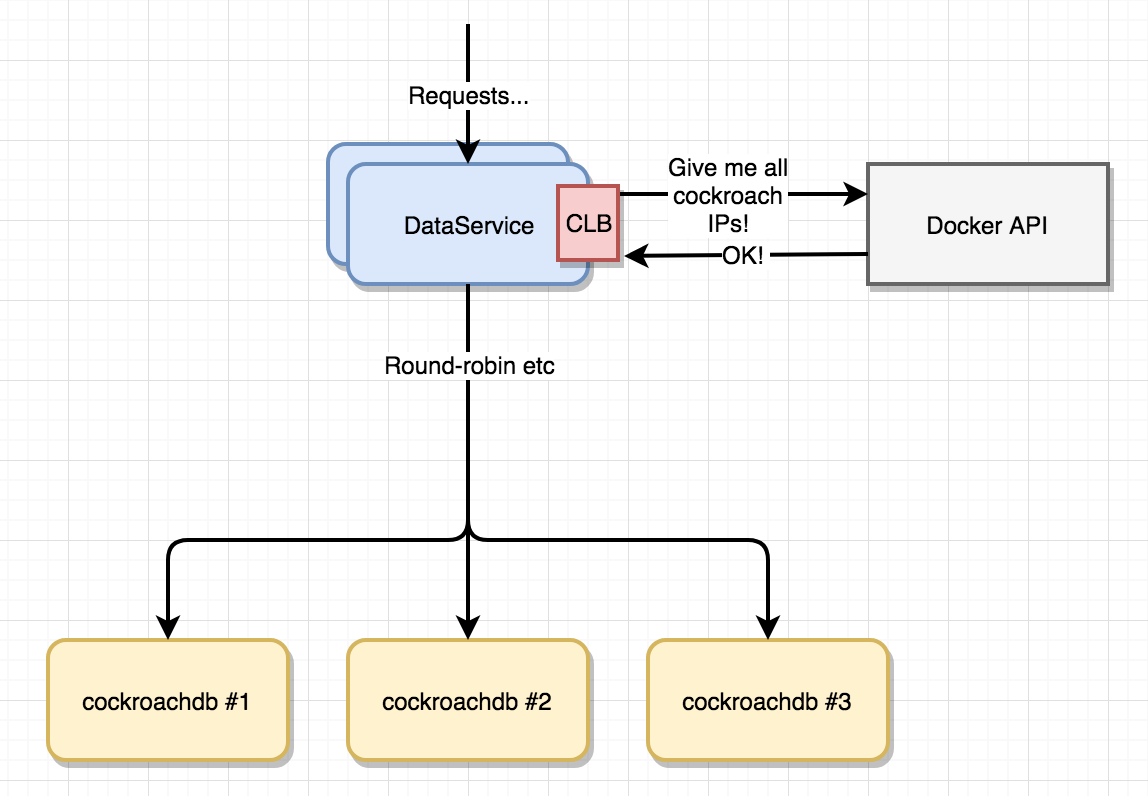 Figure 7.3
I’d consider the above solution a hack, I’d much rather figure out how to run CockroachDB instances using replicas. Also - do note that running production databases inside containers with mounted storage is kind of frowned upon anyway, so in a production scenario you’d probably want to use a dedicated DB cluster anyway.
In this part of the blog series, we’ve added a “dataservice” that works with the CockroachDB database well suited to distributed operation, also using the Gorm O/R-mapper for Go for mapping our Go structs to SQL and back. While we’ve only scratched the surface of the capabilities of CockroachDB, our simple tests seems to indicate an open-source database that might be a really interesting candidate for systems that needs a SQL/ACID-capable relational database with horizontal scalability, consistency and high availability.
The next part should deal with an issue that actually should be one of the first things to incorporate in a sound software architecture - security~ adds support for querying accounts using GraphQL. We’ll get to security - promise!
Please help spread the word! Feel free to share this blog post using your favorite social media platform, there’s some icons below to get you started.
Until next time,
// Erik