Blogg
Här finns tekniska artiklar, presentationer och nyheter om arkitektur och systemutveckling. Håll dig uppdaterad, följ oss på LinkedIn
Här finns tekniska artiklar, presentationer och nyheter om arkitektur och systemutveckling. Håll dig uppdaterad, följ oss på LinkedIn

This is the second part of the blog series “Faster startup with Spring Boot 3.2 and CRaC”, where we will learn how to warm up a Spring Boot application before the checkpoint is taken and how to provide configuration at runtime when the application is restarted from the checkpoint.
In the previous blog post, we learned how to use CRaC to start Spring Boot applications ten times faster using automatic checkpoints provided by Spring Boot 3.2. It, however, came with two significant drawbacks:
The checkpoint is automatically taken after all non-lazy beans have been instantiated, but before the application is started, preventing us from fully warming up the application and the Java VM’s Hotspot engine, e.g., performing method inline optimizations, etc.
The runtime configuration is set at build time, so we cannot specify the configuration to use when the application is restarted from the CRaC checkpoint at runtime. This also means that sensitive configuration information like credentials and secrets stored in the JVM’s memory will be serialized into the files created by the checkpoint.
In this blog post, we will learn how to overcome these shortcomings by performing the checkpoint on-demand. It is a bit more complex compared to performing an automatic checkpoint, requiring a couple of extra steps in the build phase. This blog post will show you how they can be automated.
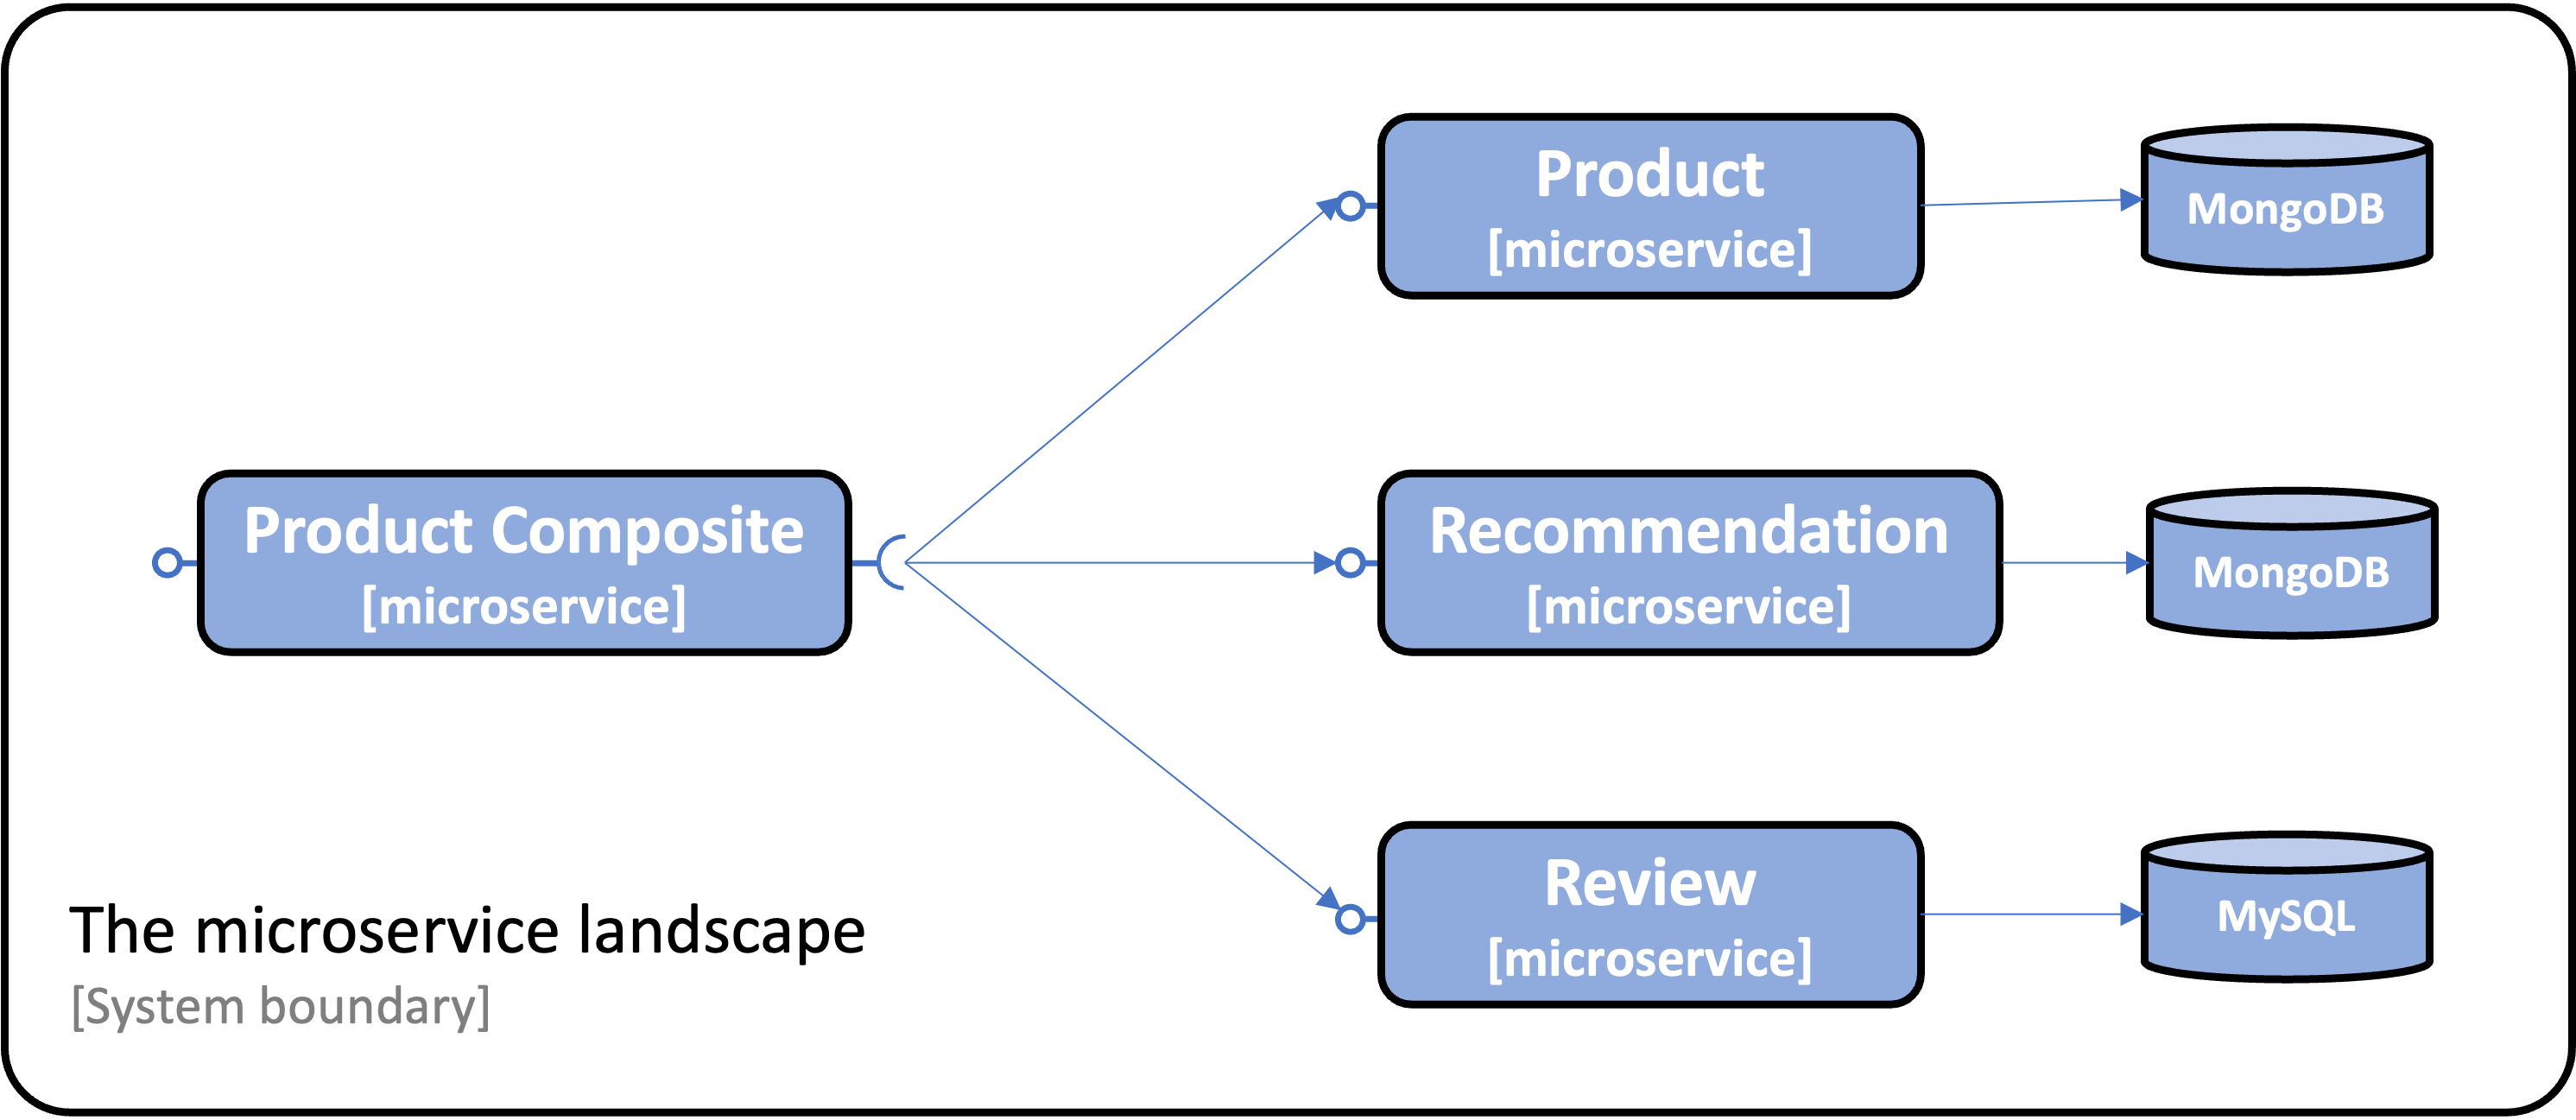
The sample Spring Boot applications used in this blog post are based on Chapter 6 in my book on building microservices with Spring Boot. The system landscape consists of four microservices: three of them store data in databases, while the fourth aggregates information from the other three. The system landscape is managed using Docker Compose. Docker compose will start the microservices from CraC enabled Docker images, i.e. Docker images containing CRaC checkpoints, together with the databases used. This is illustrated by the following image:
The blog post is divided into the following sections:
Let’s start by learning how to warm up a Spring Boot application before taking the checkpoint.
To warm up the applications, we need a runtime environment called a training environment. The training environment must be isolated from the production environment but configured similarly from a warmup perspective. This means that the same type of database must be used, and mocks, if used, need to behave like the actual services for the use cases used during warmup.
To be able to run relevant tests during the warmup phase, we must prepare the training environment with test data.
Let’s start with setting up a training environment and populating it with test data applicable for the microservices used in this blog post.
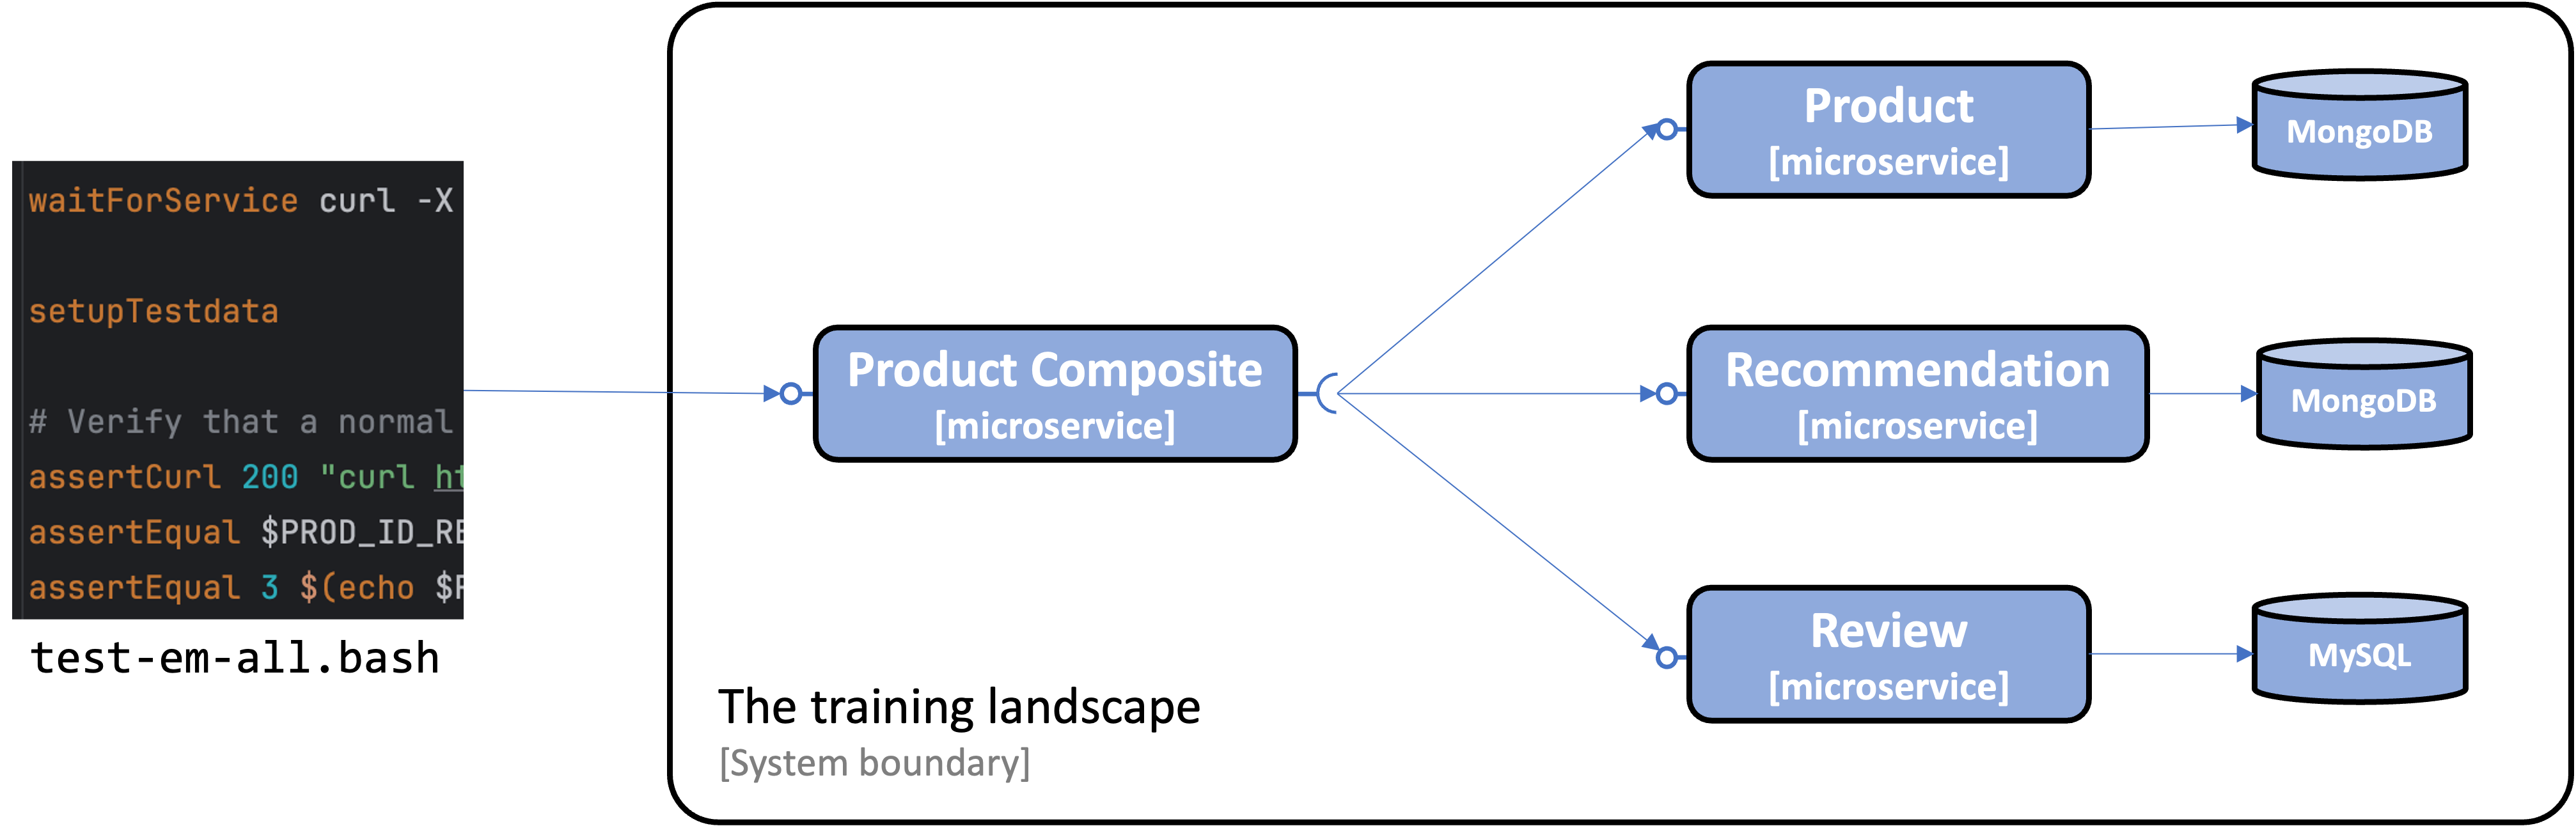
In this blog post, we will reuse the development environment from the book as the training environment and prepare it with test data by using the test script from the book. The test script, test-em-all.bash, contains a section that prepares databases with test data before it runs tests to verify that the system landscape of microservices works as expected.
The following image illustrates this:
The training environment can be built from the source, started up, and populated with test data using the following commands:
./gradlew build
docker compose build
docker compose up -d
./test-em-all.bash
For detailed instructions, see section 4. Trying out on-demand checkpoint and restore below.
With the training environment established and populated with test data, let’s see how we can use it to warm up our applications before taking the CRaC checkpoint.
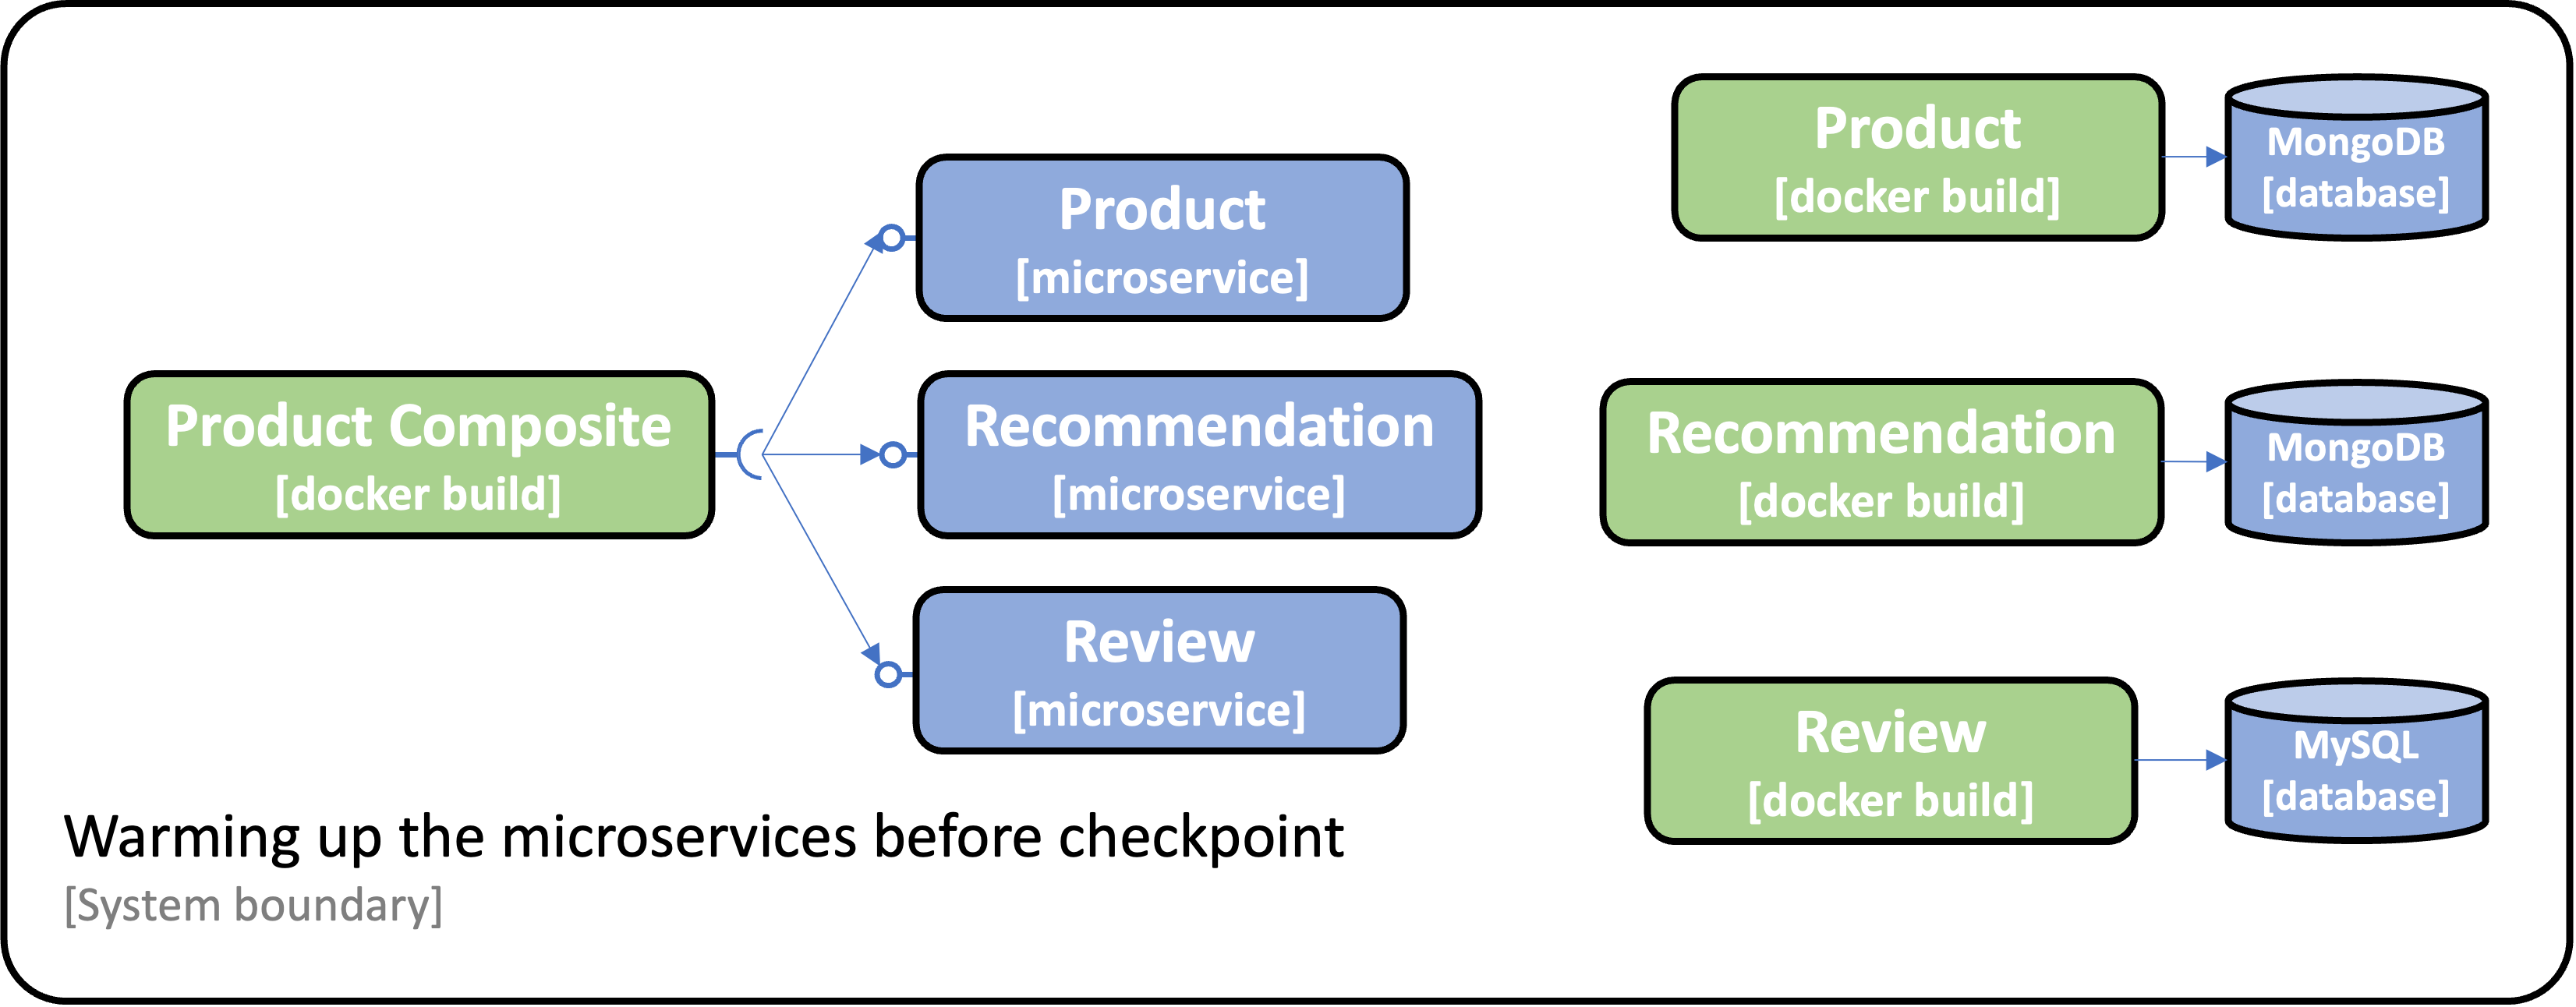
The system landscape used in this blog post has the following requirements for the training environment to be able to warm up its microservices:
From the previous blog post, we learned how to use a Dockerfile to build a Docker image containing a CRaC checkpoint of a Spring Boot Application. We will expand this approach by adding support for on-demand checkpoints. One new requirement in this blog post is that the docker build commands must be able to connect to the Docker containers in the training environment. This will be solved by adding network connectivity to the Docker buildx builder used in this blog post.
See section 4. Trying out on-demand checkpoint and restore below for detailed instructions.
These requirements are summarized in the following image:
Note: To fully warm up the Java VM’s Hotspot engine, e.g., performing inlining of frequently used method calls, it takes tens of thousands of iterations. For the scope of this blog post, we will only perform 100 iterations for demonstration purposes. For further details on warming up the Hotspot engine, see:
Since each warmup procedure is specific to each microservice, they will have their own version of the script, checkpoint-on-demand.bash, used to warm up and take the checkpoint.
The Dockerfile invoking the script, Dockerfile-crac-on-demand, is generic, so all microservices use the same Dockerfile. The most important parts of the Dockerfile look like:
FROM azul/zulu-openjdk:21.0.3-21.34-jdk-crac AS builder

ADD build/libs/*.jar app.jar
ADD crac/checkpoint-on-demand.bash checkpoint-on-demand.bash

RUN --security=insecure ./checkpoint-on-demand.bash

FROM azul/zulu-openjdk:21.0.3-21.34-jdk-crac AS runtime

COPY --from=builder checkpoint checkpoint
COPY --from=builder app.jar app.jar

EXPOSE 8080
ENTRYPOINT ["java", "-XX:CRaCRestoreFrom=checkpoint"]
It is a multi-stage Dockerfile where the builder part:
The runtime part:
builderThe most important parts of one of the checkpoint scripts, checkpoint-on-demand.bash from the Product microservice, looks like:
function runWarmupCalls() {
  assertCurl 200 "localhost:$PORT/product/1"
  assertEqual 1 $(echo $RESPONSE | jq ".productId")
}

function warmup() {
  waitForService localhost:$PORT/actuator
  for i in {1..100}; do runWarmupCalls; done
}

warmup && jcmd app.jar JDK.checkpoint &
java -XX:CRaCCheckpointTo=$OUT_FOLDER -jar app.jar
The script contains:
warmup function that performs calls to endpoints exposed by the application to warm up the application and the Java VM Hotspot engine.
NOTE: This warmup function is supplied as a basic example, it needs to be enhanced for a real-world use case.
With that, we have covered how to perform a checkpoint after a warming up the application and Java VM Hotspot engine. Next, let’s see how we can provide configuration at restart from a checkpoint, i.e., restore of the application with an environment-specific configuration.
To load the runtime configuration at CRaC restore time, we can use Spring Cloud’s Context Refresh functionality. It provides the following two features:
The @RefreshScope annotation can be used for properties defined in our source code, e.g., the host and port properties in the Product Composite microservice. It will look like:
 @RefreshScope
 @Component
 public class ProductCompositeIntegration implements ProductService...
 public ProductCompositeIntegration(
   @Value("${app product-service.host}") String productServiceHost,
   @Value("${app-product-service-port}") int productServicePort,
   ...
For properties in libraries that we use, e.g., the properties of the SQL DataSource bean in the spring-data-jpa library, we can use the property spring.cloud.refresh.extra-refreshable to point out classes of beans that need to be refreshed.
Finally, we can use the spring.config.import property to point out an external property file used in runtime to load the values for the refreshed properties.
For example, the Product Composite microservice declares a separate profile, crac, to point out an external property file for its properties that depend on the runtime environment, i.e., the host and port properties. The relevant parts look like:
---
spring.config.activate.on-profile: crac

spring.config.import: file:./runtime-configuration.yml
Its runtime configuration file looks like this:
app.product-service:
  host: product-prod
  port: 8080
The Review microservice also uses a separate crac profile, declaring that the DataSource bean in the spring-data-jpa library needs to be refreshed:
spring:
  cloud.refresh.extra-refreshable:
    - javax.sql.DataSource
  config.import: file:./runtime-configuration.yml
Its runtime configuration file looks like this:
spring.datasource:
  url: jdbc:mysql://mysql/review-db-prod
  username: user-prod
  password: pwd-prod
See section 4. Trying out on-demand checkpoint and restore below for details on how the runtime configuration files are used.
To ensure that we can use different configurations at build time and runtime, we will use different hostnames, ports, and database credentials, as described in the following table:
| Environment | Build time | Runtime |
|---|---|---|
| Product service | localhost:7001 | product-prod:8080 |
| Recommendation service | localhost:7002 | recommendation-prod:8080 |
| Review Service | localhost:7003 | review-prod:8080 |
| MongoDB | localhost:27017 | mongodb:27017 |
| MySQL URL | localhost:3306/review-db | mysql:3306/review-db-prod |
| MySQL credentials | user/pwd | user-prod/pwd-prod |
The existing default Spring profile will be used at build time. The configuration specified by the external configuration files explained above will be used at runtime.
Currently, the MongoClient prevents using CRaC checkpoints; see the following error reports:
The problem can party be resolved by programmatically closing the MongoClient instance before taking the checkpoint. Unfortunately, the MongoClient uses the configuration provided at build time when restarting at restore, disregarding the configuration provided at runtime. This means that the configuration for connections to MongoDB databases must be supplied at build time.
For this blog post, the problem will be resolved by using the hostname used in runtime, mongodb, also at build time. When building the Docker images for the microservices that use MongoDB, the product and recommendation services, the hostname mongodb will be used in the crac Spring profile for each service. The hostname mongodb will be mapped to 127.0.0.1 when running the Docker build command.
See section 4. Trying out on-demand checkpoint and restore below for details for how the Docker build command maps mongodb to 127.0.0.1.
To see all changes applied to implement on-demand checkpoint and restore, you can compare Chapter06 in the branch SB3.2-crac-on-demand with the branch SB3.2. To see the changes between implementing on-demand checkpoint and restore with automatic checkpoint and restore, compare the branches SB3.2-crac-on-demand and SB3.2-crac-automatic.
To summarize the most significant changes:
crac/Dockerfile-crac-on-demand
As mentioned above, this Docker file is used to create the CRaC-enabled Docker images. It uses the microservice’s specific checkpoint-on-demand.bash scripts to warm up the microservices before the checkpoint is taken.
New config repository crac/config-repo/prod/*.yml
This folder contains the configuration used at runtime, one configuration file per microservice.
crac/docker-compose-crac.yml
It is used to start up the runtime environment. It configures the microservices to start from the CRaC-enabled Docker images and use volumes to include the external configuration files provided by the config repository mentioned above. It also defines runtime specific hostnames of the services and credentials for the MySQL database.
Source code changes in the microservices folder
build.gradle: Added a new dependency to spring-cloud-starter, bringing in Spring Cloud’s Context Refresh functionality.crac/checkpoint-on-demand.bash script, to warm up the microservice before taking the checkpointresources/application.yml, added a new Spring profile, crac, configures the use of Spring Cloud’s Context Refresh functionality.Product Composite service:
The RestTemplate can’t be used during warmup with WebFlux; it needs to be switched to WebMvc. For details, see the following error report:
RestTemplateConfiguration class uses ReactorNettyRequestFactory to configure the RestTemplate according to the resolution described in the error report above.ProductCompositeIntegration added a @RefreshScope annotation to reload properties for hostnames and ports for its services.Product and Recommendation service:
ProductServiceApplication and RecommendationServiceApplication, closes its mongoClient bean in a beforeCheckpoint method to avoid open ports errors at checkpoint.Now, it is time to try it out!
First we need to get the source code and build the microservices. Next, we start up the training landscape. After that, we can create the Docker images using the Dockerfile Dockerfile-crac-on-demand. Finally, we can start up the runtime environment and try out the microservices.
Run the following commands to get the source code from GitHub, jump into the Chapter06 folder, checkout the branch used in this blog post, SB3.2-crac-on-demand, and ensure that a Java 21 JDK is used (Eclipse Temurin is used in the blog post):
git clone https://github.com/PacktPublishing/Microservices-with-Spring-Boot-and-Spring-Cloud-Third-Edition.git
cd Microservices-with-Spring-Boot-and-Spring-Cloud-Third-Edition/Chapter06
git checkout SB3.2-crac-on-demand
sdk use java 21.0.3-tem
Build the microservices and their standard Docker images, which are not based on CRaC. The training landscape will use these Docker images. Run the following commands:
./gradlew build
unset COMPOSE_FILE
docker compose build
Startup the training system landscape and populate it with test data with the following commands:
docker compose up -d
./test-em-all.bash
Expect the test-em-all.bash script to end with the output End, all tests OK.
As mentioned above, the docker build commands must be able to connect to the Docker containers in the training environment. In this blog post, we will use host-based networking, i.e., sharing localhost with the Docker engine.
Note: To avoid a port conflict in the Docker engine’s network when building the Product Composite service, we will shut down the Product Composite service in the training landscape. Once it has been used to populate the test data, it is no longer required for building the CRaC-enabled Docker images.
Bring down the Product Composite service with the command:
docker compose rm -fs product-composite
First, we must create a Docker buildx builder with host-based networking. This can be done with the following command:
docker buildx create \
  --name insecure-host-network-builder \
  --driver-opt network=host \
  --buildkitd-flags '--allow-insecure-entitlement security.insecure --allow-insecure-entitlement network.host'
Note: See the previous blog post for information on why we use a Docker
buildxbuilder when building the Docker images.
Now, we can build the CRaC-enabled Docker images with warmed-up microservices:
docker buildx --builder insecure-host-network-builder build --allow network.host --network host --allow security.insecure -f  crac/Dockerfile-crac-on-demand -t product-composite-crac --progress=plain --load microservices/product-composite-service

docker buildx --builder insecure-host-network-builder build --allow network.host --network host --allow security.insecure -f  crac/Dockerfile-crac-on-demand -t review-crac            --progress=plain --load microservices/review-service

docker buildx --builder insecure-host-network-builder build --add-host=mongodb:127.0.0.1 --allow network.host --network host --allow security.insecure -f  crac/Dockerfile-crac-on-demand -t product-crac           --progress=plain --load microservices/product-service

docker buildx --builder insecure-host-network-builder build --add-host=mongodb:127.0.0.1 --allow network.host --network host --allow security.insecure -f  crac/Dockerfile-crac-on-demand -t recommendation-crac     --progress=plain --load microservices/recommendation-service
Note: When building the product and recommendation services, that use MongoDB, the hostname
mongodbis mapped to127.0.0.1using the--add-hostoption. See section 2.1 Problems with the MongoClient on restore above for details.
Verify that we got four Docker images, whose names are suffixed with -crac, with the command:
docker images | grep -e "-crac"
We are now done with the training environment, so we can shut it down:
docker compose down
Start up the runtime environment with CRaC-enabled Docker images using the Docker Compose file crac/docker-compose-crac.yml, and use the test script, test-em-all.bash, to verify that it works as expected:
export COMPOSE_FILE=crac/docker-compose-crac.yml
docker compose up -d
./test-em-all.bash
Note: The docker compose file creates the MySQL database for the Review service using the script
crac/sql-scripts/create-tables.sql. See the previous blog post for more info.
Verify that the startup time (i.e. CRaC restore time) is short, by running the command:
docker compose logs | grep "restart completed"
Verify that the response contains output similar to:
recommendation-prod-1 ... restored JVM running for 133 ms
product-prod-1 ... restored JVM running for 127 ms
product-composite-prod-1 ... restored JVM running for 155 ms
review-prod-1 ... restored JVM running for 183 ms
To verify that the configuration is correctly updated in runtime at restore, run the following command:
docker compose logs product-composite-prod review-prod | grep "Refreshed keys"
Look for the updated SQL DataSource properties used by the Review service and the updated host and port properties used by the Product Composite service. Expect the response from the command containing the following:
review-prod-1  | ... Refreshed keys: [spring.datasource.username, spring.datasource.url, spring.datasource.password]

product-composite-prod-1  | ... Refreshed keys: [app.product-service.host, app.product-service.port, app.recommendation-service.host, app.recommendation-service.port, app.review-service.host, app.review-service.port]
Note: Due to the
MongoClientproblem describes above, this will not apply to the Product and Recommendation microservices.
With that, we are done; let’s wrap up by bringing down the runtime environment with the commands:
docker compose down
unset COMPOSE_FILE
In this blog post, we have learned how to overcome the two shortcomings of using Automatic checkpoint and restore. We have introduced On-demand checkpoint and restore that allows us to:
Control when to perform the checkpoint, allowing us to warm up the application and its Java VM Hotspot engine before taking the checkpoint. This allows for optimal application performance after a restore.
Use Spring Cloud’s Context Refresh functionality to reload configuration that depends on the runtime environment when the application is restored. This means we no longer need to store runtime-specific and sensitive configurations in the Docker image containing the checkpoint.
In the next blog post, I intend to explain how to use CRaC together with reactive microservices. These microservices are built using Project Reactor, Spring WebFlux, Spring Data MongoDB Reactive, and event streaming using Spring Cloud Stream with Kafka.
UPDATE: The next blog post can be found here: Part 3 - Automated build process.