Blogg
Här finns tekniska artiklar, presentationer och nyheter om arkitektur och systemutveckling. Håll dig uppdaterad, följ oss på LinkedIn
Här finns tekniska artiklar, presentationer och nyheter om arkitektur och systemutveckling. Håll dig uppdaterad, följ oss på LinkedIn

The more microservices we get in our system landscape, the harder it gets to perform configuration management. If each microservice have its own configuration, typically in a local property or yaml file, it can quickly become a nightmare to maintain. Let’s add a Configuration Server to centralise management of all the configuration files!
In this blog post we will complement the system landscape in the blog series - Building Microservices with a configuration server based on Spring Cloud Config:
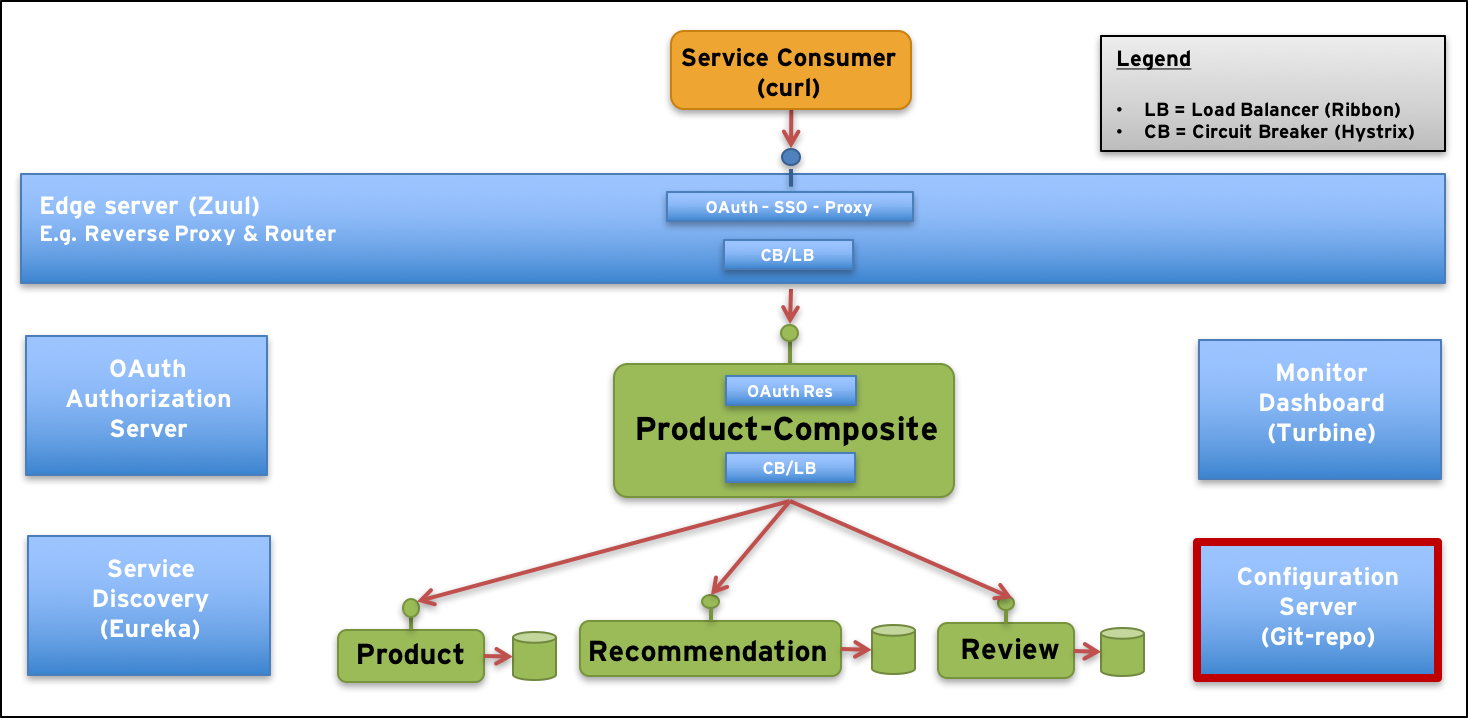
…and describe how it can be used to centralise the configuration management for a microservices based system landscape:
We actually used the configuration server already in the previous blog post that focused on tooling, e.g. Docker for Mac and Spring Cloud Brixton (i.e. v1.1). Now it’s time to explain how it works!
We will cover the following aspects of using Spring Cloud Config:
Server setup
How to create a configuration server
Client configuration
How to configure the clients, i.e. our microservices, to get their configuration from the config server
Configuration structure
How a configuration repository can be structured
Secure the configuration
How to secure the configuration, both at rest and in transit
Configuration storage and change propagation
How to store the configuration and how changes in the configuration can be propagated to the configuration server and affected microservices
Refreshable properties
How a microservice can react on an updated configuration in runtime without require a restart
Each section will explain the most central parts of the code and when applicable run some tests to prove that it’s actually working!
But first, let’s get it up and running without any further explanations, shall we?
For details on how to build and run the microservice landscape in this blog post series, see the previous blog post.
To be able to run some of the commands used below you need to have the tools cURL and jq installed.
In summary:
Open a terminal, create a folder of your choice and cd into it:
 $ mkdir a-folder-of-your-choice
 $ cd a-folder-of-your-choice
Since we have externalised our configuration into a configuration repository we first need to get it from GitHub:
$ git clone https://github.com/callistaenterprise/blog-microservices-config.git
Next, we get the source code from GitHub and checkout the branch used for this blog post:
 $ git clone https://github.com/callistaenterprise/blog-microservices.git
 $ cd blog-microservices
 $ git checkout -b B9 M9
Now we can build our microservices with:
$ ./build-all.sh
Finally we can bring up the dockerized microservice landscape and run a test:
$ . ./test-all.sh start
It should after a while result in a response from the API request like:
 $ curl -ks https://localhost:443/api/product/123 -H "Authorization: Bearer $TOKEN" | jq .
 {
   "productId": 123,
   "name": "name",
   "weight": 123,
   "recommendations": [	...  ],
   "reviews": [ ... ],
   "serviceAddresses": { ... }
 }
Note #1: We, don’t shut down the microservice landscape (can be done by adding the parameter:
stop). We will use it later on run some tests that demonstrates that the things we explain actually works.
Note #2: The first
.in the command above is essential. It allows us to reuse theTOKENenvironment variable that the script creates to store an OAuth Access Token, i.e. we don’t need to acquire one ourselves.
Further details, not covered in this blog post, on how to use Spring Cloud Config can be found in the reference documentation.
We have replaced the no longer maintained Docker image for a 32 bit embedded Java 8 JRE, used to keep memory consumption to a minimum, with the official 64 bit Open JDK Java 8 JRE. To minimise the increase of memory usage by going from 32 bit to 64 bit we have setup a max size of the heap for each microservice in the docker-compose.yml - file:
environment:
  - JAVA_TOOL_OPTIONS=${MY_JAVA_TOOL_OPTIONS}
We have created a setup-file, setup-env.sh for the required environment variable MY_JAVA_TOOL_OPTIONS:
export MY_JAVA_TOOL_OPTIONS=-Xmx256M
You need to execute it once before you run any docker-composecommands:
$ . ./setup-env.sh
Then you can, for example, start up the system landscape with:
$ docker-compose up -d
Setting up a Spring Cloud Config server is very straight forward, i.e. very similar to how to setup the other Spring Cloud servers, e.g. Discovery, Edge and OAuth Authorization Servers:
The Gradle dependency that enables it to be a config server is:
compile('org.springframework.cloud:spring-cloud-config-server')
It only contains a single Java class: ConfigServerApplication and the only thing of interest in it is the following annotations on its static main - method:
 @EnableConfigServer
 @EnableDiscoveryClient
 @SpringBootApplication
@EnableConfigServer is what makes it a config server@EnableDiscoveryClient enables it to register itself with Eureka, our discovery server, (more on that below)@SpringBootApplication is, as usual, what makes our application an Spring Boot application.The source code of the config server also contains:
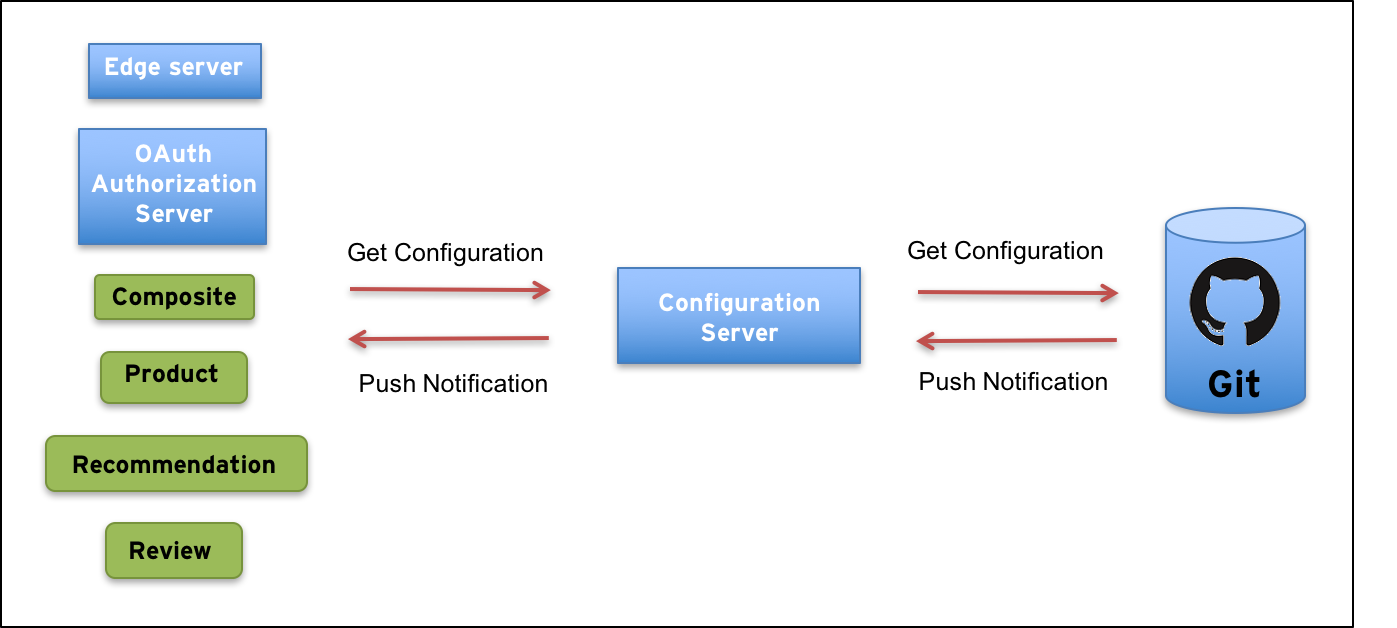
Clients, i.e. our microservices, that want’s to access its configuration can reach the config server in two ways:
spring.cloud.config.urispring.cloud.config.discovery.enabled: true (defaults to false)spring.cloud.config.discovery.serviceId: config-server, i.e. the name of the config server as specified in the config server’s bootstrap.yml - file in the property spring.application.name.Each client stores this connection configuration in its local bootstrap.yml-file.
Clients can’t store information on how to connect to the config server in the config servers repository, right?
Option no. 2 might seem better due to the looser coupling, e.g. you can move the config-server or have multiple config servers started to avoid a single point of failure. Option no. 1 however works fine as well given that you deploy your microservices in a container orchestrator, e.g. Docker in Swarm mode or Kubernetes, since they will provide a logical service name that the clients can use and the container orchestrator will forward the request to one of the running config server. More on that subject in a future blog post.
For the scope of this blog post we will use option no. 1, but the configuration files are prepared for option no. 2, just change the properties spring.cloud.config.discovery.enabled from falseto true.
To add some robustness to the solution I have also added connection configuration that allows the clients to retry connecting to the config server if they can’t access the config server, e.g. during startup of all the services after a docker-compose ut -d - command:
spring:
  cloud:
    config:
      failFast: true
      retry:
        initialInterval: 3000
        multiplier: 1.3
        maxInterval: 5000
        maxAttempts: 20
All local configuration files, e.g. application.yml, for each microservice will be moved to a central configuration repository (use Git branch B6 to see the local configuration files before they were centralised). An obvious question is how to structure the files when they are placed together.
Two important aspects are:
All common configuration is placed in the file application.yml and specific configuration per microservice is placed in a file with the name of the microservice (as specified in the property spring.application.name in the local file bootstrap.yml).
Environment specific configuration is handled as before, i.e. in different Spring profiles. The default profile is used for running the microservices locally without containers and the docker profile is used for deployment in Docker. This model can easily be extended by adding more profiles for specific environments, e.g. profiles for test, qaand prod.
The config repository contains the following files:
application.yml
auth-server.yml
composite-service.yml
edge-server.yml
monitor-dashboard.yml
review-service.yml
The config server expose a REST API for accessing the configuration.
To get access to the default configuration for all microservices you make a request like:
$ curl -ks https://$MY_CONFIG_USER:$MY_CONFIG_PWD@localhost:8888/application/default | jq
The use of
$MY_CONFIG_USER:$MY_CONFIG_PWD@will be explain below in the section regarding security.
…and you will get a response like:
{
  "name": "application",
  "profiles": [
    "default"
  ],
  "label": null,
  "version": null,
  "propertySources": [
    {
      "name": "file:/config-repo/application.yml",
      "source": {
        "server.port": 0,
        "service.defaultMinMs": 5,
        "service.defaultMaxMs": 20,
		  .	..
If you want to see the configuration for the review-service when it runs in Docker you ca submit a request like:
$ curl -ks https://$MY_CONFIG_USER:$MY_CONFIG_PWD@localhost:8888/review-service/docker | jq
…and get a response like:
{
  "name": "review-service",
  "profiles": [
    "docker"
  ],
  "label": null,
  "version": null,
  "propertySources": [
    {
      "name": "file:/config-repo/application.yml#docker",
      "source": {
        "spring.profiles": "docker",
        "server.port": 8080,
        "spring.rabbitmq.host": "rabbitmq",
        "eureka.instance.preferIpAddress": true,
        "eureka.client.serviceUrl.defaultZone": "http://discovery:8761/eureka/"
      }
    },
    {
      "name": "file:/config-repo/review-service.yml",
      "source": {
        "service": "",
        "my-secret-property": "my-secret-value"
      }
    },
    {
      "name": "file:/config-repo/application.yml",
      "source": {
        "server.port": 0,
        "service.defaultMinMs": 5,
		  .	..
Securing the configuration is of course vital in a production environment.
To me, security aspects can be divided in two main areas:
How to prevent unauthorised clients to access the configuration information when it is in transit, i.e. during an API call to the configuration server.
How to protect sensitive data (e.g. credentials) at rest, i.e on disk, from potential intruders that got access to the file system.
To protect the configuration information in transit there are two aspects to cover:
How to ensure that only authorised clients can make calls to the configuration server API.
How to ensure that a non authorised third parties can’t eavesdrop the API calls, i.e. intercept the network traffic and get access to the configuration information.
To prevent eavesdropping we need to ensure that the traffic is encrypted in a sufficient way (i.e. using HTTPS with TLS and proper encryption algorithms and cipher suites) and to authorise the clients we can apply a wide range of mechanisms e.g. HTTP Basic Authentication, HTTPS with mutual authentication or OAuth.
In this blog post we use HTTPS to encrypt the communication and HTTP Basic Auth to ensure that only authorised clients can make calls to the configuration server.
The username and password used for Basic Auth is externalised in the setup-env.sh - file:
export MY_CONFIG_USER=config_client
export MY_CONFIG_PWD=config_client_pwd
The config server uses Spring Security to protect its API’s and gets the approved username and password injected in the docker-compose.yml - file as:
  config:
    environment:
      - SECURITY_USER_NAME=${MY_CONFIG_USER}
      - SECURITY_USER_PASSWORD=${MY_CONFIG_PWD}
All config clients gets a pair of environment variables defined in docker-compose.yml - file as:
environment:
  - MY_CONFIG_USER=${MY_CONFIG_USER}
  - MY_CONFIG_PWD=${MY_CONFIG_PWD}
That they use in their local bootstrap.yml - file to setup the username and password in the URL to the config server as:
spring:
  cloud:
    config:
      uri: https://${MY_CONFIG_USER}:${MY_CONFIG_PWD}@config:8888
Note: In a Docker based production environment I strongly recommend you to use a container orchestrator such as Kubernetes or Docker in Swarm mode and then use the build in support in those tools for handling secrets such as usernames and passwords instead of passing them through environment files. I hope to be able to cover how that is done in a future blog post!
Try it out by asking for some configuration information!
First without supplying any credentials:
$ curl -ks https://localhost:8888/application/default | jq
Returns an expected error message:
{
  "timestamp": 1494318890659,
  "status": 401,
  "error": "Unauthorized",
  "message": "Full authentication is required to access this resource",
  "path": "/application/default"
}
Next, add authentication info in the request:
$ curl -ks https://$MY_CONFIG_USER:$MY_CONFIG_PWD@localhost:8888/application/default | jq
…and you will get the expected configuration information:
{
  "name": "application",
  "profiles": [
    "default"
  ],
  "label": null,
  "version": null,
  "propertySources": [
    {
      "name": "file:/config-repo/application.yml",
      "source": {
        "server.port": 0,
        .
        .
        .
The Spring Cloud Config server supports encryption of sensitive properties in the configuration files. To be able to encrypt sensitive properties it needs a encryption key to be configured. The key can either be symmetric or asymmetric.
Asymmetric keys are superior in terms of security, but symmetric keys are easier to setup so we will use a symmetric key in this blog post. For details see the reference documentation regarding key_management.
The config server provides two endpoint for encrypting and decrypting sensitive properties: /encryptand /decrypt. These two endpoints needs of course to be protected as well as described above.
We have, again, used the setup-env.sh- file to externalise sensitive information, in this case the symmetric key:
export MY_CONFIG_ENCRYPT_KEY=my-very-secret-encryption-key
We setup an environment variable for the config server with the symmetric key in the docker-compose.yml - file as:
  config:
    environment:
	   - MY_CONFIG_ENCRYPT_KEY=${MY_CONFIG_ENCRYPT_KEY}
Finally is the config server using the environment variable in its local configuration file bootstrap.yml as:
encrypt.key: ${MY_CONFIG_ENCRYPT_KEY}
Try it out, encrypt the text my-secret:
$ curl -ks https://$MY_CONFIG_USER:$MY_CONFIG_PWD@localhost:8888/encrypt -d my-secret
cfdfe0ed3eeb9dc406508d4a5a7124e7192def5422a86bd5183ff00eb6fb1d77
…and decrypt it back:
$ curl -ks https://$MY_CONFIG_USER:$MY_CONFIG_PWD@localhost:8888/decrypt -d cfdfe0ed3eeb9dc406508d4a5a7124e7192def5422a86bd5183ff00eb6fb1d77
my-secret
The encrypted value can be used in our config files in the config repo, e.g. in review-service.yml:
my-secret-property: '{cipher}cfdfe0ed3eeb9dc406508d4a5a7124e7192def5422a86bd5183ff00eb6fb1d77'
The review service will get the property in clear text from the config server, so it is totally unaware of that the property is protected at rest.
See blog-microservices/microservices/core/review-service/src/main/java/se/callista/microservices/core/review/service/ReviewService.java:
public class ReviewService {

    @Value("${my-secret-property:UNKNOWN}")
    private String mySecretProperty;

	...

    @RequestMapping("/review")
    public List<Review> getReviews(
        @RequestParam(value = "productId",  required = true) int productId) {

        LOG.info("mySecretProperty: {}", mySecretProperty);
Try it out with:
$ curl -ks https://localhost:443/api/product/123 -H "Authorization: Bearer $TOKEN" | jq .
…and you will see the decrypted value in the log output:
$ docker-compose logs --tail=10 rev
...
rev_1 | 2017-05-12 13:34:30.185 INFO ... ReviewService : mySecretProperty: my-secret-value
...
In general it is obviously not a very good idea to print out decrypted values in the log output…
Spring Cloud Config supports storing the configuration files in either:
This blog post covers how to store the configuration files in ether a Git repo or in the local file system, checkout the reference documentation for information on the other options.
The configuration files are normally stored in a Git repo, providing version control of the configuration (actually very useful!). For development, storing the configuration directly in the local file system is very handy.
In this section we will go through:
The Git repo can be stored locally, e.g during development, but is normally hosted on a Git server.
For a local Git repo, the configuration can look like:
spring.cloud.config.server.git.uri: file:///${PWD}/../../../../blog-microservices-config/
For a git repo on GitHub, the configuration can look like:
spring.cloud.config.server.git:
  uri: https://github.com/callistaenterprise/blog-microservices-config.git
  username: your-username
  password: your-password
To be able to be notified on changes of the configuration in a Git repo on a Git server Spring Cloud Config supports webhook based push notifications from GitHub, GitLab and Bitbucket. By adding the following dependency in the config servers Gradle build file, a /monitor endpoint is enabled:
compile('org.springframework.cloud:spring-cloud-config-monitor')
A webhook can now be registered in the Git repo on the Git server using a URL like:
http://dns-name-for-the-config-server:8888/monitor
To test push notifications locally you can simulate a webhook request from GitHub using curl like:
$ curl -H "X-Github-Event: push" -H "Content-Type: application/json" -X POST -d '{"commits": [{"modified": ["review-service.yml"]}]}' -ks https://$MY_CONFIG_USER:$MY_CONFIG_PWD@localhost:8888/monitor
["review:service","review-service"]
What this request actually says is that the configuration file review-service.yml is changed in the Git repo.
The configuration server will notify the affected microservices, the review-service in the example above, and it will pick up the changes. This can be seen in the log output from the affected microservices, e.g.:
$ docker-compose logs --tail=10 rev
...
rev_1        | 2017-05-12 13:40:21.552  INFO [review-service, ... : Fetching config from server at: https://config:8888
rev_1        | 2017-05-12 13:40:21.776  INFO [review-service, ... : Located environment: name=review-service, profiles=[docker], label=null, version=null
...
To notify the affected clients Spring Cloud Config use the Spring Cloud Bus (that uses Spring Cloud Stream under the hood). Spring Cloud Bus supports a number of message brokers, e.g. RabbitMQ and Kafka.
In this blog post we use RabbitMQ by adding the following dependency in both the config server and config clients Gradle build files:
compile("org.springframework.cloud:spring-cloud-starter-bus-amqp")
…and adding the following configuration for both the default profile and the docker profile:
spring.rabbitmq:
  host: localhost
  port: 5672

---
# For deployment in Docker containers
spring:
  profiles: docker

spring.rabbitmq.host: rabbitmq
The configuration is added in the config repo file application.yml, so it applies to all microservices. Since the config server don’t reads its own configuration from the config repo we also needs to repeat the configuration in the config servers local application.yml - file, see blog-microservices/microservices/support/config-server/src/main/resources/application.yml
Finally to bring in RabbitMQ we simply run it as a Docker container added to our docker-compose.yml file:
  rabbitmq:
    image: rabbitmq:3-management
    restart: always
    ports:
      - "15672:15672"
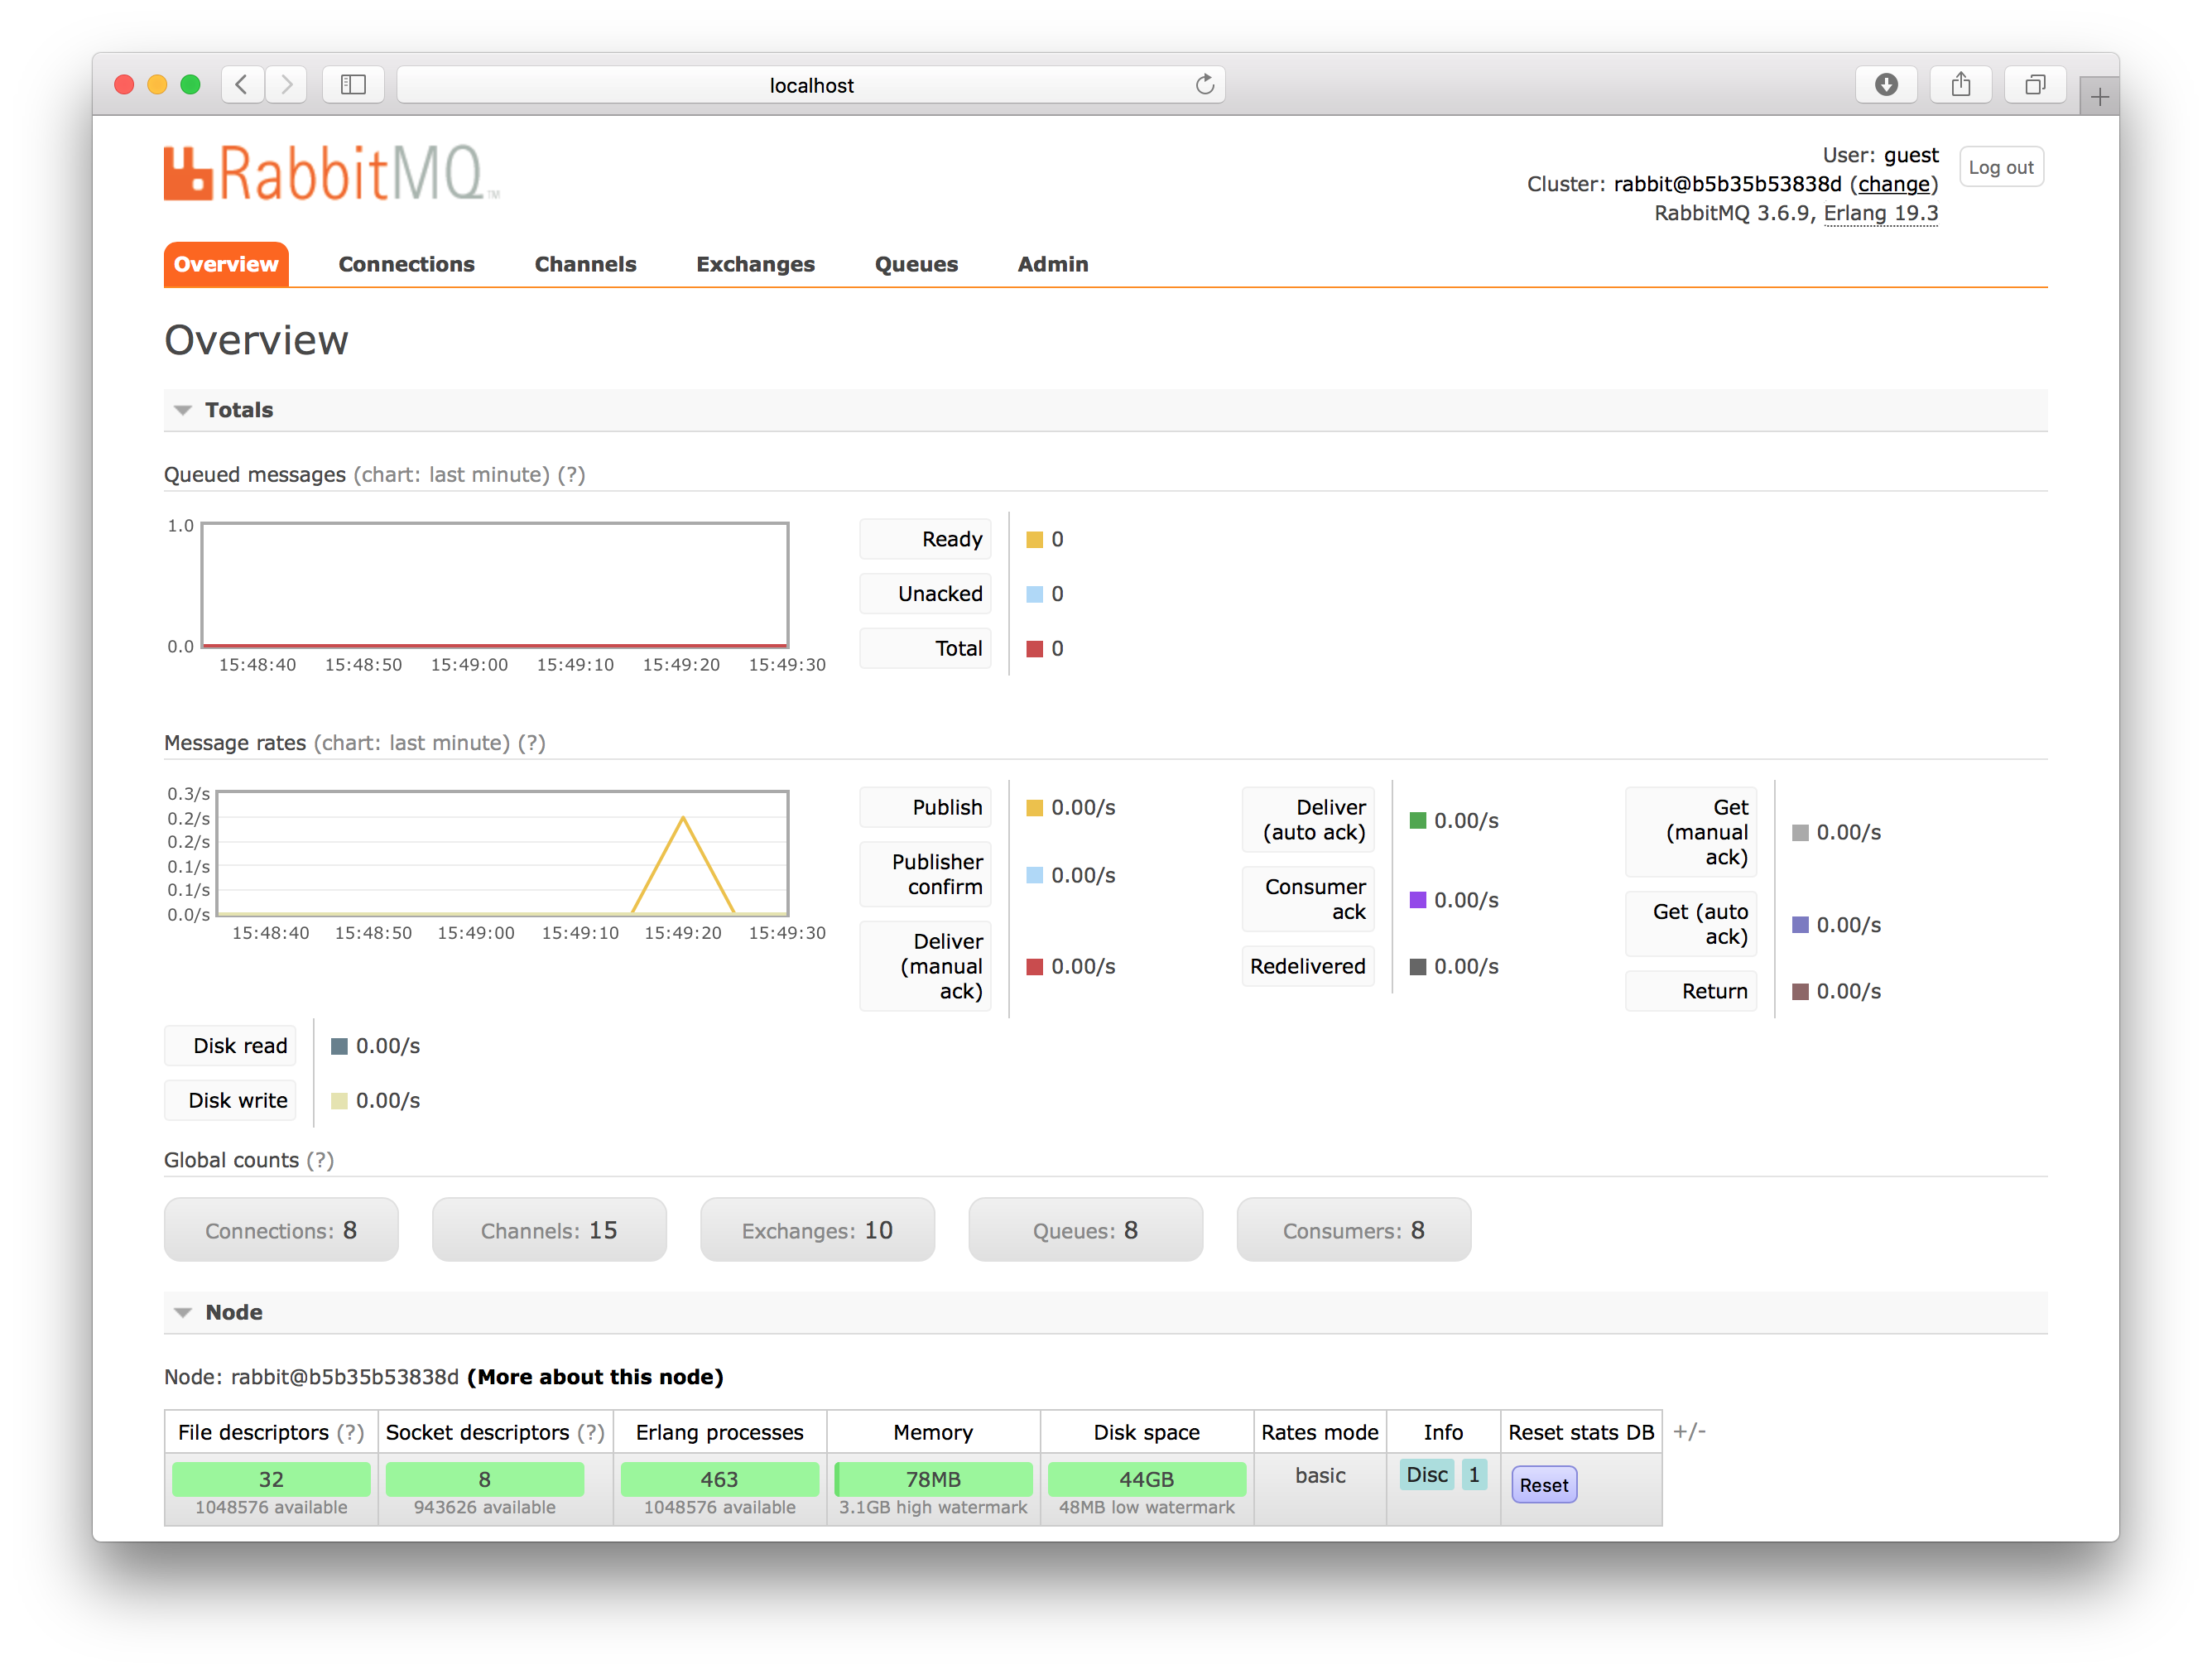
Running RabbitMQ in a single container like this is only useful for development and test, for production you need to setup a proper RabbitMQ cluster or use a cloud service like CloudAMQP
The RabbitMQ web admin GUI can be reached at: http://localhost:15672 and you can login using the default credentials “guest/guest”.
Another option, that is very handy during development, is to configure the config server to use the native file system instead of Git. This enable the config server to pickup changes directly form the local file system and promote them immediately to the affected clients (i.e. our microservice instances).
To setup the config server to use the native file system instead of Git you configure it to use the Spring profile native and then use the property spring.cloud.config.server.native.searchLocations to specify where to find the configuration files.
In this blog post we are using a file based configuration repository. We specify the configuration for the config server in the docker-compose.yml- file like:
environment:
  - SPRING_PROFILES_ACTIVE=docker,native
  - SPRING_CLOUD_CONFIG_SERVER_NATIVE_SEARCH_LOCATIONS=file:/config-repo
…and we have a Docker volume that connects the Docker container folder /config-repo to the config-repo we checked out from Git above:
volumes:
  - $PWD/../blog-microservices-config:/config-repo
If you want to try out Git based usage you can remove the native profile and the SPRING_CLOUD_CONFIG_SERVER_NATIVE_SEARCH_LOCATIONS environment variable from the docker-compose.yml file.
I have setup the config server to use a local Git repo in the file: blog-microservices/microservices/support/config-server/src/main/resources/application.yml for both the default Spring profile and the docker profile:
# Configuration of a local Git-repo for development locally without Docker
# note that we are still using git; We just access the git-repo via file: protocol
spring.cloud.config.server.git.uri: file:///${PWD}/../../../../blog-microservices-config/

---
# For deployment in Docker containers
spring:
  profiles: docker

# when running docker locally on a dev pc the config-repo is mounted to a local git-repo in docker-compose file
spring.cloud.config.server.git.uri: /config-repo
Ok, so the learned that the config server can get notifications from the config repo (e.g. GitHub) when some configuration was changed and the config server can use Spring Cloud Bus to inform our microservices regarding the change…
But now what?
I.e. how can we write code to react on changed configurations in realtime, i.e. without perform a traditional restart of the service?
Spring Cloud comes with a bean annotation, @RefreshScope, that is very useful for this purpose. It will instruct Spring to reinject all fields and setter methods that are annotated with the @Value - annotation if their configuration property is changed. See (refresh scope)[http://cloud.spring.io/spring-cloud-static/docs/1.0.x/spring-cloud.html#_refresh_scope] for details.
Some built in properties are already using the @RefreshScope - annotation, e.g. logging. This means that changes of the log level settings in the config repo has immediate affect.
Try it by monitoring the logs and then change log level from INFO to DEBUG for the review-service.
Edit review-service.yml in the config repo and remove the comment mark from:
#logging.level.se.callista: DEBUG
to:
logging.level.se.callista: DEBUG
Try call the API:
$ curl -ks https://localhost:443/api/product/123 -H "Authorization: Bearer $TOKEN" | jq .
…and you should start to see log output from the review service with DEBUG level like:
$ docker-compose logs --tail=10 rev
...
rev_1 | 2017-05-12 13:56:15.662 DEBUG [review-service, ... : Return calculated processing time: 14 ms
...
As seen when playing with the circuit breaker in the previous blog post you can change the response time for our services with properties:
service:
  defaultMinMs: 6000
  defaultMaxMs: 6000
The code to enable realtime updates of these properties looks like:
(see blog-microservices/util/src/main/java/se/callista/microservices/util/SetProcTimeBean.java)
@RefreshScope
@Component
public class SetProcTimeBean {

    @Value("${service.defaultMinMs:0}")
    public void setMinMs(int minMs) {
        LOG.info("Set min response time to {} ms.", Integer.valueOf(minMs));
        this.minMs = minMs;
    }

    @Value("${service.defaultMaxMs:0}")
    public void setMaxMs(int maxMs) {
        LOG.info("Set max response time to {} ms.", Integer.valueOf(maxMs));
        this.maxMs = maxMs;
    }
I.e. a Spring Bean that is annotated with @RefreshScope and a couple setter-methods that are annotated with @Value(...).
Well, that’s it!
It might look a bit overwhelming at a first glance. But when you get used to it I hope you will find it as convenient to work with as I did!
Next up in the blog series - Building Microservices is centralised logging and a pre-req for doing centralised logging, handling correlation ids, stay tuned…