Blogg
Här finns tekniska artiklar, presentationer och nyheter om arkitektur och systemutveckling. Håll dig uppdaterad, följ oss på LinkedIn
Här finns tekniska artiklar, presentationer och nyheter om arkitektur och systemutveckling. Håll dig uppdaterad, följ oss på LinkedIn

According to my colleges that work with frontend technologies many of our customers have today started to use HTML5 to build single page web apps but most of them have not yet switched from old school HTTP to WebSockets when it comes to communicating with backend server applications.
WebSockets simplifies much of the complexity in HTTP for bi-directional communication required by single page web apps. With its support for full duplex communication over a single socket it enables both client initiated request/response and server initiated push or publish/subscribe in a natural and simple way. Added to this the WebSocket protocol have a much lower overhead compared to the HTTP protocol resulting in lower latency. With its support for full duplex and low latency communication WebSocket opens up for true realtime communication, not feasible with HTTP.
With the growing support for WebSocket in web browsers it is now becoming more and more interesting to look into how to start to use WebSocket instead of HTTP.
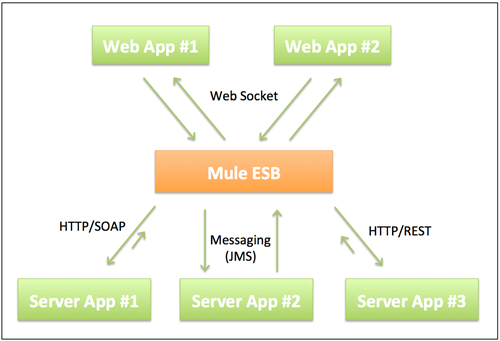
In a previous blog post we covered how WebSocket communication can be established with a number of servers using an intermediate integration platform, Mule ESB, like:
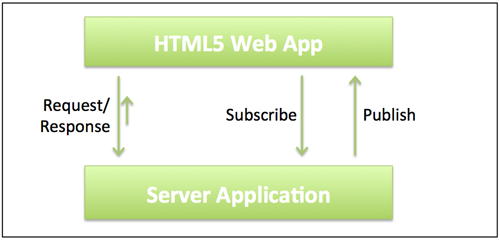
In this blog we will focus on the case where we (at least for the time being) don’t want to invest in a WebSocket enabled integration platform or ESB but just want to WebSocket-enable a single Java based server application:
The blog is divided in the following sections:
Requirements for the scope of this blog entry are:
Web apps must be able to send requests asynchronously allowing the user to do other things while the server process the request and also allow the server to send information to the web app without the web app asking for it in advance. To support remote mobile devices with potential limited bandwidth it is also important that the communication have minimal overhead built into the protocol to be able to communicate in realtime.
Added to the traditional request/response model we also want to be able to notify users as soon as any interesting happens on the server side without having to wait for polling solutions or forcing the user to refresh the user interface to see if any interesting have happened since the previous refresh…
Exposing enterprise applications to large user groups on their mobile devices is expected to raise requirements of handling much larger numbers of concurrent users on the server side then before.
Given that we don’t want to bring in a full fledged integration platform or ESB in between the server and its clients we need to ensure that the server application itself can be enhanced with communication capabilities that meets the requirements above without draining the server hardware or requiring extra server processes to be setup, managed and monitored separately from the application itself. Otherwise, in the end, that could easily lead to a solution that is equally complex as introducing a separate integration platform!
Added to these requirements we have defined the following constraints:
Target application technology on the client side are HTML5 based single page web applications.
It could actually be any type of WebSocket enabled technology on the client side, such as native iOS or Android apps, but we have limited this blog to HTML5 web apps.
Server applications are expected to be based on Java SE. It should however be very interesting to cover other alternatives, such as node.js, in a future blog.
Historically HTTP has been used with various success to meet these requirements, e.g. using AJAX, Reverse AJAX and Comet technologies. But HTTP was never designed for this purpose, HTTP is based on a half-duplex model initially targeted for fetching documents and added to that with a substantial communication overhead. WebSocket on the other hand is explicitly designed for full duplex communication with a very low overhead enabling realtime communication even over wireless connections with very limited bandwidth. WebSocket is clearly the technology for the future to meet this requirement!
Decision #1: Use WebSocket for realtime full duplex communication.
WebSocket, with its fully asynchronous and duplex communication over a single socket, however neither understand nor support message exchange patterns such as request/response or publish/subscribe. An asynchronous version of the request/response model is however very simple to implement using WebSocket. One concern could be how to correlate incoming responses on the client side to the originating requests in the case where more than one request can submitted concurrently from one and the same client. Using some kind of correlation id in the message payload however solves the problem in most cases.
When it comes to the publish/subscribe model it becomes tricker since WebSocket have no understanding of critical concepts such as subscribers, publishers and topics. We clearly need a protocol on top of the WebSocket protocol to handle publish/subscribe!
A good thing is that WebSocket is prepared for these types of extensions with its support for subprotocols. Clients and servers can agree upon use of subprotocols during the connection phase (see the WebSocket API). Even tough we here have the opportunity to create our own publish/subscribe subprotocol we prefer to use something already existing and well established!
Commonly used open (i.e. not proprietary and vendor locked in) protocols for messaging are AMQP, STOMP and MQTT (Facebook is for example using MQTT in its Facebook Messenger application). Both STOMP and MQTT are available as subprotocols of WebSockets so lets focus on these two. STOMP is a simple text oriented messaging protocol (giving it its name) while MQTT is a more advanced binary protocol with more features and potentially higher performance due to its binary nature. Which one to prefer is hard to say and will depend on case specific requirements, STOMP being very simple and easy to learn while MQTT being more functional and potentially better performing but with a steeper learning curve. Let’s look into both!
Decision #2: Complement the WebSocket protocol with the subprotocols STOMP and MQTT to support the publish/subscribe model.
When it comes to handling large number of users, e.g. thousands of concurrently connected user, it has historically been quite complex requiring lots of server hardware and carefully configured communication software. This is mostly depending on the fact that a blocking I/O model was used, locking a separate thread per connection or request. This quickly drain the server hardware resources when the number of concurrent requests rises. A much better approach to handle large number of concurrent users are a non blocking I/O model allowing one thread to handle many concurrent requests. For more background information see the C10K problem.
The Java Runtime Environment supports non blocking I/O since J2SE 1.4 with a library called “New I/O” or “NIO”, later enhanced in Java SE 7 with “NIO.2”. But we also need a framework on top of it that handles WebSocket based on Java NIO.
Decision #3: Base server solution on Java NIO.
As described above we don’t want to bring in a complex and resource demanding solution on the server side. In that case we actually should take the integration platform/ESB path from the start enabling other server applications to benefit from it as well.
A number of Java based web servers and frameworks with support for WebSockets exists today. The two most widely used in my mind are the open source projects Jetty and Netty, both with support for non blocking I/O (using Java NIO) and both having a good track record and an active user community. Jetty being a full blown web server and servlet-container (+ much more) and Netty a lightweight framework optimized for supporting development of asynchronous event-driven network applications. For the purpose of this blog, i.e. setting up a embeddable lightweight but highly scalable Java server for asynchronous WebSocket communication, Netty became a natural choice.
Netty supports however neither of the messaging protocols STOMP and MQTT. Seems like we need a messaging product to complement Netty for the publish/subscribe part!
Apache ActiveMQ is on of the major Java based open source messaging product and it has support for both STOMP and MQTT over WebSockets (including Javascript API’s) so it seems like a good candidate for this blog. ActiveMQ are in most cases used as a full blown JMS Messaging Server (not so much lightweight) but it can be configured for a very slimmed down execution where it runs embedded inside a server application using the internal VM protocol instead of TCP. If not required you can also disable resource demanding features such as transactions, persistent messages and durable subscribers to make the configuration even more lightweight.
Decision #4: Use Netty and ActiveMQ as embeddable frameworks in the server application.
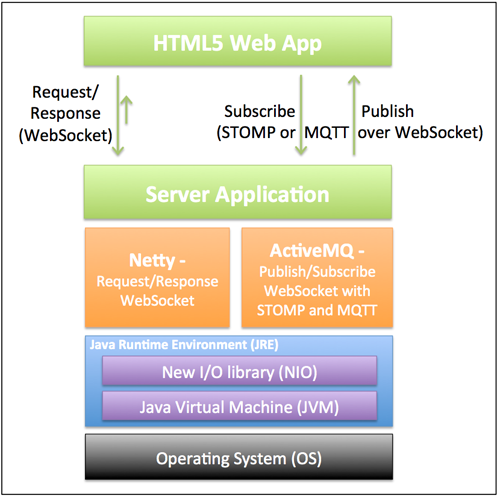
This leads to the following architecture:
Well, that was a lot of theory! Let’s look into some code examples of how this can be implemented instead.
The full source code is available at github: https://github.com/callistaenterprise/websocket-labs/tree/master/ws-one.
The source code uses Maven as build tool so to get the code and build it simply perform:
$ git clone https://github.com/callistaenterprise/websocket-labs.git
$ cd websocket-labs/ws-one/
$ git checkout -b my-branch ws-one-1.0.1
$ mvn package
After the Maven build is done a server application based on Java Service Wrapper is created under the folder target/generated-resources/appassembler/jsw/ws-one-server.
If you want to run the server application in the development environment without running it as a Java Service Wrapper simply perform:
$ mvn -Pserver
After the server application print out a log message like:
2013-08-09 07:18:10,193 | INFO | websocketlabs.wsone.http.file.HttpStaticFileServer | WS-One: - Developent URL: http://localhost:8081/target/classes/web/index.html
…you can visit the url http://localhost:8081/target/classes/web/index.html in a WebWocket enabled web browser to see the web client. Try to send requests with the commands status, on and off. More about what happens in response to these requests is explained below, so read on!
The server application is based on a simple Main-class demonstrating how Netty and ActiveMQ can be embedded in an existing Java application. The Main-class also creates a JMS publisher for the server application to use whenever it wants to push information to the WebSocket clients over STOMP and MQTT. Finally the Main-class also use Netty to provide a HTTP based static file server to host the HTML and Javascript files used by the web app (in real life this typically should be handled by a dedicated web server like Apache or Nginx).
// Start embedded ActiveMQ broker with vm and ws-transports
runActiveMQBroker();

// Initiate a publisher
Publisher publisher = new Publisher();

// Start Web Socket server
runWebSocketServer(publisher);

// Start HTTP Static File server
runHttpStaticFileServer();
Initiating ActiveMQ with VM-transport for internal communication and WebSocket for external communication is as simple as:
public static void runActiveMQBroker() throws Exception {
  BrokerService broker = new BrokerService();

  // configure the broker
  broker.addConnector("ws://0.0.0.0:61614");

  // start the broker
  broker.start();
}
Note #1: We don’t need to initiate the VM-transport, it is enabled by default.
Note #2: Support for STOMP and MQTT over WebSocket comes out of the box with the WebSocket - transport.
Initiating Netty is a bit more involved compared to ActiveMQ but follows a standard pattern that is very simple to reuse:
public void runWebSocketServer(final Publisher publisher) throws Exception {

  EventLoopGroup bossGroup = new NioEventLoopGroup();
  EventLoopGroup workerGroup = new NioEventLoopGroup();
  ServerBootstrap sb = new ServerBootstrap();
  sb.group(bossGroup, workerGroup)
    .channel(NioServerSocketChannel.class)
    .childHandler(new ChannelInitializer<SocketChannel>() {
    @Override
    public void initChannel(final SocketChannel ch) throws Exception {
      ch.pipeline().addLast(
        new HttpRequestDecoder(),
        new HttpObjectAggregator(65536),
        new HttpResponseEncoder(),
        new WebSocketServerProtocolHandler(DEFAULT_WEBSOCKET_BASE_URI),
        new CustomTextFrameHandler(publisher));
    }
  });

  final Channel ch = sb.bind(ws_port).sync().channel();
  LOG.info("WS-One: Web socket server started at port " + ws_port);
}
channel(NioServerSocketChannel.class) creates a Java NIO based channel.new WebSocketServerProtocolHandler(DEFAULT_WEBSOCKET_BASE_URI) initiates WebSocket on the Java NIO based channel.new CustomTextFrameHandler(publisher) adds an application specific request handler.The CustomTextFrameHandler-class picks up a WebSocket request as a string and hands it over to a request handler method, requestHandler(), that that is totally unaware of Netty. The request handler returns the response as a string and CustomTextFrameHandler-class writes the response back to the WebSocket client:
public class CustomTextFrameHandler extends SimpleChannelInboundHandler<TextWebSocketFrame> {

  @Override
  public void messageReceived(ChannelHandlerContext ctx, TextWebSocketFrame frame) throws Exception {
    String request = frame.text();
    String response = requestHandler(request);
    ctx.channel().write(new TextWebSocketFrame(response));
  }

  public String requestHandler(String request) {
    ...
  }
}
Note: We also clearly need some mechanism for configuration, like dependency injection in Spring Framework, to separate the application logic in the request handler from the Netty-plumbing seen above but that has not been addressed in this blog.
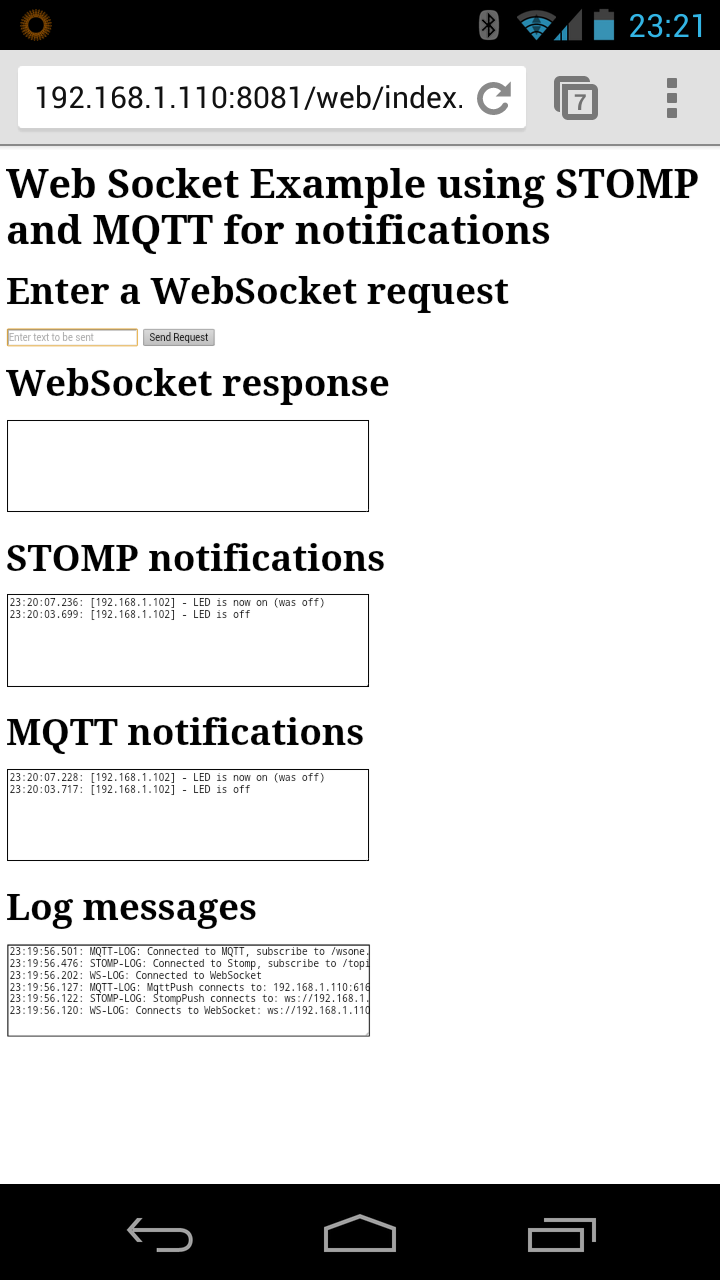
The client is a HTML5 based web app (as simple as possible). It has an input field for text based WebSocket requests and a number of read-only text areas for displaying:
Note: This test web app subscribes using both STOMP and MQTT, a real world web app of course use only one of the subprotocols.
After initialization the web page looks like:
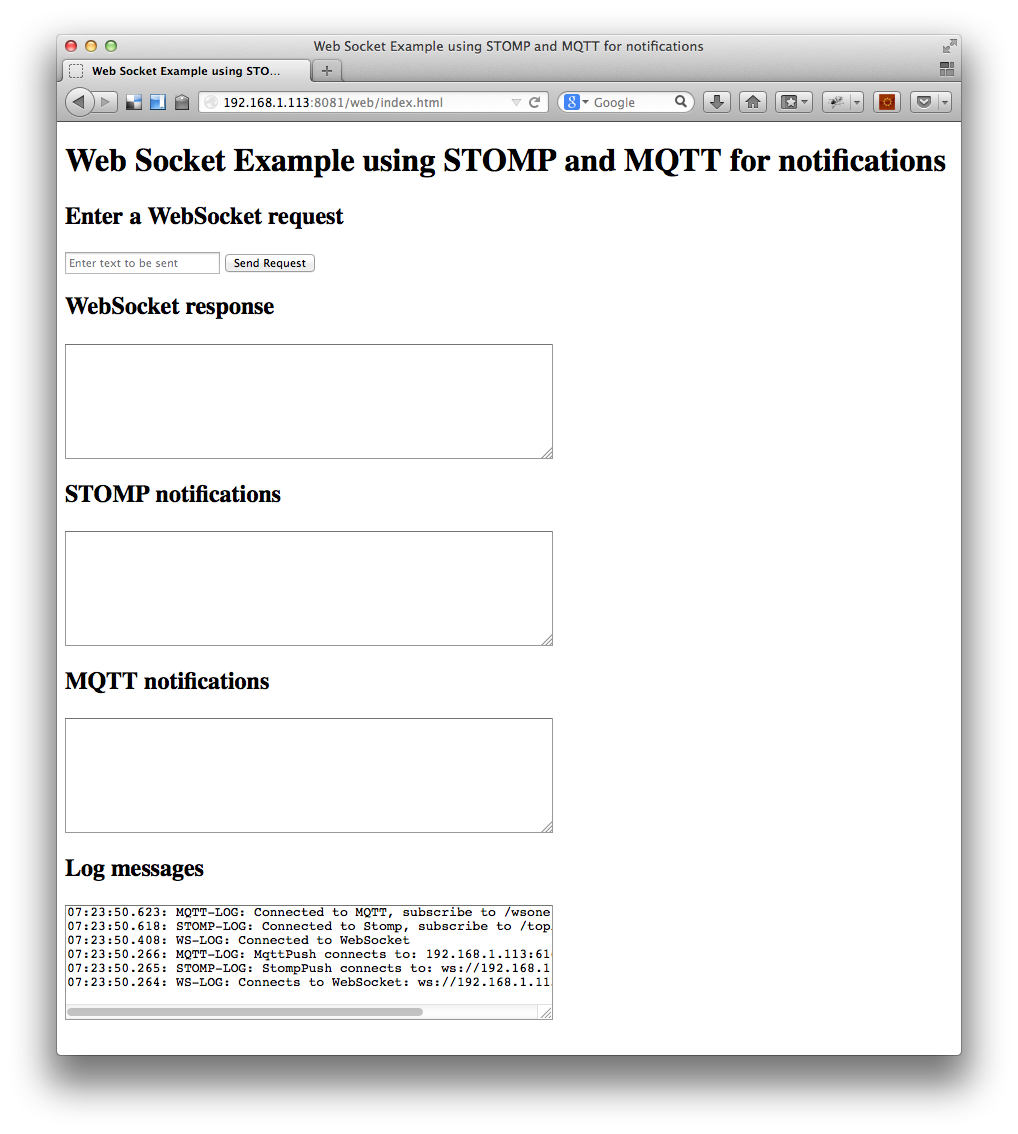
In the Log messages test area you can see how the communication is initiated for a WebSocket and adding a subscriber using both STOMP and MQTT.
The HTML page only contains layout:
<!DOCTYPE html>
<html lang="en">
  <head>
    <meta charset="utf-8">
    <title>Web Socket Example using STOMP and MQTT for notifications</title>
    <script src="js/stomp.js"></script>
    <script src="js/stomp_push.js"></script>
    <script src="js/mqttws31.js"></script>
    <script src="js/mqtt_push.js"></script>
    <script src="js/websocket.js"></script>
    <script src="js/app.js"></script>
  </head>
  <body>
    <h1>Web Socket Example using STOMP and MQTT for notifications</h1>

    <h2>Enter a WebSocket request</h2>
    <form name="inputform">
      <input type="text" name="message" id="message" placeholder="Enter text to be sent" autofocus>
      <input type="submit" value="Send Request">
    </form>

    <h2>WebSocket response</h2>
    <textarea id="responseText" wrap="off" rows="7" cols="60" readonly></textarea>

    <h2>STOMP notifications</h2>
    <textarea id="stompNotification" wrap="off" rows="7" cols="60" readonly></textarea>

    <h2>MQTT notifications</h2>
    <textarea id="mqttNotification"  wrap="off" rows="7" cols="60" readonly></textarea>

    <h2>Log messages</h2>
    <textarea id="debug" wrap="off" rows="7" cols="60" readonly></textarea>
  </body>
</html>
The Javascript code is separated in a number of source files where app.js initiate the web app and the other three source files handles the communication, one source file per protocol:
(function() {
  var App = function() {
    var socket;

    if (!window.WebSocket) {
      window.WebSocket = window.MozWebSocket;
    }

    if (window.WebSocket) {
      var hostname = location.hostname
      socket = new Sock("ws://" + hostname + ":8080/websocket", appendWebSocketTextArea, appendDebugTextArea);
      new StompPush("ws://" + hostname + ":61614/stomp", "/topic/wsone.notify", appendStompNotificationTextArea, appendDebugTextArea);
      new MqttPush(hostname, "61614", "/wsone.notify", appendMqttNotificationTextArea, appendDebugTextArea);

    } else {
      alert("Your browser does not support Web Socket.");
    }

    function send(event) {
      socket.send(event);
    }
    document.forms.inputform.addEventListener('submit', send, false);

    function appendWebSocketTextArea(newData) {
      appendTextArea(newData, 'responseText');
    }

    function appendStompNotificationTextArea(newData) {
      appendTextArea(newData, 'stompNotification');
    }

    function appendMqttNotificationTextArea(newData) {
      appendTextArea(newData, 'mqttNotification');
    }

    function appendDebugTextArea(newData) {
      appendTextArea(newData, 'debug');
    }

    function appendTextArea(newData, textAreaName) {
      var el = document.getElementById(textAreaName);
      el.value = getTs() + ": " + newData + '\n' + el.value;
    }

    function getTs() {

      var ts = new Date();

      var h = ts.getHours();
      if (h < 10) h = '0' + h;

      var m = ts.getMinutes();
      if (m < 10) m = '0' + m;

      var s = ts.getSeconds();
      if (s < 10) s = '0' + s;

      var ms = ts.getMilliseconds();
      if (ms < 10) {
        ms = '00' + ms;
      } else if (ms < 100) {
        ms = '0' + ms;
      }

      return h + ":" + m + ":" + s + "." + ms;
    }
  }
  window.addEventListener('load', function() { new App(); }, false);
})();
function Sock (url, displayMessage, displayLog) {
  var socket;

  // this allows to display logs directly on the web page
  var log = function(str) {
    displayLog("WS-LOG: " + str);
  };
  var logError = function(str) {
    displayLog("WS-ERROR: " + str);
  };

  log("Connects to WebSocket: " + url);

  socket = new WebSocket(url);
  socket.onopen = onopen;
  socket.onmessage = onmessage;
  socket.onclose = onclose;
  socket.onerror = onerror;

  function onopen(event) {
    log("Connected to WebSocket");
  }
  function onmessage(event) {
    displayMessage(event.data);
  }
  function onclose(event) {
    log("Web Socket closed");
  }
  function onerror(event) {
    logError("ERROR: Web Socket problem: data = " + event.data + ", name = " + event.name + ", message = " + event.message);
  }

  this.send = function(event) {
    log("Send Web Socket Request");
    event.preventDefault();
    if (window.WebSocket) {
      if (socket.readyState == WebSocket.OPEN) {
        socket.send(event.target.message.value);
      } else {
        alert("The socket is not open.");
      }
    }
  }
}
function StompPush (url, topic, displayMessage, displayLog) {
  var client;

  // this allows to display logs directly on the web page
  var log = function(str) {
    displayLog("STOMP-LOG: " + str);
  };
  var logError = function(str) {
    displayLog("STOMP-ERROR: " + str);
  };

  // the client is notified when it is connected to the server.
  var onconnect = function(frame) {
    log("Connected to Stomp, subscribe to " + topic)

    client.subscribe(topic, function(message) {
      displayMessage(message.body);
    });
  };

  log("StompPush connects to: " + url);
  client = Stomp.client(url);

  client.debug = function(str) {
// log(str);
  };

  client.connect("", "", onconnect);
}
function MqttPush (host, port, topic, displayMessage, displayLog) {
  var client;

  // this allows to display logs directly on the web page
  var log = function(str) {
    displayLog("MQTT-LOG: " + str);
  };
  var logError = function(str) {
    displayLog("MQTT-ERROR: " + str);
  };

  // the client is notified when it is connected to the server.
  var onConnect = function(frame) {
    log("Connected to MQTT, subscribe to " + topic);
    client.subscribe(topic);
  };

  var onMessageArrived = function(message) {
    displayMessage(message.payloadString)
  };

  var onConnectionLost = function(responseObject) {
    if (responseObject.errorCode !== 0) {
      logError(client.clientId + ", Error code: " + responseObject.errorCode);
    } else {
      logError(client.clientId + ", Unknown Error");
    }
  };

  var onFailure = function(failure) {
    logError("Failure: " + failure.errorMessage);
  };

  var clientId = generateClientId();

  log("MqttPush connects to: " + host + ":" + port + " (" + clientId + ")");

  client = new Messaging.Client(host, Number(port), clientId);

  client.onConnect = onConnect;
  client.onMessageArrived = onMessageArrived;
  client.onConnectionLost = onConnectionLost;

  client.connect({onSuccess:onConnect, onFailure:onFailure});

  function generateClientId() {
    return Math.floor((1 + Math.random()) * 0x10000000000).toString(16).substring(1);
  }
}
That’s all the code we need to write!
Let’s deploy it to a small server (the smaller the better) to prove that the Java server solution really is lightweight!
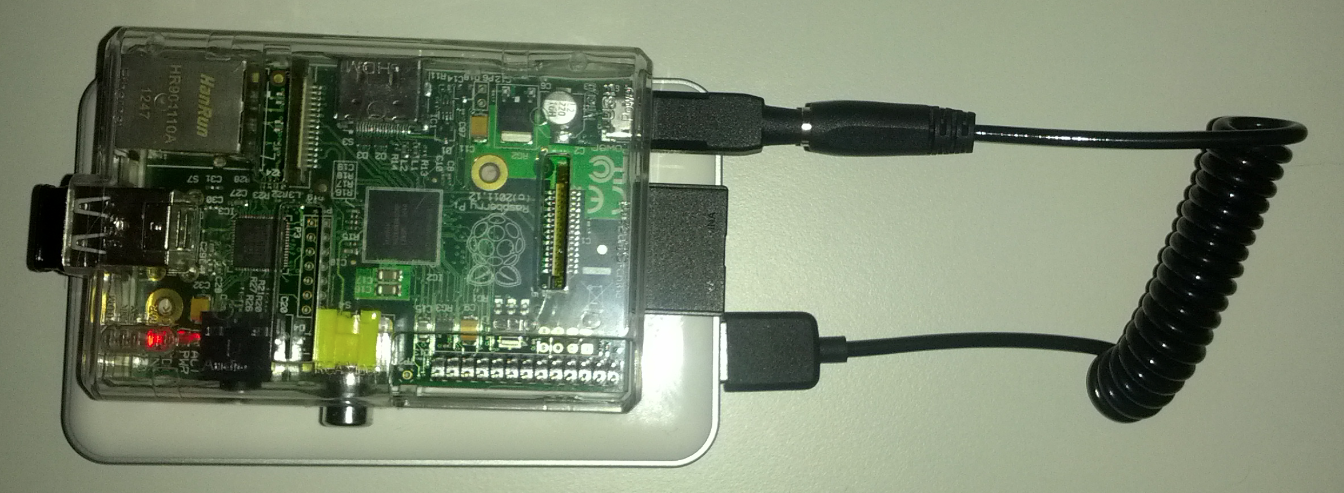
The smallest server I can think of is the Raspberry Pi, a credit card sized computer at $35!
It is equipped with a single core 700 MHz 32 bit Arm processor, 512 MB memory and a SD card as disk device, i.e. it has hardware equivalent of a simple entry level smartphone. If our Java server runs on this tiny little server it has to be lightweight!
In the photo below we can see my Raspberry Pi (equipped with a WiFi adapter to the left and a SD-card to the right) on top of its battery pack, powered up and waiting for something useful to do…
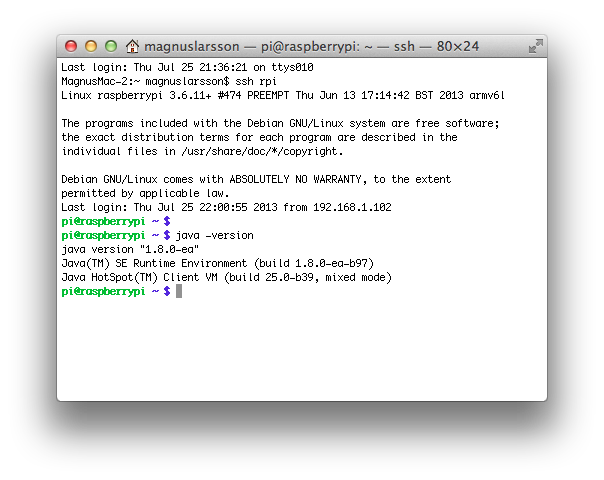
My Raspberry Pi runs Raspbian, a Linux Debian dialect optimized for the Raspberry Pi hardware, with Oracle’s Java SE. Logging in to it over SSH reveals the following version information:
Ok, so now we need a Java server application that can perform some useful work that we can control via WebSocket commands and monitor via WebSocket notifications. The Raspberry Pi comes with a set of GPIO pins that can be use for various thing, the easiest one probably controlling a LED light. So I wrote a very simple Java application that controls a LED light exposing three commands over a WebSocket: on, off and status. Each time a command is executed the result returned to the caller is also notified over WebSocket to connected STOMP and MQTT subscribers.
Note: When the Java application runs on a non Raspberry Pi hardware (e.g. a PC or a Mac) the implementation of the commands are handled by a stub that only maintain the state (on/off) of the, in this case, imaginary LED light making it possible to run the server application on other hardware than a Raspberry Pi.
The source code for the request handler looks like:
public String requestHandler(String clientHost, String request) {
  String response = null;
  try {
    String req = request.trim().toLowerCase();

    String currentLedStatus = getLedStatus();

    switch (req) {
    case "status":
      response = "LED is " + currentLedStatus;
      break;

    case "on":
    case "off":
      rpi.setLedOn(req.equals("on"));
      response = "LED is now " + getLedStatus() + " (was " + currentLedStatus + ")";
      break;

    default:
      response = "ERROR. Unknown command: \"" + request + "\", Usage: \"status|on|off\"";
      break;
    }
  } catch (Exception ex) {
    response = "ERROR. Failed to process command: \"" + request + "\". See log for error: " + ex.getMessage();
    ex.printStackTrace();
  }

  publisher.publish("[" + clientHost + "] - " + response);

  return response;
}

private String getLedStatus() {
  return (rpi.isLedOn()) ? "on" : "off";
}
Using the web app above to send the commands status and on results in the following output on the HTML page:
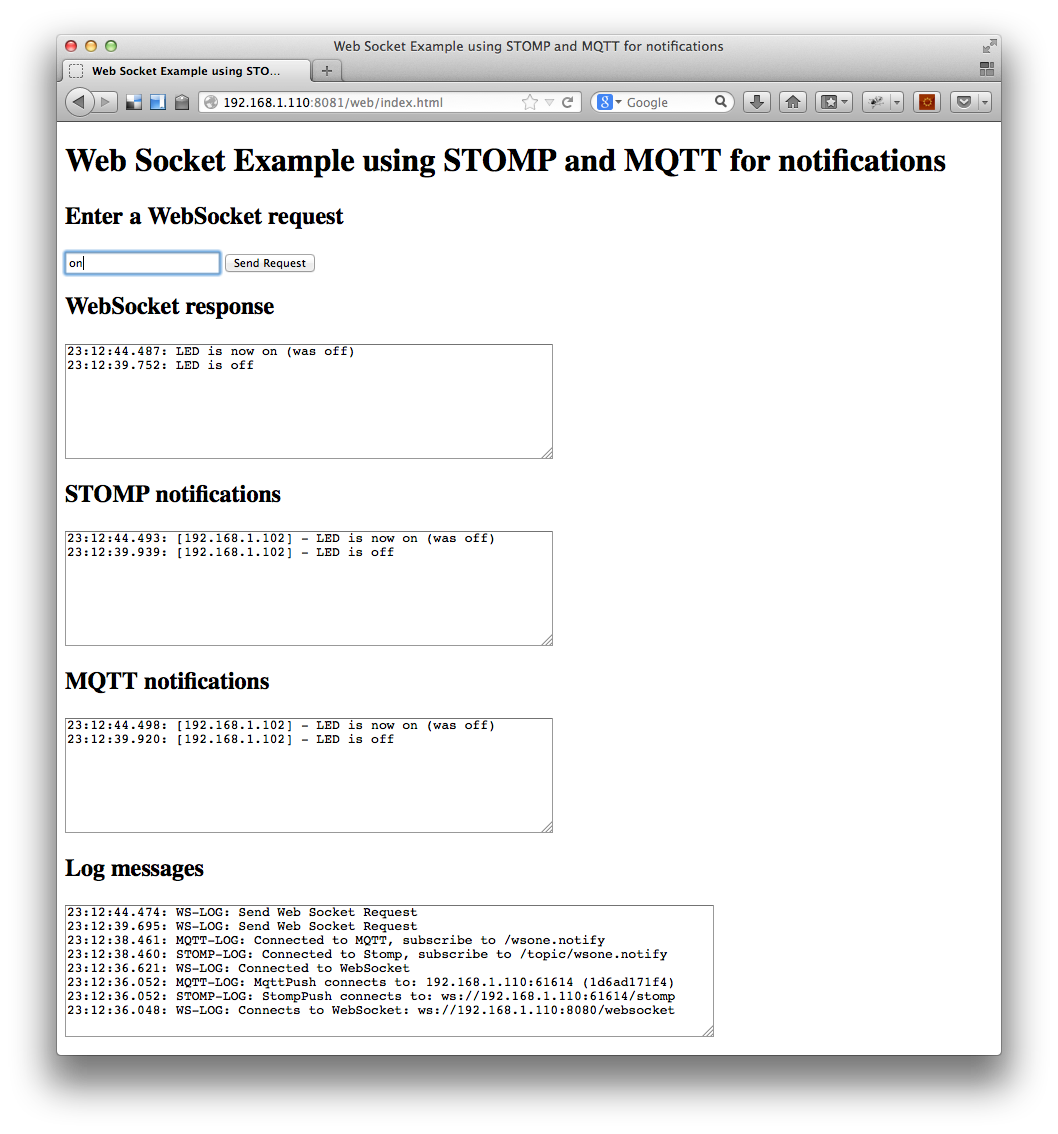
Note: messages are written in reverse order to the text areas to always have the latest message in the top of each text area.
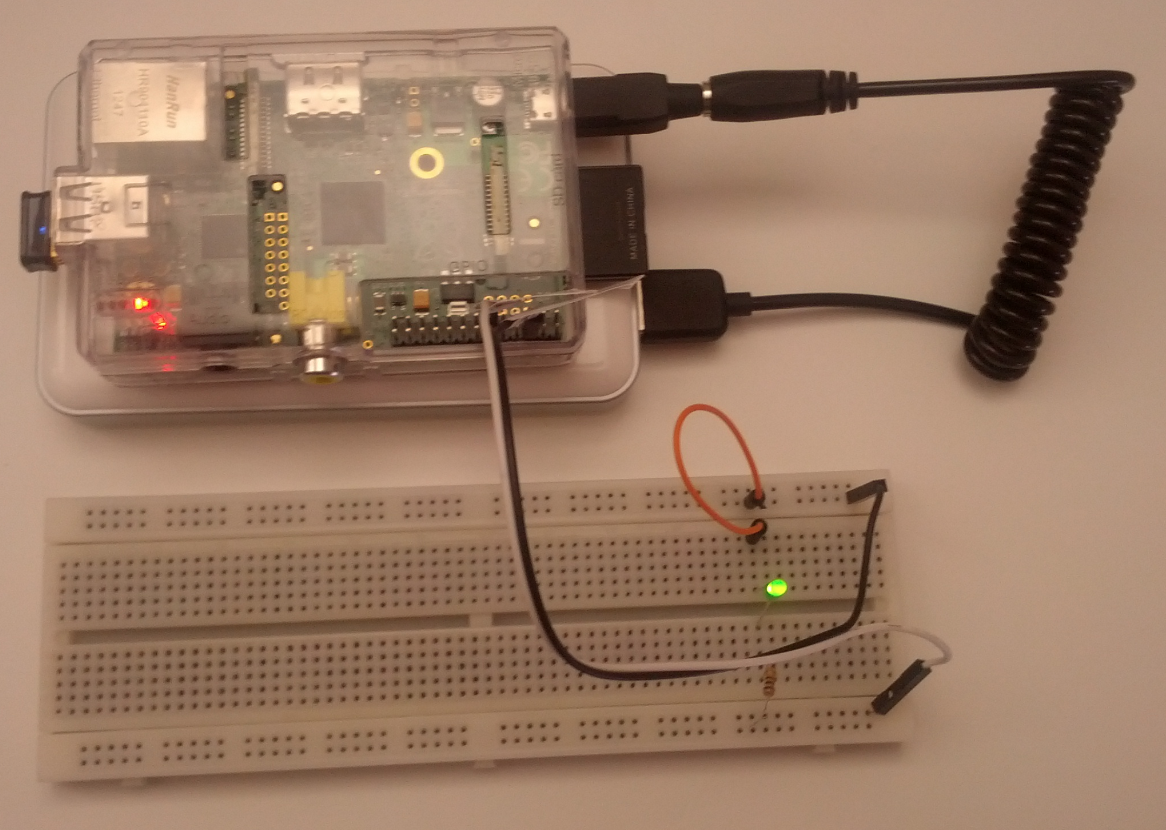
…and of course the LED light (green) is turned on:
As you can see from the log messages in the HTML page the server application response to the last on - command in 13 ms (response timestamp (23:12:44.487) - request timestemp (23:12:44.474)) and the two notifications (over STOMP and MQTT) are received 19 ms and 24 ms after the request was sent.
That is what I call realtime responses (at least in world or web browsers)!
Coming from a $35 server indicates that our solution indeed is lightweight!
Monitoring the server application from another device (an Android mobile in this example) shows how it is notified in realtime (sorry about the small font size):
Finally lets take a quick look using JConsole of what resources the server app requires:
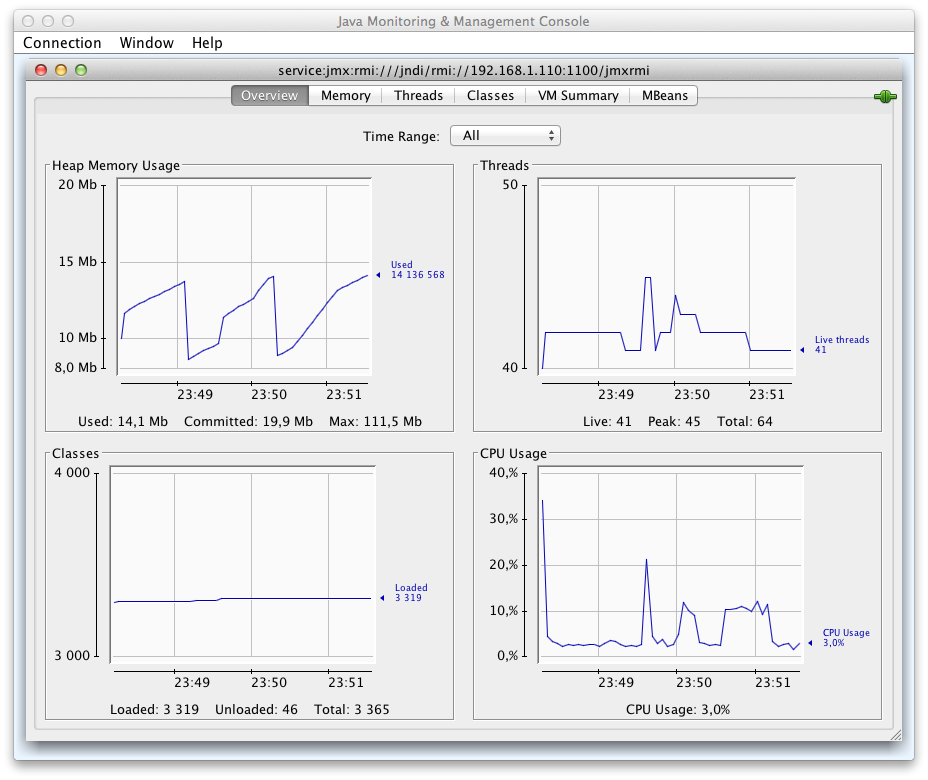
I tried to put some manual load on the server application sending 4 reqs/sec and as you can see above the heap size is never exceeding 15 Mb, that is again what I call lightweight!
The CPU was working at 10% during my minimal 4 reqs/sec load test (after all, it’s only a single core 700 MHz Arm processor).
Now it should be very interesting to take on an appropriate load test tool and perform some serious scalability tests with a couple of thousands connected test clients but I have to leave that exercise to a follow up blog.
In this blog we have demonstrated how popular Java based open source products such as Netty and ActiveMQ can be embedded in an existing server application to enable it for full duplex communicating with modern HTML5 web apps using WebSocket, both for client initiated request/response and server initiated publish/subscribe. To support publish/subscribe over WebSocket we however need to use a protocol on top of WebSocket such as STOMP or MQTT as demonstrated. The proposed solution is straightforward to implement and provides a lightweight solution with low latency enabling realtime communication. The solution is based on the Java SE library for non blocking I/O, “New I/O”, that provides capabilities for handling large numbers of concurrently connected clients. An actual test that demonstrates the scalability capabilities of this solution however has to be left for a follow up blog.
There are a number of interesting follow up questions worth their own blog posts in the future:
So stay tuned for follow up blog entries on these subjects!