Blogg
Här finns tekniska artiklar, presentationer och nyheter om arkitektur och systemutveckling. Håll dig uppdaterad, följ oss på LinkedIn
Här finns tekniska artiklar, presentationer och nyheter om arkitektur och systemutveckling. Håll dig uppdaterad, följ oss på LinkedIn

Gradle is a build tool that tries to combine the best of Maven and Ant and at the same time replace the verbose XML syntax in these tools with a compact and easy to understand Groovy based DSL. Gradle supports Mavens default project structure, dependency management mechanism and repository infrastructure making a replacement fairly straight forward, please read the excellent documentation for more information.
Some large open source projects already have migrated to Gradle: the Grails project replaced Ant back in 2010, last year Google decided to replace their existing build system for the Android SDK, Netflix seems to use Gradle for its massive open source portfolio and now (since the Spring 4.0 release) all guides on spring.io contains both build scripts for Maven and Gradle. Seems like there is a momentum building up for Gradle…
Recently I was involved in a project where one of the deliverables was a small Android demo app and we decided to give Gradle a try to replace the Maven scripts we usually struggle with. The result looked very promising (even though not covering every aspect of a large enterprise project requirements on a build system). This blog is based on the experiences from this project and describes how you can develop a minimal Android app and use Gradle as a build system not only for building the deployable apk-file but also deploy it on an Android device. The blog also briefly demonstrates the tight integration between Gradle and the new upcoming IntelliJ based Android Studio IDE.
If you want to check out the code sample and deploy it to your own Android device you need to have Java SE 7 and Git installed (an Android device, mobile or tablet, is also useful if you want to try out the result in the end). Then perform:
$ git clone git@github.com:callistaenterprise/blog-a-first-look-at-gradle.git
$ cd blog-a-first-look-at-gradle/android-gradle-one
$ tree
This should result in a tree structure containing nine files, five related to Gradle and four related to the Android app itself:
├── build.gradle
├── gradle
│   └── wrapper
│       ├── gradle-wrapper.jar
│       └── gradle-wrapper.properties
├── gradlew
├── gradlew.bat
└── src
    └── main
    ├── AndroidManifest.xml
    ├── java
    │   └── se
    │       └── callista
    │           └── datecalculator
    │               └── DateCalculatorActivity.java
    └── res
        ├── layout
        │   └── date_calculator_layout.xml
        └── values
        └── strings.xml
For this blog I have developed the simplest possible Android app I could think of that is one level above a “Hello world!” example.
I decided to try out the brand new Date and Time API in Java SE 8 by calculating the date of a given number of days from today. According to the spec this should now be able to be calculated as simply as:
LocalDate.now().plusDays(days);
One problem with this is of course that the Android SDK is based on Java SE 7 :-(. But since the new Date and Time API is based on an already existing open source project, Joda-Time, this can easily be solved by adding a dependency to Joda-Time in my build file.
The user interface is based on a layout with an input field for the number of days, a button for performing the calculation and an output field for the result. Something like:

The source code for this Android app is very simple:
This is a standardized manifest file that declares to the Android OS how the app works. For this minimal app it declares:
package="se.callista.datecalculator")minSdkVersion="8")<activity android:name=".DateCalculatorActivity")<?xml version="1.0" encoding="utf-8"?>
<manifest xmlns:android="http://schemas.android.com/apk/res/android"
package="se.callista.datecalculator"
android:versionCode="1"
android:versionName="1.0.0" >
<uses-sdk android:minSdkVersion="8" android:targetSdkVersion="17" />
<application android:label="@string/app_name">
<activity android:name=".DateCalculatorActivity"
android:label="@string/app_name" >
<intent-filter>
<action android:name="android.intent.action.MAIN" />
<category android:name="android.intent.category.LAUNCHER" />
</intent-filter>
</activity>
</application>
</manifest>
This is the core part of the app:
package se.callista.datecalculator;

import android.app.Activity;
import android.os.Bundle;
import android.util.Log;
import android.view.View;
import android.widget.Button;
import android.widget.EditText;

import org.joda.time.LocalDate;

public class DateCalculatorActivity extends Activity {

  private final String TAG = this.getClass().getName();

  @Override
  public void onCreate(Bundle savedInstanceState) {
    super.onCreate(savedInstanceState);
    setContentView(R.layout.date_calculator_layout);

    final EditText inputField  = (EditText) findViewById(R.id.editText);
    final EditText resultField = (EditText) findViewById(R.id.editResult);

    Button button = (Button) findViewById(R.id.buttonCalculate);
    button.setOnClickListener(new View.OnClickListener() {

      public void onClick(View v) {
        String daysString = inputField.getText().toString();
        Log.d(TAG, "Days as string: " + daysString);

        try {
          int days = Integer.parseInt(daysString);
          Log.d(TAG, "Days: " + days);

          LocalDate now = LocalDate.now();
          String newDate = now.plusDays(days).toString("yyyy-MM-dd");
          Log.d(TAG, "New Date: " + newDate);

          resultField.setText(newDate + "\n(" + days + " days added to today's date, " + now + ")");
        } catch (NumberFormatException nfe) {
          Log.e(TAG, "Error parsing: " + daysString, nfe);
          resultField.setText("\"" + daysString + "\" is not an integer, try again!");
        }
      }
    });
  }
}
Holds a static layout of the user interface:
<?xml version="1.0" encoding="utf-8"?>
<LinearLayout xmlns:android="http://schemas.android.com/apk/res/android"
    android:orientation="vertical"
    android:layout_width="fill_parent"
    android:layout_height="fill_parent">

  <LinearLayout
      android:orientation="horizontal"
      android:layout_width="match_parent"
      android:layout_height="wrap_content">

    <TextView
        android:id="@+id/textInputLabel"
        android:layout_width="wrap_content"
        android:layout_height="wrap_content"
        android:text="Enter days from today: "
        android:layout_weight="0.1" />

    <EditText
        android:layout_width="wrap_content"
        android:layout_height="wrap_content"
        android:id="@+id/editText"
        android:layout_weight="1" />
  </LinearLayout>

  <Button
      android:id="@+id/buttonCalculate"
      android:layout_width="wrap_content"
      android:layout_height="wrap_content"
      android:text="Calculate" />

  <LinearLayout
      android:orientation="horizontal"
      android:layout_width="match_parent"
      android:layout_height="wrap_content">

    <TextView
        android:id="@+id/textResultLabel"
        android:layout_width="wrap_content"
        android:layout_height="wrap_content"
        android:text="Date: "
        android:layout_weight="0.1" />

    <EditText
        android:id="@+id/editResult"
        android:layout_width="wrap_content"
        android:layout_height="wrap_content"
        android:layout_weight="1"
        android:editable="true"
        android:enabled="true" />

  </LinearLayout>
</LinearLayout>
Finally a XML based file for string values when required:
<?xml version="1.0" encoding="utf-8"?>
<resources>
  <string name="app_name">Date calculator</string>
</resources>
Ok, so now we have an Android app, but how do we build it and deploy it?
Time for Gradle…
The Gradle build file, build.gradle, looks like:
buildscript {
  repositories {
    mavenCentral()
  }

  dependencies {
    classpath 'com.android.tools.build:gradle:0.7.+'
  }
}

apply plugin: 'android'

android {
  buildToolsVersion "19.0.3"
  compileSdkVersion 17
}

repositories {
  mavenCentral()
}

dependencies {
  compile("joda-time:joda-time:2.3")
}

task wrapper(type: Wrapper) {
  gradleVersion = '1.9'
}
buildscript directive. Gradle use this to find dependencies for the build script it self, e.g. plugins. In our case Gradle tooling for Android.apply directive.android properties that relates how the Android plugin should compile and build the apk-file.repositories and dependencies for our own source code. Here we can see that our code depends on joda-time v2.3 and that is should be downloaded from Maven Central Repository.task wrapperconstruct we are not used to in the Maven world. This is used to define what version of Gradle that should be used to execute the build script and also directs a Gradle wrapper (gradlew + a gradle - folder) that comes with the source code to automatically download the specified version of Gradle (if not already downloaded) before running the build script. This means that you don’t have to pre-install Gradle!This is something else then Maven’s bloated XML syntax, right?
If you still are in doubt then take some time to study the examples available at the guides on spring.io. There you can find both Gradle and Maven files for the same project, i.e. solving the same problems. Meaning that you can compare them head to head :-)
Ok, let’s take it out for a spin, shall we?
First warm up by asking what tasks it can process:
$ ./gradlew tasks
That’s useful information if you are new to Gradle, right?
Now let’s build the deployable apk-file:
$ ./gradlew build
You can now find the file in the build/apk - folder.
To deploy it to a Android test device simply attach it to your computer with a USB cable and give the command:
$ ./gradlew installDebug
The execution should end with something like:
:installDebug
3524 KB/s (395189 bytes in 0.109s)
 pkg: /data/local/tmp/android-gradle-one-debug-unaligned.apk
Success

BUILD SUCCESSFUL
Note: You Android device has to be in developer mode to accept installation of an app this way.
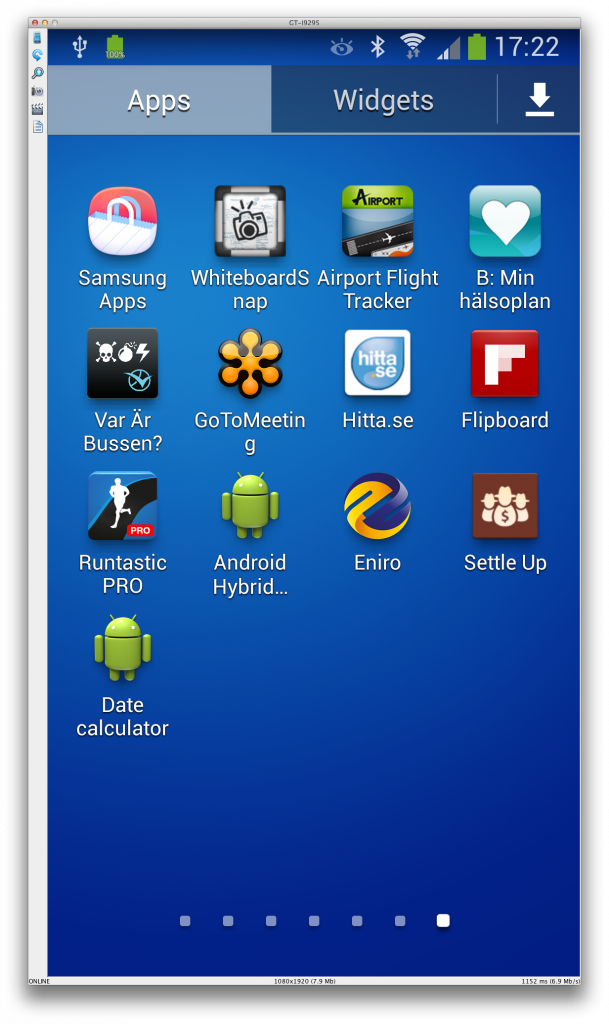
Head over to you Android device and look for the app. You should find it like:
Start it and you should see something similar to:

Fill in some number and hit the Calculate button:
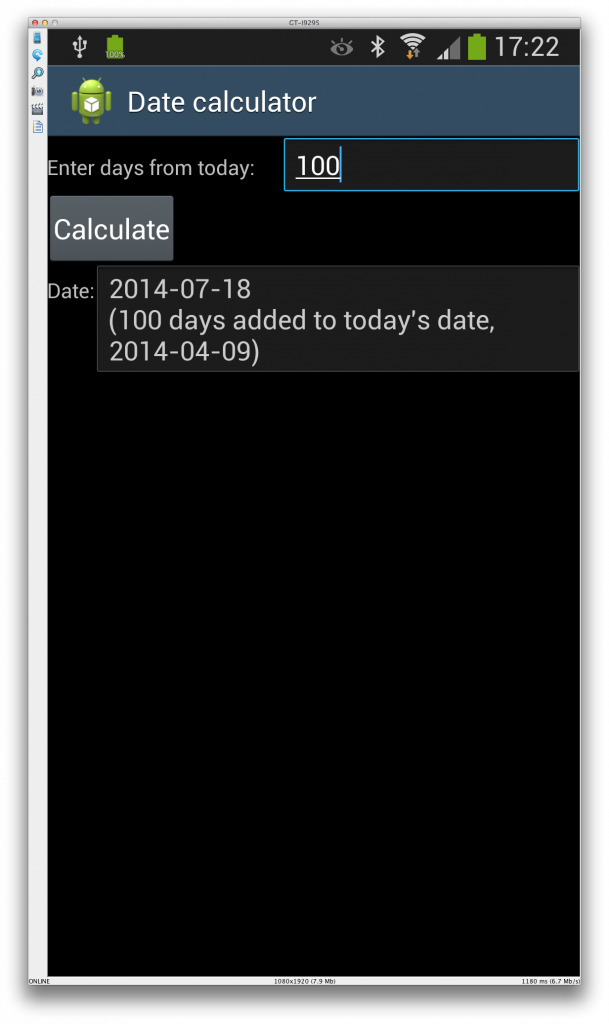
It works, Gradle successfully built and deployed the Android app!
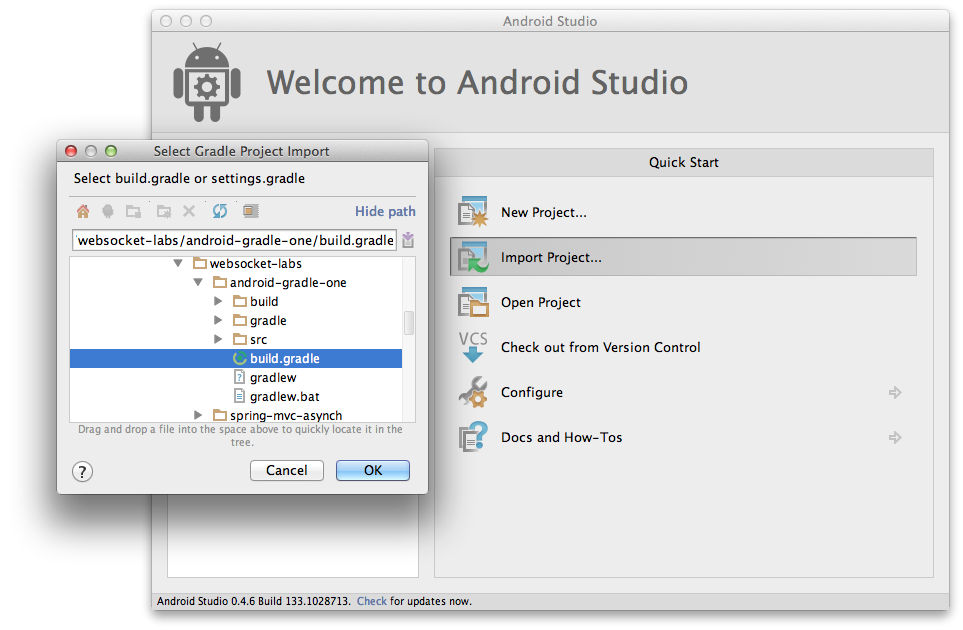
Let’s wrap up this introduction with a few words on IDE integration. Gradle comes (of course) with plugins for integration with popular IDE’s such as Eclipse and IntelliJ. Google provides prepackaged IDE’s for Android development. The current, Android SDK, is based Eclipse but a new IntelliJ based IDE, Android Studio, is under development. Android Studio supports Gradle natively out of the box. Just start its “import command” and point out your build.gradle file:
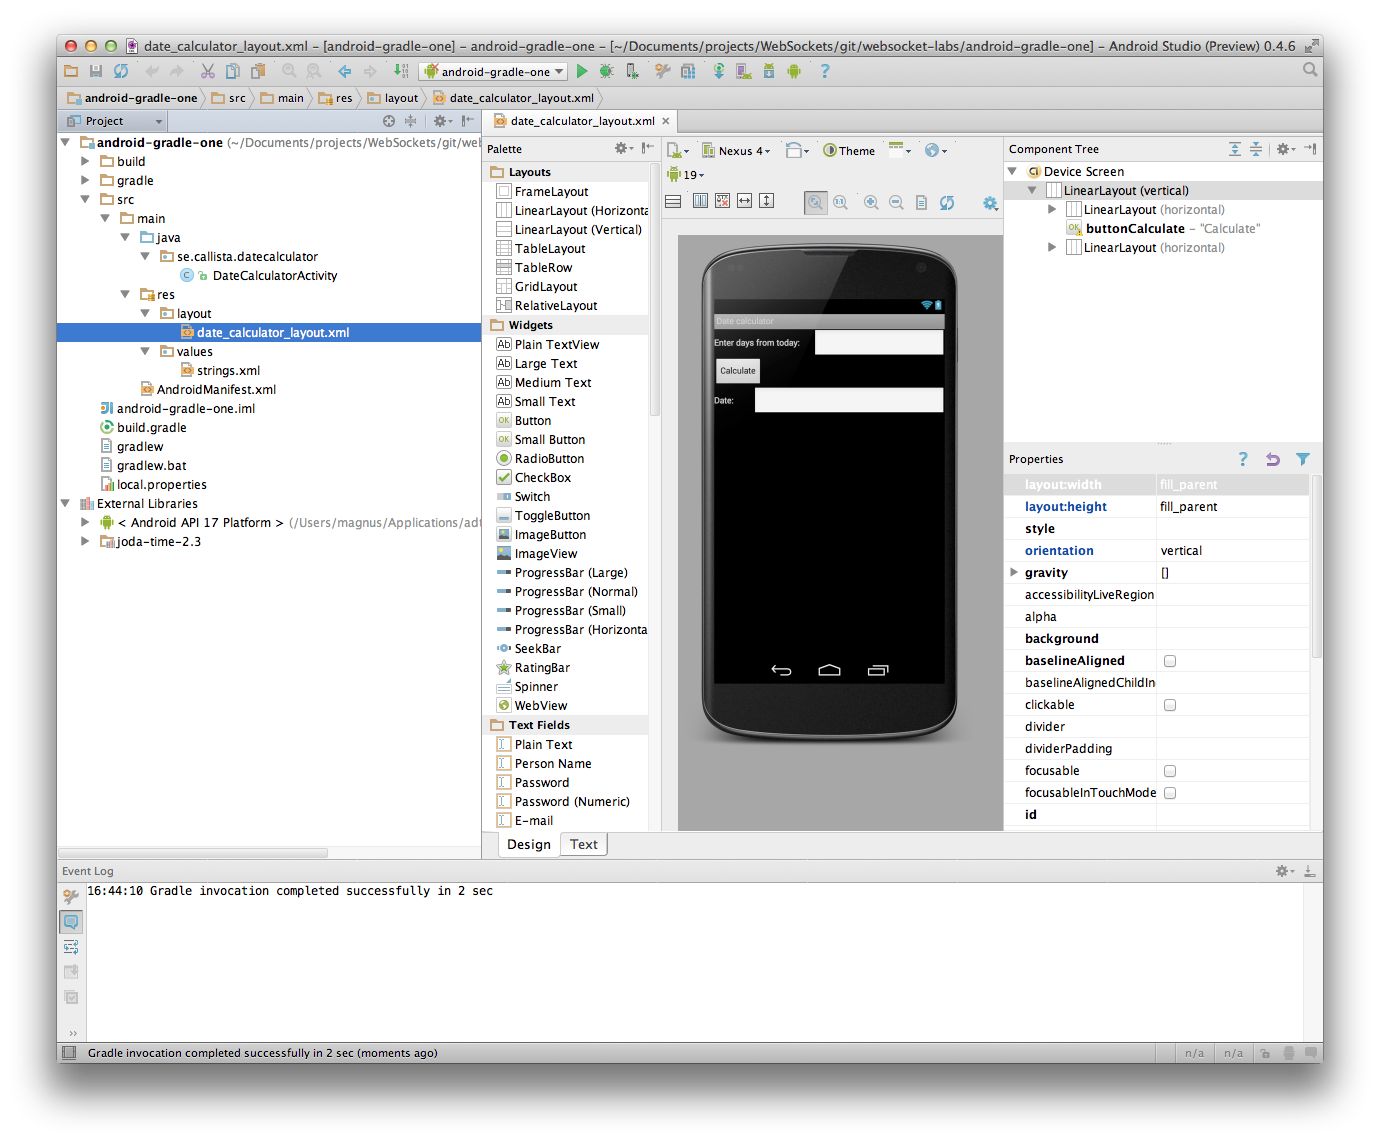
Wait a few seconds and then you have everything setup as specified in the build.gradle file and you can start working, e.g. refining the layout with the drag and drop tooling that comes with Android Studio:
This looks very promising indeed! There are some aspects still to be investigated, such as handling of multi module projects and release handling, but we have decided to step up and use Gradle in a full scale project. If that succeeds I guess it’s time to leave Maven behind. I’ll be back with a follow up on that. Meanwhile I would like to encourage all Maven and Ant users out there to carefully look into Gradle, hopefully you will upgrade as well!