Blogg
Här finns tekniska artiklar, presentationer och nyheter om arkitektur och systemutveckling. Håll dig uppdaterad, följ oss på LinkedIn
Här finns tekniska artiklar, presentationer och nyheter om arkitektur och systemutveckling. Håll dig uppdaterad, följ oss på LinkedIn

In this blog post we will create a secure API for external access, using OAuth 2.0, to the microservices we created in Part 1 and Part 2.
For information about OAuth 2.0 either see introductory material Parecki - OAuth 2 Simplified and Jenkov - OAuth 2.0 Tutorial or the specification IETF RFC 6749.
We will add a new microservice, product-api, that will act as the external API (a Resource Server in OAuth terminology) and we will expose its services through the edge server that we introduced in Part 1 acting as a token relay, i.e. forwarding OAuth access tokens from the client to the resource server. We will also add an OAuth Authorization Server and an OAuth client, i.e. service consumer, we will continue to use cURL.
The system landscape from Part 2 will be complemented with the new OAuth components (marked with a red line):
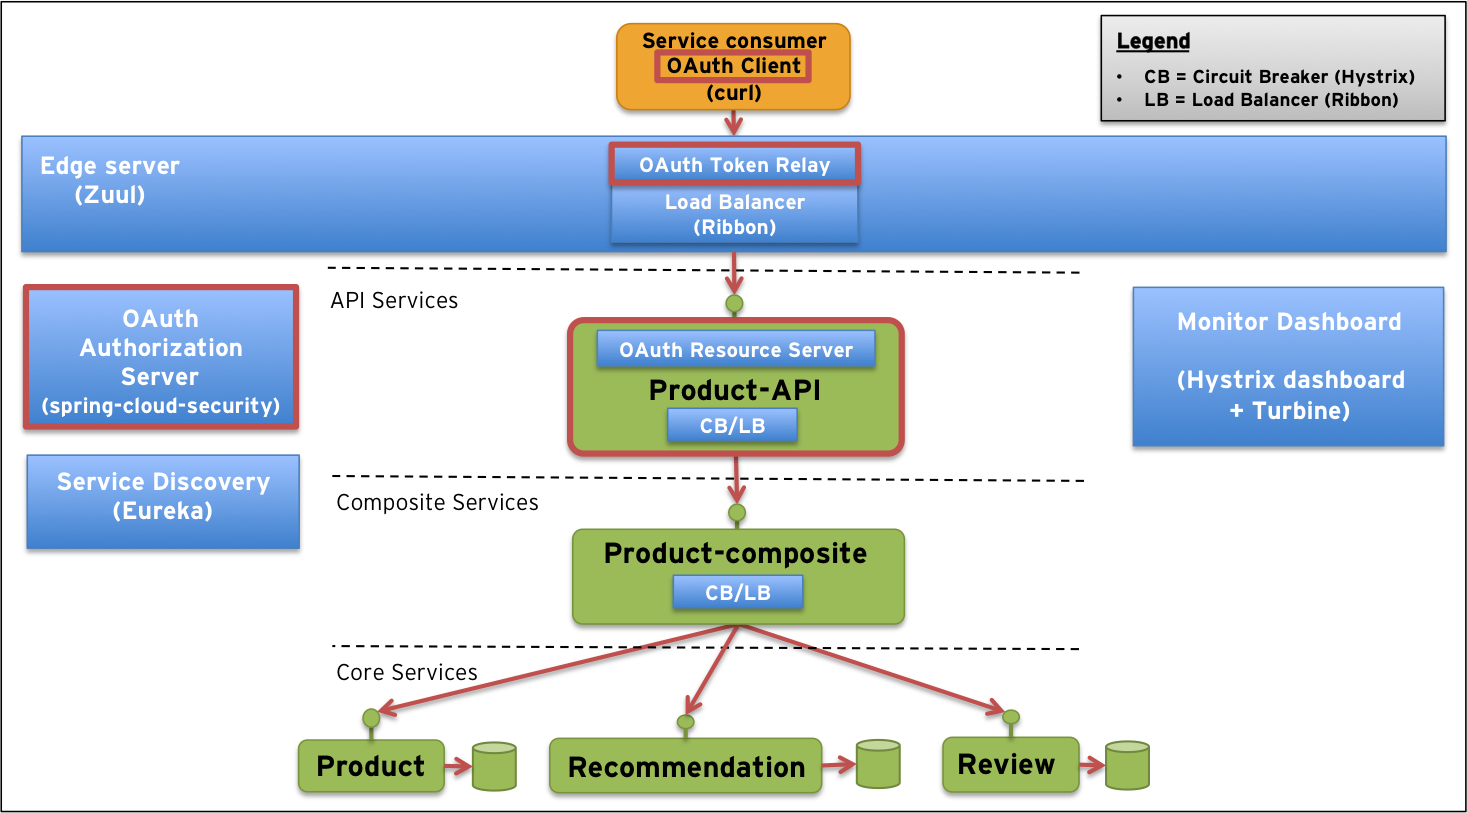
We will demonstrate how a client can use any of the four standard authorization grant flows to get an access token from the authorization server and then use the access token to make a secure request to the resource server, i.e. the API.
NOTES:
Protecting external API’s is nothing specific to microservices, so this blog post is applicable to any architecture where there is a need to secure external API’s using OAuth 2.0!
We will provide a lightweight OAuth authorization server only useful for development and testing. In a real world usage it needs to be replaced, e.g. by an API platform or by delegating the sign in and authorization process to social networks such as Facebook or Twitter.
We are on purpose only using HTTP in this blog post to reduce complexity. In any real world usage of OAuth all traffic should be protected using TLS, i.e. HTTPS!
As in the previous posts we emphasize the differences between microservices and monolithic applications by running each service in a separate microservice, i.e. in separate processes.
As in Part 2 we use Java SE 8, Git and Gradle. So, to access the source code and build it perform:
git clone https://github.com/callistaenterprise/blog-microservices.git
cd blog-microservices
git checkout -b B3 M3.1
./build-all.sh
If you are on Windows you can execute the corresponding bat-file
build-all.bat!
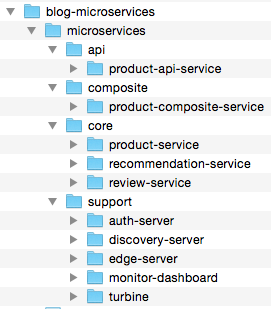
Two new source code components have been added since Part 2, an OAuth Authorization Server, auth-server, and the OAuth Resource Server, product-api-service:
The build should result in ten log messages that all says:
BUILD SUCCESSFUL
Let’s look into how the two new components are implemented and how the edge server is updated to be able to relay the OAuth access tokens. We will also change the URL for the API to make it a bit more convenient to use.
To be able to use OAuth 2.0 we will bring in the open source projects spring-cloud-security and spring-security-oauth2 with the following dependencies.
For the auth-server:
    compile("org.springframework.boot:spring-boot-starter-security")
    compile("org.springframework.security.oauth:spring-security-oauth2:2.0.6.RELEASE")
For full source code see auth-server/build.gradle.
For the product-api-service:
    compile("org.springframework.cloud:spring-cloud-starter-security:1.0.0.RELEASE")
    compile("org.springframework.security.oauth:spring-security-oauth2:2.0.6.RELEASE")
For full source code see product-api-service/build.gradle.
The implementation of the authorization server is straight forward. It is brought to life using an annotation, @EnableAuthorizationServer. Then we use a configuration class to register (in-memory only) the approved client applications, specifying client-id, client-secret, allowed grant flows and scopes:
  @EnableAuthorizationServer
  protected static class OAuth2Config extends AuthorizationServerConfigurerAdapter {

    @Override
    public void configure(ClientDetailsServiceConfigurer clients) throws Exception {
      clients.inMemory()
        .withClient("acme")
        .secret("acmesecret")
        .authorizedGrantTypes("authorization_code", "refresh_token", "implicit", "password", "client_credentials")
        .scopes("webshop");
    }
  }
This approach obviously only works for development and test to simulate a client application registration process provided by real world OAuth Authorization Servers, e.g. LinkedIn or GitHub.
For full source code see AuthserverApplication.java.
Registration of users (Resource Owner in OAuth terminology), simulating a real world Identity Provider (IdP), is done by adding one line per user in the file application.properties, e.g.:
security.user.password=password
For full source code see application.properties.
The implementation also comes with two simple web based user interfaces for user authentication and user consent, see the source code for details.
To make our API-implementation act as a OAuth Resource Server we only need to annotate the main-method with the @EnableOAuth2Resource-annotation:
@EnableOAuth2Resource
public class ProductApiServiceApplication {
For full source code see ProductApiServiceApplication.java.
The implementation of the API-service is very similar to the composite service in Part 2. To be able to verify that OAuth works we have added logging of the user-id and the access token:
@RequestMapping("/{productId}")
    @HystrixCommand(fallbackMethod = "defaultProductComposite")
    public ResponseEntity<String> getProductComposite(
        @PathVariable int productId,
        @RequestHeader(value="Authorization") String authorizationHeader,
        Principal currentUser) {

        LOG.info("ProductApi: User={}, Auth={}, called with productId={}",
          currentUser.getName(), authorizationHeader, productId);
        ...
NOTES:
Spring MVC will fill in the extra parameters for the current user and the authorization header automatically.
We have removed the uri
/productfrom the@RequestMappingto be able to get a more compact URL when using the edge server since it will add a/productprefix to the url to be able to route the request to the correct service.Writing access tokens to the log is probably not to recommend from a security perspective in a real world application.
Finally we need to make the edge server forward the OAuth access tokens down to the API-service. Fortunately this is actually already the default behavior, so we don’t need to do anything in this case :-)
To make the URL’s a bit more compact we have modified the route configuration slightly from Part 2 to:
zuul:
  ignoredServices: "*"
  prefix: /api
  routes:
    productapi: /product/**
This makes it possible to use URL’s like: http://localhost:8765/api/product/123 instead of http://localhost:8765/productapi/product/123 as we used in the previous posts.
We have also replaced the route to the composite-service with a route to the api-service.
For full source code see application.yml.
As in Part 2, we will start the microservices as java processes in our local development environment and you need to have the cURL and jq tools installed to be able to run some of the commands below. See Part 2 for details on how to start up the system landscape.
First start RabbitMQ:
$ ~/Applications/rabbitmq_server-3.4.3/sbin/rabbitmq-server
If you are on Windows use Windows Services to ensure that the RabbitMQ service is started!
Then start the infrastructure microservices, e.g.:
$ cd support/auth-server;       ./gradlew bootRun
$ cd support/discovery-server;  ./gradlew bootRun
$ cd support/edge-server;       ./gradlew bootRun
$ cd support/monitor-dashboard; ./gradlew bootRun
$ cd support/turbine;           ./gradlew bootRun
Finally launch the business microservices:
$ cd core/product-service;                ./gradlew bootRun
$ cd core/recommendation-service;         ./gradlew bootRun
$ cd core/review-service;                 ./gradlew bootRun
$ cd composite/product-composite-service; ./gradlew bootRun
$ cd api/product-api-service;             ./gradlew bootRun
If you are on Windows you can execute the corresponding bat-file
start-all.bat!
Once the microservices are started up and registered with the service discovery server they should write the following in the log:
DiscoveryClient ... - registration status: 204
We are now ready to try out obtaining an access token and then use it to call the API in a secure way!
The OAuth 2.0 specification defines four grant flows to obtain an access token:
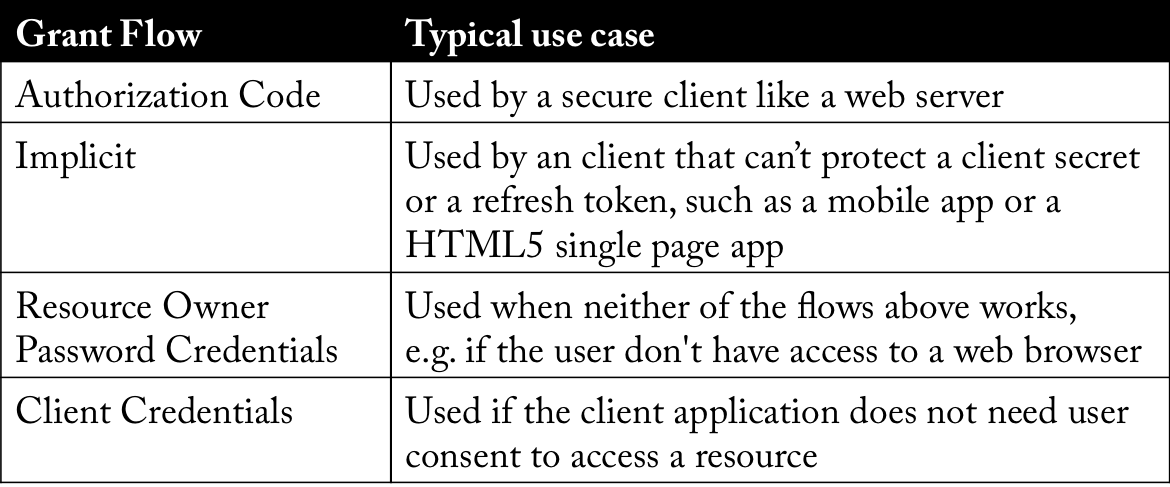
See Jenkov - OAuth 2.0 Authorization for more details regarding the grant flows.
NOTE: The grant flows Authorization Code and Implicit are the most frequently used and the two remaining are considered to cover corner cases where the first two does not apply.
Let’s go through each grant flow and see how it can be used to obtain an access token!
First we need to get a code grant (its like a one time password) using a web browser. Go to:
Login (user/password) and give your consent in the web pages that are displayed. The web browser should redirect you to a URL like:
http://example.com/?
  code=IyJh4Y&
  state=97536
NOTE: The state parameter should be set to a random value in the request and checked on the response for preventing cross-site request forgery
Take the code parameter from the redirect URL you got as the response and store it in an environment variable:
CODE=IyJh4Y
Now act as the secure web server and use the code grant to get the access token:
curl acme:acmesecret@localhost:9999/uaa/oauth/token \
 -d grant_type=authorization_code \
 -d client_id=acme \
 -d redirect_uri=http://example.com \
 -d code=$CODE -s | jq .
{
  "access_token": "eba6a974-3c33-48fb-9c2e-5978217ae727",
  "token_type": "bearer",
  "refresh_token": "0eebc878-145d-4df5-a1bc-69a7ef5a0bc3",
  "expires_in": 43105,
  "scope": "webshop"
}
Save the access token in an environment variable for later use when we access the API:
TOKEN=eba6a974-3c33-48fb-9c2e-5978217ae727
Let’s make a second attempt to get an access token for the same code. It should fail, e.g. the code is actually working as a one time password:
curl acme:acmesecret@localhost:9999/uaa/oauth/token \
 -d grant_type=authorization_code \
 -d client_id=acme \
 -d redirect_uri=http://example.com \
 -d code=$CODE -s | jq .
{
  "error": "invalid_grant",
  "error_description": "Invalid authorization code: IyJh4Y"
}
With implicit grant we skip the code grant, instead we request the access token directly from the web browser (lowering the security). Use the following URL in a web browser:
Login (user/password) and give your consent, if required, in the web pages that are displayed. The web browser should redirect you to a URL like:
http://example.com/#
 access_token=00d182dc-9f41-41cd-b37e-59de8f882703&
 token_type=bearer&
 state=48532&
 expires_in=42704
NOTE: The state parameter should be set to a random value in the request and checked on the response for preventing cross-site request forgery
Save the access token in an environment variable for later use when we access the API:
TOKEN=00d182dc-9f41-41cd-b37e-59de8f882703
In this case the user typically don’t have access to a web browser, instead the user have to give his/her credentials to the client application that use them to obtain an access token (not a very good idea from a security perspective if you can’t trust the client application):
curl -s acme:acmesecret@localhost:9999/uaa/oauth/token  \
 -d grant_type=password \
 -d client_id=acme \
 -d scope=webshop \
 -d username=user \
 -d password=password | jq .
{
  "access_token": "62ca1eb0-b2a1-4f66-bcf4-2c0171bbb593",
  "token_type": "bearer",
  "refresh_token": "920fd8e6-1407-41cd-87ad-e7a07bd6337a",
  "expires_in": 43173,
  "scope": "webshop"
}
Save the access token in an environment variable for later use when we access the API:
TOKEN=62ca1eb0-b2a1-4f66-bcf4-2c0171bbb593
In the last case we assume that there is no need of a user consent to access the API. The client application can, in this case, authenticate it self to the authorization server and obtain an access token:
curl -s acme:acmesecret@localhost:9999/uaa/oauth/token  \
 -d grant_type=client_credentials \
 -d scope=webshop | jq .
{
  "access_token": "8265eee1-1309-4481-a734-24a2a4f19299",
  "token_type": "bearer",
  "expires_in": 43189,
  "scope": "webshop"
}
Save the access token in an environment variable for later use when we access the API:
TOKEN=8265eee1-1309-4481-a734-24a2a4f19299
Note that the access token in this case represent the client application, not the resource owner (i.e. the user), resulting in that
currentUser.getName()will returnacmeand notuserwhen called from theproduct-api-service.
Now, when we have an access token, we can start to access the actual API.
First try to access the API without an access token, it should fail:
curl 'http://localhost:8765/api/product/123' -s | jq .
{
  "error": "unauthorized",
  "error_description": "Full authentication is required to access this resource"
}
Great, we are stopped as expected!
Next, try with a invalid access token, it should fail as well:
curl 'http://localhost:8765/api/product/123' \
 -H  "Authorization: Bearer invalid-access-token" -s | jq .
{
  "error": "access_denied",
  "error_description": "Unable to obtain a new access token for resource 'null'. The provider manager is not configured to support it."
}
Again, we are denied access as expected!
Now, let’s try to perform a correct request supplying one of the access tokens we received from the grant flows above:
curl 'http://localhost:8765/api/product/123' \
 -H  "Authorization: Bearer $TOKEN" -s | jq .
{
  "productId": 123,
  "name": "name",
  "weight": 123,
  "recommendations": [...],
  "reviews": [... ]
}
Great, it works!
Also take a look at the log events printed by the api-service, product-api-service:
2015-04-23 18:39:59.014  INFO 79321 --- [ XNIO-2 task-20] o.s.c.s.o.r.UserInfoTokenServices        : Getting user info from: http://localhost:9999/uaa/user
2015-04-23 18:39:59.030  INFO 79321 --- [ctApiService-10] s.c.m.a.p.service.ProductApiService      : ProductApi: User=user, Auth=Bearer a0f91d9e-00a6-4b61-a59f-9a084936e474, called with productId=123
2015-04-23 18:39:59.381  INFO 79321 --- [ctApiService-10] s.c.m.a.p.service.ProductApiService      : GetProductComposite http-status: 200
We can see that the API contacts the Authorization Server to get info about the user and then prints out the username and the access token in the log!
Finally, let’s try to invalidate the access token, e.g. simulating that it has expired. One way to do that is to restart the auth-server (it only stores information in the memory…) and then retry the request from above:
curl 'http://localhost:8765/api/product/123' \
 -H  "Authorization: Bearer $TOKEN" -s | jq .
{
  "error": "access_denied",
  "error_description": "Unable to obtain a new access token for resource 'null'. The provider manager is not configured to support it."
}
The previously accepted access token is now rejected, as expected!
We have seen how we, thanks to the open source projects spring-cloud-security and spring-security-auth, easily can set up a secure API based on OAuth 2.0. Remember, however, that the Authorization Server we used only is useful for development and testing!
Next up in the Blog Series - Building Microservices is centralized log management using the ELK stack, i.e. Elasticsearch, LogStash and Kibana.
Stay tuned!