Blogg
Här finns tekniska artiklar, presentationer och nyheter om arkitektur och systemutveckling. Håll dig uppdaterad, följ oss på LinkedIn
Här finns tekniska artiklar, presentationer och nyheter om arkitektur och systemutveckling. Håll dig uppdaterad, följ oss på LinkedIn

This is the second blog post describing how to update the tools and frameworks used in the 2’nd edition of my book. In this blog post, we will focus on updating Kubernetes and Istio, but also update related development tools such as Docker Desktop and Minikube.
Table of Contents
In the previous blog post, we learned how to upgrade Spring Boot, Spring Cloud, and Spring Native. Now it’s time to upgrade Kubernetes and Istio to their latest releases. It also seems rational to upgrade the development tools we use to run a Kubernetes cluster locally, Minikube and Docker Desktop.
Since one of the infrastructure products we use in the book, the cert-manager, has dependencies on what Kubernetes version we use (as described here), we also need to upgrade the cert-manager. Finally, since Istio is used together with other tools to implement a service mesh, we will install one of the essential add-ons, Kiali. Kiali is used to observe the traffic that flows through the service mesh. To collect metrics, it relies on Prometheus. In chapter 18, you can learn how other add-ons, such as Jaeger and Grafana, can be installed and used.
The following table summarizes the updates covered by this blog post:
| Software | Old version | New version |
|---|---|---|
| Kubernetes | 1.20.5 | 1.25.0 |
| Istio | 1.9.3 | 1.15.0 |
| Kiali | 1.29 | 1.55 |
| Prometheus | 2.21.0 | 2.34.0 |
| cert-manager | 1.3.1 | 1.9.1 |
| Minikube | 1.18.1 | 1.27.0 |
| Docker Desktop | 20.10.5 | 20.10.17 |
The source code for this blog post is found in the Git branch: K8S1.25 in the book’s Git repo. Since each chapter builds on the previous chapter, only Chapter 17 (covering all Kubernetes features) and Chapter 20 (covering all parts in Istio and the EFK stack) have been updated in this Git branch.
The following illustration summarizes the Kubernetes features covered in Chapter 17:

Figure 1 - Kubernetes capabilities
The following illustration summarizes the Kubernetes and Istio features covered in this blog post:

Figure 2 - Kubernetes and Istio capabilities
Since this blog post focus on Kubernetes and Istio, all features available in the source code for Chapter 20 will not be used. The unused features (Jaeger, Grafana, and the EFK stack) are greyed out in the figure above. See chapters 18 - 20 for information on how to utilize these features.
Note that each infrastructure component has a label next to it describing what capabilities it adds to the system landscape. You can compare them with the capabilities required by a microservice-based system landscape, as discussed in Chapter 1.
Before we look into the upgrade commands, let’s see where to find information regarding news in the various releases.
To find out news on Kubernetes releases, the following page can be used: Release History.
Before upgrading to a new Kubernetes version, looking for deprecated or removed Kubernetes APIs is a good practice. Specifically, if your application depends on alpha or beta versions of a Kubernetes API. Given that you keep track of the evolution of a Kubernetes API from alpha, beta, and finally to a stable GA release, this is not a significant concern since there is plenty of time between the deprecation and removal steps. For details on the process, see the Kubernetes Deprecation Policy.
For example, when the Ingress API graduated to stable and general available in Kubernetes 1.19, its beta API became deprecated. One year later, in Kubernetes 1.22, the beta APIs for the Ingress were removed.
Since the source code in the book doesn’t use any alpha or beta Kubernetes APIs, this is not a concern.
Another change that caused a lot of confusion was the deprecation and removal of dockershim in v1.20 and v1.24, respectively. This removal prevents Kubernetes from running on top of Docker. This sounds far more dramatic than it actually is. Instead of depending on just Docker as a Container Runtime, Kubernetes can use any runtime that implements the Container Runtime Interface (CRI), such as containerd and cri-o. Since Docker doesn’t implement the CRI, dockershim was used as a thin layer between the CRI and Docker.
Due to this removal, there was also a misunderstanding that developers can no longer use Docker to create Docker images to be deployed in Kubernetes. This is actually not a problem since there is another specification, Open Container Initiative (OCI), standardizing how a container image is packaged. Images created by Docker’s build tool are compliant with the OCI specification, and the CRI-compliant container runtimes, such as containerd and cri-o, support the use of OCI images. This means that Docker can be used at development time to create OCI images that container runtimes like containerd and cri-o can pull and run in Kubernetes.
Minikube, which is used in the book, uses a replacement adapter for Docker, cri-dockerd, that enabled Minikube to continue to use Docker as its container runtime.
The
minikube startcommand has an option--container-runtimethat can be used to select another runtime, e.g.containerdorcri-o. In the book, only Docker is used as a container runtime.
For Istio, new releases are announced here. The sections named “Before you upgrade” are of specific interest, containing information regarding required changes before
For the scope of the book, there are no changes required, but one new feature of interest in the v1.10 release notes:
PILOT_JWT_PUB_KEY_REFRESH_INTERVAL to configure the interval of istiod fetching the jwks_uri for the JWKS public keySince we deploy our own OAuth authorization server with our application, redeploying the application also means the authorization server is redeployed. Since the authorization server creates its keys for signing the access tokens at startup, they will be different after each redeploy of the application. This makes it important to be able to reset the authorization keys that Istio cache after a redeploy of the application. Before v1.10, it was not possible to configure a refresh interval for the keys cashed by Istio, hardcoded to 20 min. With this new environment variable, we can lower the refresh interval, so we don’t have to wait after a redeploy of the application before we can try it out. The instructions below will set the refresh interval to 15 s.
To track which versions of Istio are compatible with what Kubernetes versions, see the Istio - Kubernetes support matrix.
With the most essential news in the new releases covered, let’s see how we can upgrade the tools to the latest versions.
In this section, we will learn how to upgrade the following tools:
In some cases, the commands have to be executed differently on macOS and on WSL 2 in Windows. Therefore, macOS and WSL 2 specific commands have a comment starting with either # macOS-version or # WSL2-version.
To upgrade to kubectl v1.25, run the following commands:
# macOS-version
OS=darwin

# WSL2-version
OS=linux

K8S_VERSION=1.25.0
curl -LO "https://dl.k8s.io/release/v${K8S_VERSION}/bin/${OS}/amd64/kubectl"
sudo install kubectl /usr/local/bin/kubectl
rm kubectl
kubectl version --client --output=json | jq -r .clientVersion.gitVersion
The final kubectl version command shall return v1.25.0.
Before upgrading istioctl, it is important to remember that istioctl only can install Istio in a Kubernetes cluster of the same version as istioctl itself. So, if you need to work with Istio 1.9.3 after upgrading to v1.15.0, I suggest you keep a copy of the 1.9.3 version of istioctl. Run a command like:
sudo mv /usr/local/bin/istioctl /usr/local/bin/istioctl-1.9.3
To upgrade to istioctl v1.15.0, run the following commands:
ISTIO_VERSION=1.15.0
curl -L https://istio.io/downloadIstio | ISTIO_VERSION=${ISTIO_VERSION} TARGET_ARCH=x86_64 sh -
sudo install istio-${ISTIO_VERSION}/bin/istioctl /usr/local/bin/istioctl
rm -r istio-${ISTIO_VERSION}
istioctl version --remote=false
The final istioctl version command shall return 1.15.0.
To upgrade to minikube v1.27.0, run the following commands:
# macOS-version
OS=darwin

# WSL2-version
OS=linux

MINIKUBE_VERSION=1.27.0
curl -LO https://storage.googleapis.com/minikube/releases/v${MINIKUBE_VERSION}/minikube-${OS}-amd64
sudo install minikube-${OS}-amd64 /usr/local/bin/minikube
rm minikube-${OS}-amd64
minikube version --short
The final minikube version command shall return v1.27.0.
Use the Docker Desktop menu and select “Check for Updates…” and ensure you have the latest version of Docker Desktop installed.
With the new versions of the tools in place, we are ready to try out the new versions of Kubernetes and Istio.
Since this blog post is about trying out new versions of infrastructure components such as Kubernetes and Istio, no source code changes have been required since the previous blog post on updating the Spring components.
The first subsection describes the commands required to create a Kubernetes cluster using the latest version and deploying the application from the book in it. The commands and application source code are taken from Chapter 17 in the book, so take a look in that chapter if you want to know more about a specific command.
In the second subsection, the latest version of Istio is added to the cluster, and Kiali is also added to be able to observe the traffic in the service mesh. These commands are taken from Chapter 18 in the book, while the application code comes from Chapter 20. Chapter 19 and 20 contain more add-ons, such as describing how the EFK-stack can be used for log analysis and how to use Prometheus and Grafana for monitoring and alerts.
Before heading on, ensure that the tools Java, git, jq, curl, helm, and stern are installed. For installation instructions, see chapters 21 and 22.
To try out the new Kubernetes version, v1.25.0, with the source code in Chapter 17, perform the following steps:
Get the source code
 git clone https://github.com/PacktPublishing/Microservices-with-Spring-Boot-and-Spring-Cloud-2E.git
 cd Microservices-with-Spring-Boot-and-Spring-Cloud-2E
 git checkout K8S1.25
 cd Chapter17
Create the Minikube cluster from scratch
 minikube delete -p handson-spring-boot-cloud

 # macOS-version
 minikube start \
 --profile=handson-spring-boot-cloud \
 --memory=10240 \
 --cpus=4 \
 --disk-size=30g \
 --kubernetes-version=v1.25.0 \
 --driver=hyperkit

 # WSL2-version
 minikube start \
 --profile=handson-spring-boot-cloud \
 --memory=10240 \
 --cpus=4 \
 --disk-size=30g \
 --kubernetes-version=v1.25.0 \
 --driver=docker \
 --ports=8080:80 --ports=8443:443 \
 --ports=30080:30080 --ports=30443:30443

 minikube profile handson-spring-boot-cloud
 minikube addons enable ingress
 minikube addons enable metrics-server

 kubectl wait --timeout=600s --for=condition=ready pod -n kube-system --all
Update the IP address of minikube.me in /etc/hosts
 # First, remove an existing entry, if any:
 sudo sed -i.bak '/minikube.me/d' /etc/hosts

 # Add the new entry of minikube.me in /etc/hosts

 # macOS-version
 sudo bash -c "echo $(minikube ip) minikube.me | tee -a /etc/hosts"

 # WSL2-version
 sudo bash -c "echo 127.0.0.1 minikube.me | tee -a /etc/hosts"
Install the cert-manager
 helm repo add jetstack https://charts.jetstack.io
 helm repo update
 helm install cert-manager jetstack/cert-manager \
   --create-namespace \
   --namespace cert-manager \
   --version v1.9.1 \
   --set installCRDs=true \
   --wait
Build and test locally using Docker Compose before deploying to Kubernetes on Minikube
 ./gradlew build
 docker-compose build

 # Verify on plain Docker Desktop
 ./test-em-all.bash start stop
Deploy the application to Kubernetes on Minikube
 eval $(minikube docker-env)
 docker-compose build
 docker pull mysql:5.7.32
 docker pull mongo:4.4.2
 docker pull rabbitmq:3.8.11-management
 docker pull openzipkin/zipkin:2.23.2
 eval $(minikube docker-env -u)

 for f in kubernetes/helm/components/*; do helm dep up $f; done
 for f in kubernetes/helm/environments/*; do helm dep up $f; done

 helm install hands-on-dev-env \
   kubernetes/helm/environments/dev-env \
   -n hands-on \
   --create-namespace

 kubectl -n hands-on wait --timeout=600s --for=condition=ready pod --all
Finally, run the tests that verify the deployment
 # macOS-version
 HOST=minikube.me PORT=443 USE_K8S=true ./test-em-all.bash

 # WSL2-version
 HOST=minikube.me PORT=8443 USE_K8S=true ./test-em-all.bash
With tests of the new Kubernetes version running successfully, head over to the next section to try out the new Istio release!
To try out the new Istio and Kiali versions with the application in Chapter 20, perform the following steps:
Change directory
cd ../Chapter20
Install Istio in the Kubernetes cluster
Note the usage of the new environment variable
PILOT_JWT_PUB_KEY_REFRESH_INTERVAL, set to 15s, in the istioctl install command below!
 istioctl experimental precheck

 istioctl install --skip-confirmation \
   --set profile=demo \
   --set meshConfig.accessLogFile=/dev/stdout \
   --set meshConfig.accessLogEncoding=JSON \
   --set values.pilot.env.PILOT_JWT_PUB_KEY_REFRESH_INTERVAL=15s

 # Install Kiali and Prometheus
 istio_version=$(istioctl version --short --remote=false)
 kubectl apply -n istio-system -f https://raw.githubusercontent.com/istio/istio/${istio_version}/samples/addons/kiali.yaml

 kubectl apply -n istio-system -f https://raw.githubusercontent.com/istio/istio/${istio_version}/samples/addons/prometheus.yaml

 kubectl -n istio-system wait --timeout=600s --for=condition=available deployment --all

 helm upgrade --install istio-hands-on-addons kubernetes/helm/environments/istio-system -n istio-system --wait
In a separate terminal window, launch the minikube tunnel
The
minikube tunnelcommand makesLoadBalancer-services, such as Istio’s Ingress Gateway, accessible from the outside of the Kubernetes cluster
sudo minikube tunnel
Update the IP address of minikube.me, kiali.minikube.me, and health.minikube.me in /etc/hosts
 # First, remove an existing entry, if any:
 sudo sed -i.bak '/minikube.me/d' /etc/hosts

 INGRESS_IP=$(kubectl -n istio-system get service istio-ingressgateway -o jsonpath='{.status.loadBalancer.ingress[0].ip}')
 echo $INGRESS_IP

 MINIKUBE_HOSTS="minikube.me kiali.minikube.me health.minikube.me"
 echo "$INGRESS_IP $MINIKUBE_HOSTS" | sudo tee -a /etc/hosts

 # Verify access, expect 200 in the respose
 curl -o /dev/null -sk -L -w "%{http_code}\n" https://kiali.minikube.me/kiali
On WSL2/Windows we also need to update C:\Windows\System32\drivers\etc\hosts by adding the following line:
127.0.0.1 minikube.me kiali.minikube.me health.minikube.me
Build, deploy and verify the deployment
 ./gradlew build
 eval $(minikube docker-env)
 docker-compose build
 eval $(minikube docker-env -u)

 kubectl delete namespace hands-on
 kubectl apply -f kubernetes/hands-on-namespace.yml
 kubectl config set-context $(kubectl config current-context) --namespace=hands-on

 for f in kubernetes/helm/components/*; do helm dep up $f; done
 for f in kubernetes/helm/environments/*; do helm dep up $f; done

 helm install hands-on-dev-env \
   kubernetes/helm/environments/dev-env \
   -n hands-on --wait

 ./test-em-all.bash
To be able to observe the traffic in the service mesh, start a low volume load test
 ACCESS_TOKEN=$(curl -k https://writer:secret@minikube.me/oauth2/token -d grant_type=client_credentials -s | jq .access_token -r)
 echo ACCESS_TOKEN=$ACCESS_TOKEN
 siege https://minikube.me/product-composite/1 -H "Authorization: Bearer $ACCESS_TOKEN" -c1 -d1 -v
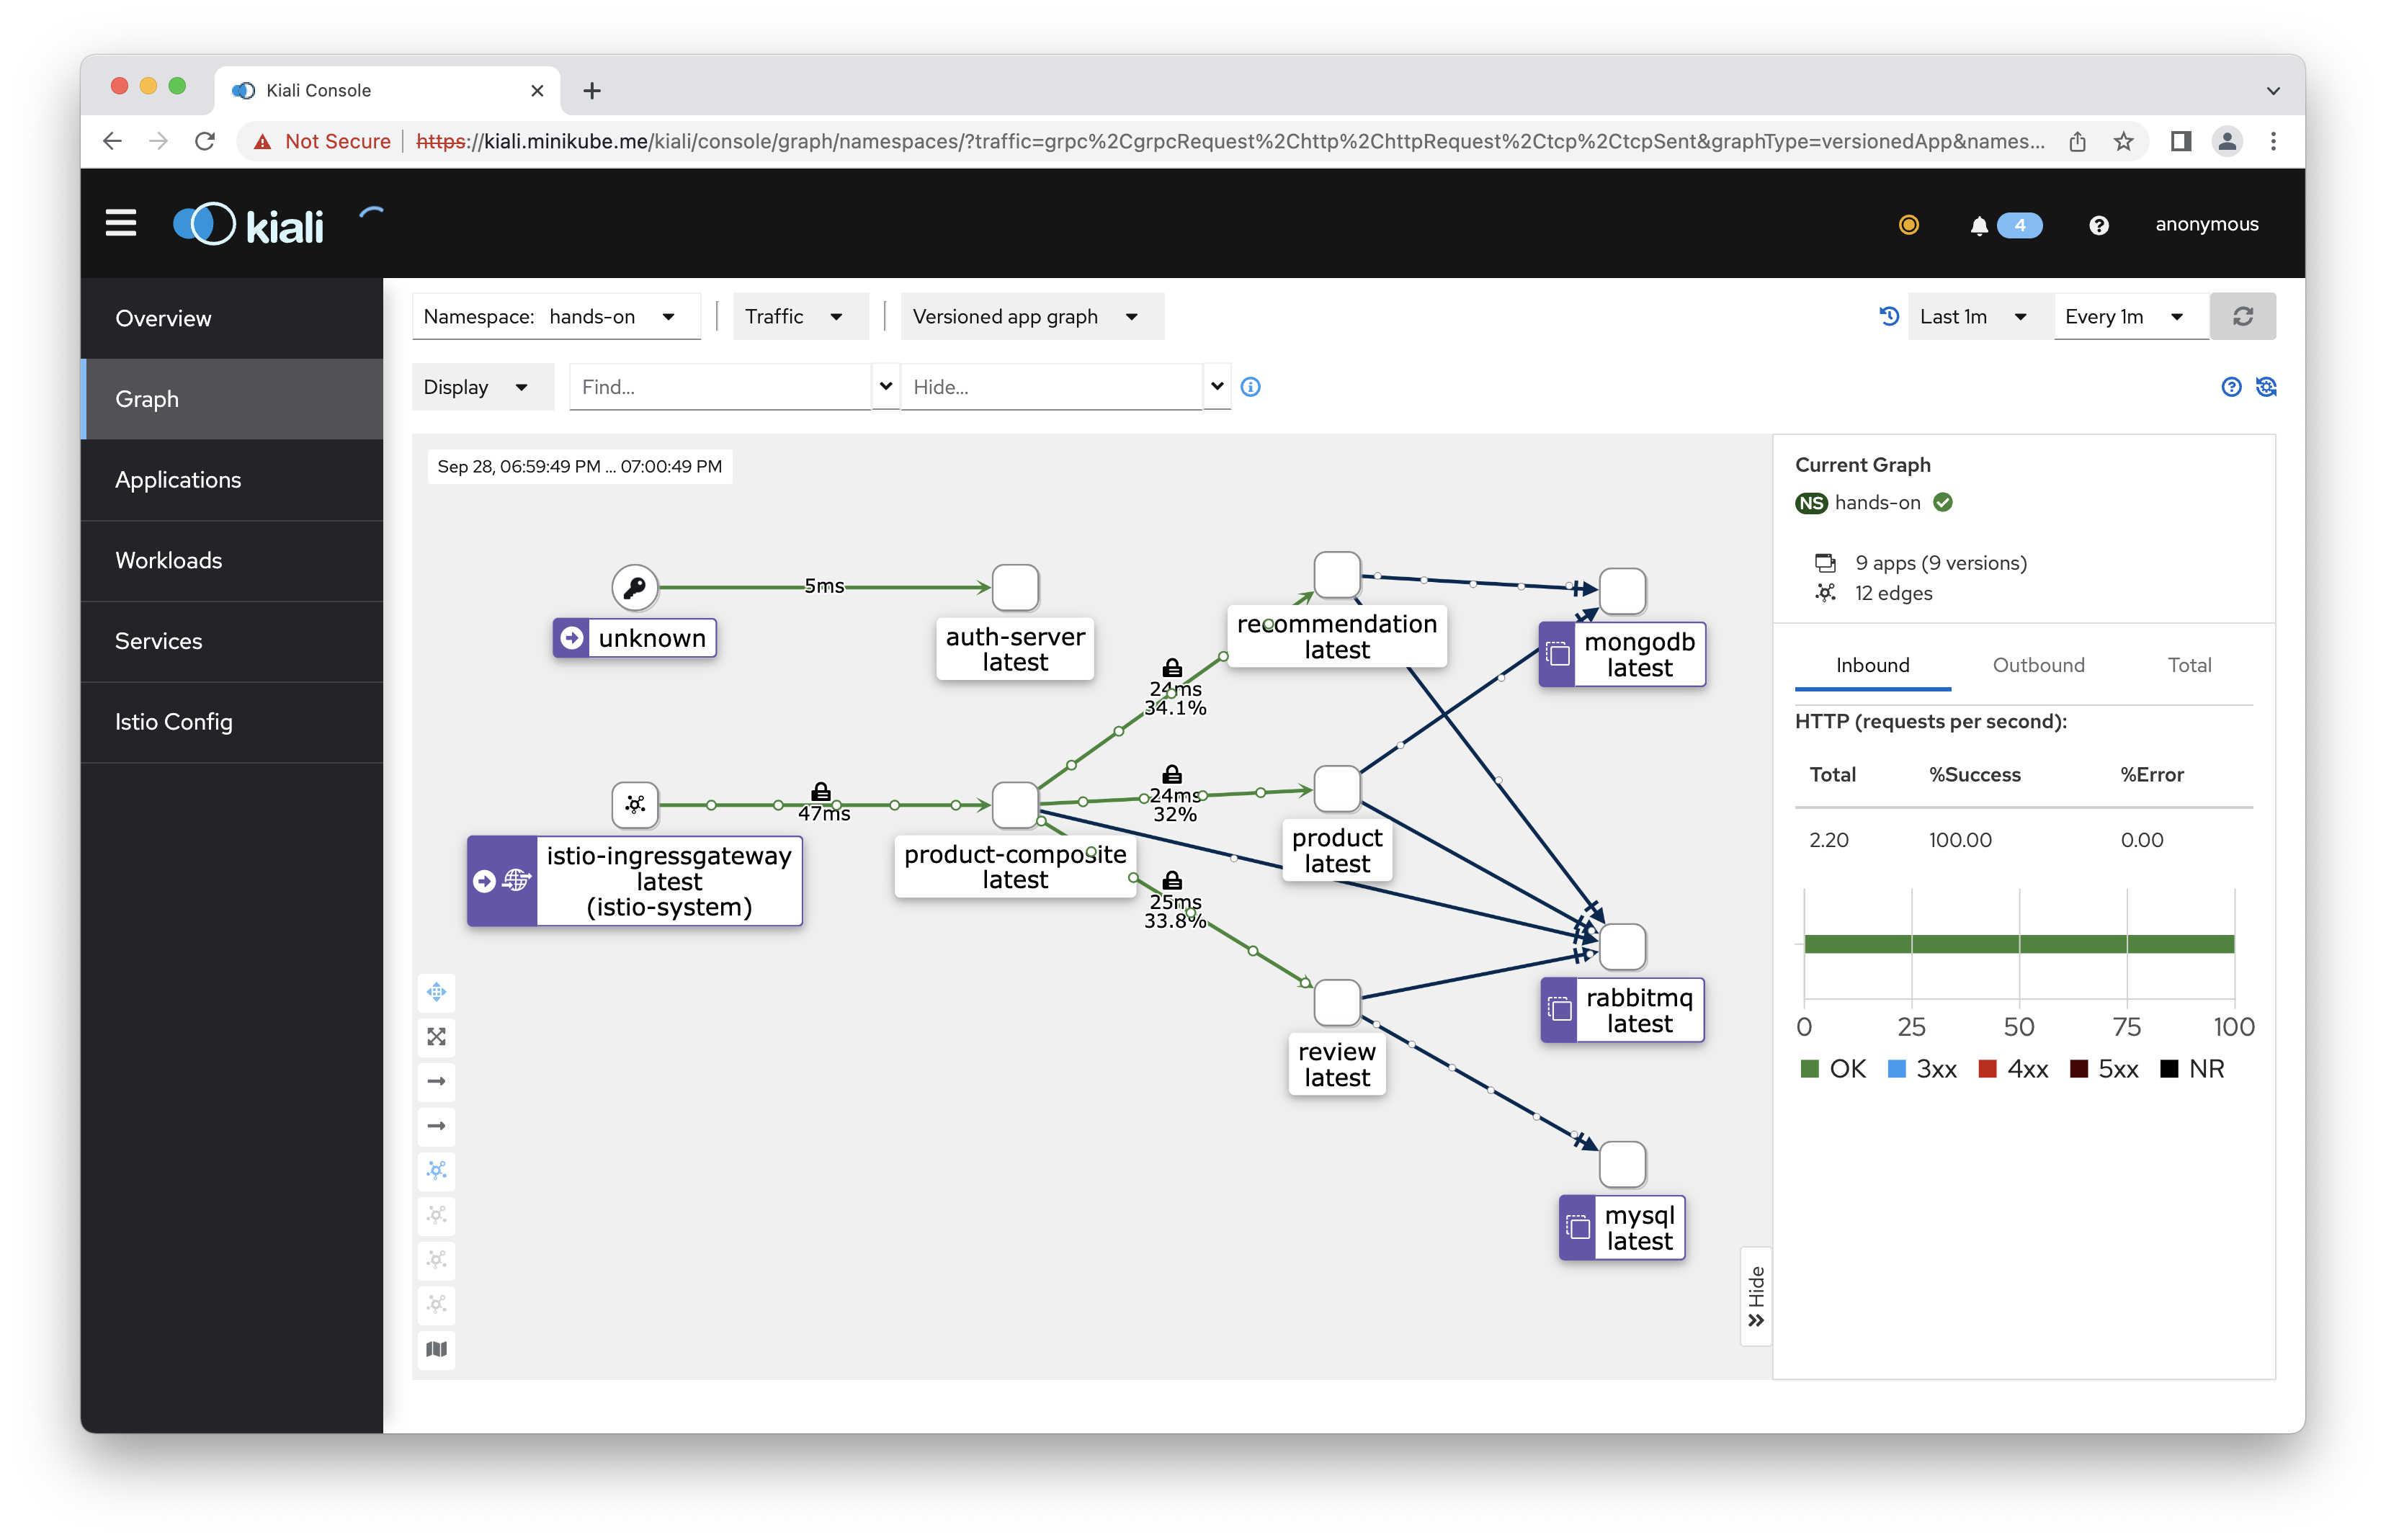
Observe the traffic with Kiali
Open https://kiali.minikube.me in a web browser.
As explained in the book, web browsers will not rely on the certificate used by Kiali since it is self-signed. In most web browsers, you can manually allow a self-signed certificate. For example, in Chrome, you can use a hidden feature by clicking anywhere on the error page and then typing “
thisisunsafe”.
Once the web browser relies on the self-signed certificate, you can navigate to the Graph tab and select the hands-on namespace. Depending on the selected Display - settings, a graph similar to the following should be visible:
For further tests with Istio, monitoring and alerts with Prometheus and Grafana, and log analysis with the EFK Stack, see the book’s instructions in chapters 18 - 20. .
In this blog post, we have learned how to upgrade the infrastructure used in this book to the latest versions of Kubernetes, Istio et al.
That’s all for this blog post; in the next one, we will learn how to build, deploy, and run microservices on ARM64-based hardware, such as a MacBook Pro with Apple silicon.