Blogg
Här finns tekniska artiklar, presentationer och nyheter om arkitektur och systemutveckling. Håll dig uppdaterad, följ oss på LinkedIn
Här finns tekniska artiklar, presentationer och nyheter om arkitektur och systemutveckling. Håll dig uppdaterad, följ oss på LinkedIn

Spring Boot 3.1 was released in May 2023 during the wrap-up of writing the 3rd ed of my book, so there was no time to upgrade the code before releasing the book. Instead, in this blog post, I will describe how to upgrade the source code examples in the book from Spring Boot 3.0 to Spring Boot 3.1, use some of the new features like Testcontainers at development time, and also cover some new and resolved bugs.
The blog post is divided into the following sections:
To access the source code of this book that is updated to Spring Boot 3.1, run the following commands:
git clone https://github.com/PacktPublishing/Microservices-with-Spring-Boot-and-Spring-Cloud-Third-Edition.git
cd Microservices-with-Spring-Boot-and-Spring-Cloud-Third-Edition
git checkout SB3.1
You can find the changes applied to upgrade the source code to Spring Boot 3.1 by comparing two folders that contain a clone of the Git-repo, one with the main branch checked out and one with the SB3.1 branch checked out.
Let’s start by looking at the changes applied to the source code.
To upgrade the source code of this book to Spring Boot 3.1, the following three steps have been performed:
Each step is described in detail in the subsections below.
The following dependencies have been upgraded in the gradle.build files:
| Dependency | Before | After |
|---|---|---|
| Spring Boot | 3.0.4 | 3.1.4 |
| Spring Cloud | 2022.0.1 | 2022.0.4 |
| Spring Dep Mgm plugin | 1.1.0 | 1.1.3 |
| springdoc-openapi | 2.0.2 | 2.1.0 |
| GraalVM Native plugin | 0.9.18 | 0.9.27 |
Note: The GraalVM Native plugin only concerns Chapter 23, Native-Complied Java Microservices.
In the main branch for Spring Boot 3.0, these dependencies look as the following in the build.gradle files:
plugins {
    id 'org.springframework.boot' version '3.0.4'
    id 'io.spring.dependency-management' version '1.1.0'
    id 'org.graalvm.buildtools.native' version '0.9.18'
}

ext {
    springCloudVersion = "2022.0.1"
}
dependencies {
    implementation 'org.springdoc:springdoc-openapi-starter-webflux-ui:2.0.2'
In the SB3.1 branch for Spring Boot 3.1, these dependencies look as the following in the build.gradle files:
plugins {
    id 'org.springframework.boot' version '3.1.4'
    id 'io.spring.dependency-management' version '1.1.3'
    id 'org.graalvm.buildtools.native' version '0.9.27'
}

ext {
    springCloudVersion = "2022.0.4"
}

dependencies {
    implementation 'org.springdoc:springdoc-openapi-starter-webflux-ui:2.1.0'
Starting with Chapter 16, Deploying Our Microservices to Kubernetes, a Readiness Health Group is used to configure Kubernetes readiness probes. The configuration uses the property management.endpoint.health.group.readiness.include to specify what Health Indicators should be executed to determine the readiness state. In Spring Boot 3.0, unavailable Health Indicators were ignored. Starting with Spring Boot 3.1, unavailable Health Indicators will cause a microservice to fail during startup.
For Spring Boot 3.0, one Readiness Health Group is declared in the common configuration file, config-repo/application.yml, like this:
management.endpoint.health.group.readiness.include: readinessState, rabbit, db, mongo
For Spring Boot 3.1, each microservice needs to specify what Health Indicators to use per Spring Boot profile. For example, the Product microservice declares, in the file config-repo/product.yml, the following is specified in the default profile, where both RabbitMQ and MongoDB are used:
management.endpoint.health.group.readiness.include: readinessState, rabbit, mongo
While only MongoDB is specified in the kafka - profile since no out-of-the-box Health Indicators exists for Kafka:
---
spring.config.activate.on-profile: kafka

management.endpoint.health.group.readiness.include: readinessState, mongo
Spring Boot 3.1 requires a few more build time properties to ensure that required Spring beans are reachable during the AOT processing at build time. See Chapter 23, Native-Complied Java Microservices for details.
The build properties have been added to each microservices build time property file located at src/main/resources/application.yml.
For the Product Composite microservice, properties have been added to make Resilience4J and springdoc-openapi work when native compiled. The properties are prefixed with resilience4j.circuitbreaker and api.common.
For the Product and Recommendation microservices, the following property has been added to be able to get correct error messages from Spring Rest tests:
	# Native Compile: Required to get a proper error message from Spring Rest tests
	server.error.include-message: always
With an understanding of how to upgrade the source code to Spring 3.1, let’s move on to look at new features in Spring Boot 3.1 and how to use them with the source code of this book!
Spring Boot 3.1 has some interesting new features within the book’s scope. They are the following:
For other news not directly related to the material in the book, see Spring Boot 3.1 Release Notes.
We will go through each feature in the following subsections.
Testcontainers make it simple to run automated integration tests with databases, queue managers, etc, that you plan to use in production. Before Testcontainers, we typically used some in-memory database instead of the one used in production. The in-memory database works similarly but not exactly the same as the production database, opening up for quality issues with the integration tests. Testcontainers provide an elegant and easy-to-use abstraction over Docker, making it easy to configure that a specific version of a database engine should be started as a Docker container before the integration tests start and also to be shut down once the tests are done.
One concern with configuring Testcontainers has been to figure out what Spring properties to map to the Testcontainer’s properties to establish connectivity from the Spring libraries to the underlying database, etc. For example, for a MongoDB database, we have to supply a configuration that looks like:
  @DynamicPropertySource
  static void setProperties(DynamicPropertyRegistry registry) {
    registry.add("spring.data.mongodb.host", database::getContainerIpAddress);
    registry.add("spring.data.mongodb.port", () -> database.getMappedPort(27017));
    registry.add("spring.data.mongodb.database", () -> "test");
  }
Starting with Spring 3.1, a new concept called Service Connections is introduced. Service Connections will automate this configuration for us for the most commonly used resources, making use of Testcontainers even easier.
With Spring 3.1, we also get a simplified setup of the dependency on Testcontainers and a new option to use Testcontainers at development time.
For more information on these improvements, see https://spring.io/blog/2023/06/23/improved-testcontainers-support-in-spring-boot-3-1.
Let’s look through each enhancement one by one.
From SpringBoot 3.1 onwards, the Testcontainer version is already configured in the BOM, so we don’t need to specify either the Testcontainer’s BOM or its version.
Using Spring Boot 3.0, we specify the following in the build.gradle- file:
    implementation platform('org.testcontainers:testcontainers-bom:1.17.6')
    testImplementation 'org.testcontainers:testcontainers'
Starting with Spring Boot 3.1, this can be simplified to:
testImplementation 'org.springframework.boot:spring-boot-testcontainers'
With Spring boot 3.1 comes a new annotation, @ServiceConnection, that understands how to configure Spring properties for a specific type of test container. For a list of supported resources, see https://docs.spring.io/spring-boot/docs/current/reference/html/features.html#features.testing.testcontainers.service-connections.
In Spring 3.0, we must specify what Spring properties to set using a property setter method annotated with @DynamicPropertySource. For a MongoDB test container, it looks like this:
public abstract class MongoDbTestBase {
  private static MongoDBContainer database = new MongoDBContainer("mongo:6.0.4");

  static {
    database.start();
  }

  @DynamicPropertySource
  static void setProperties(DynamicPropertyRegistry registry) {
    registry.add("spring.data.mongodb.host", database::getContainerIpAddress);
    registry.add("spring.data.mongodb.port", () -> database.getMappedPort(27017));
    registry.add("spring.data.mongodb.database", () -> "test");
  }
}
In Spring 3.1 it can be simplified to this:
public abstract class MongoDbTestBase {

  @ServiceConnection
  private static MongoDBContainer database = new MongoDBContainer("mongo:6.0.4");

  static {
    database.start();
  }

}
For details, see the classes MongoDbTestBase and MySqlTestBase in the src/test/java folder of the Product, Review, and Recommendation microservices, starting from Chapter 6, Adding Persistence.
Starting with Spring Boot 3.1, we can now use Testcontainers during development time and not only when we run integration tests! This allows us to configure Testcontainers for the external dependencies a Spring Boot application requires, for example, the microservices in this book. Based on this configuration, we can create a Test Application that will start the external resources as test containers when the application is started. By default, the test container stops when the application is stopped. This can be inconvenient since you, for example, might have inserted test data in a database running as a test container. We can enable an experimental feature in Testcontainers for Reusable containers to prevent the test container from stopping. Then the container will run until we kill the container explicitly. This can be very convenient if we start and stop an application multiple times while we, for example, test new code and fix errors before establishing solid integration tests.
To use Testcontainers during development, we need to write a special Test Application class, a configuration of Testcontainers to be used by the test application, and we probably also want to keep the test containers up and running if we need to restart our application to correct some code.
For more information, see https://spring.io/blog/2023/06/23/improved-testcontainers-support-in-spring-boot-3-1.
Let’s first create a test application and then learn how to run it either in a terminal or in an IDE such as Visual Studio Code.
A test application is created in the source folder for test classes, and its primary purpose is to point out the real Main Application and a configuration class that describes what Testcontainers it needs.
The test application for the Product microservice looks like this:
public class TestApplication {
  public static void main(String[] args) {
    SpringApplication.from(ProductServiceApplication::main)
      .with(TestApplicationConfiguration.class)
      .run(args);
  }
}
The test application’s configuration class defines a Testcontainer for MongoDB, required by the Product microservice. It looks like:
@TestConfiguration(proxyBeanMethods = false)
public class TestApplicationConfiguration {

  @Bean
  @ServiceConnection
  MongoDBContainer mongoDBContainerContainer() {
    return new MongoDBContainer("mongo:6.0.4").withReuse(true);
  }

}
Note that the MongoDBContainer is configured to support reuse by calling the method withReuse(true). This configures the test container not to stop the container once the application stops. The support for this feature is currently experimental and must therefore be enabled.
The reuse feature can be enabled by adding the line testcontainers.reuse.enable=true in the file ~/.testcontainers.properties. In my case, the property file looks like the following:
$ cat ~/.testcontainers.properties
#Modified by Testcontainers
#Sun Dec 05 15:33:25 CET 2021
docker.client.strategy=org.testcontainers.dockerclient.UnixSocketClientProviderStrategy
testcontainers.reuse.enable=true
Note: Once you are done with trying out the reuse - feature in Testcontainers, I suggest you disabled it again, since the support currently only is experimental.
For more information, see https://java.testcontainers.org/features/reuse/.
Let’s try out Testcontainers at development time using a terminal!
A test application can be started using the new Gradle task bootTestRun.
Test applications have been added to the microservices that use databases in Chapter 6, Adding Persistence. Head over to the source folder for Chapter 6 with the command cd Chapter06 and start each microservice in a separate terminal window.
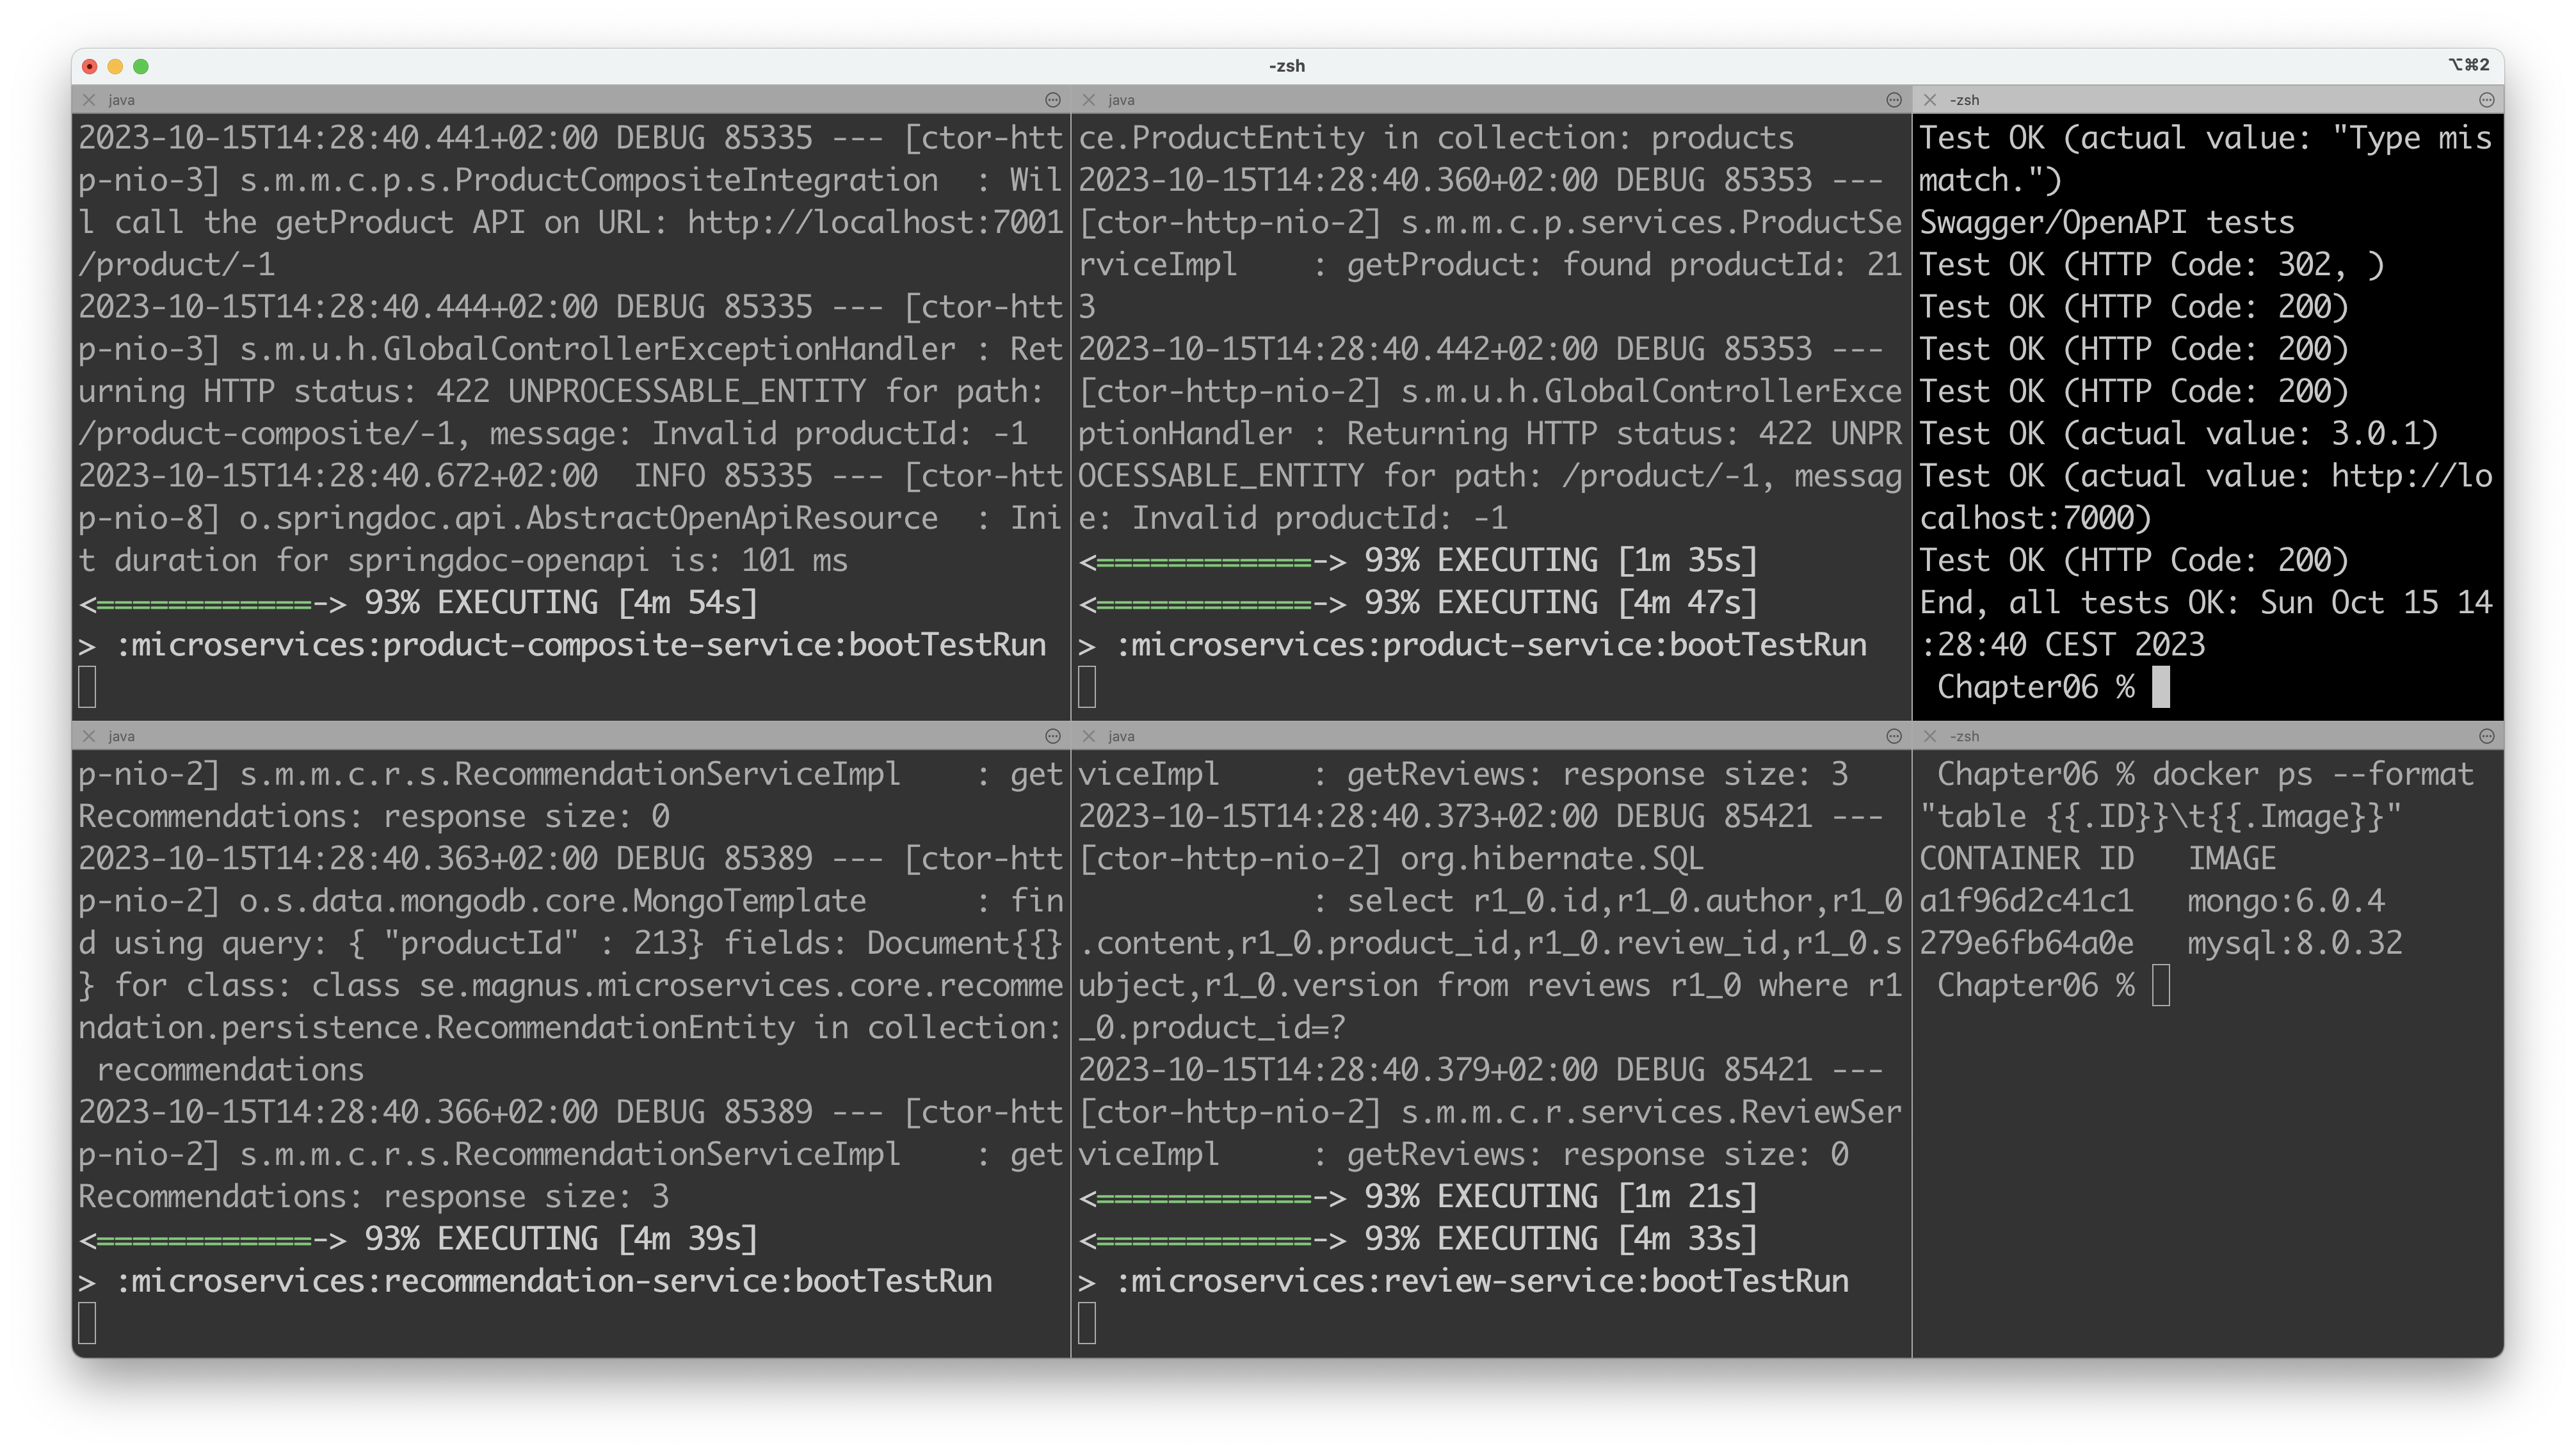
Once they have started, you can run the end-to-end test script, test-em-all.bash, to verify that the microservice landscape works as expected. Since the microservices run without Docker, we need to specify the port where the Product Composite is listening when not running as a Docker container, port 7000. After the tests have been executed successfully, you can see the Docker containers running with a docker ps command.
To summarize, you need to run the following commands, each in a separate terminal:
./gradlew microservices:product-composite-service:bootTestRun
./gradlew microservices:product-service:bootTestRun
./gradlew microservices:recommendation-service:bootTestRun
./gradlew microservices:review-service:bootTestRun
HOST=localhost PORT=7000 ./test-em-all.bash
docker ps
Here is a screenshot from my tests:
After stopping all four microservices, you can still find the data in the MongoDB and MySQL databases.
For MongoDB, you can run a command like:
docker exec a1f96d2c41c1 mongosh product-db --quiet --eval "db.products.find({}, {_id:0, productId:1})"
The response should look like:
[ { productId: 113 }, { productId: 213 }, { productId: 1 } ]
For MySQL, you can run a command like:
docker exec 279e6fb64a0e mysql -uroot -ptest test -e "select product_id, review_id from reviews"
The response should look like:
product_id	review_id
1	        1
...
113	        3
Once you are done with the test containers, you can stop them with a regular docker rm command like:
docker rm -f a1f96d2c41c1 279e6fb64a0e
Finally, let’s learn how to run the test applications in an IDE.
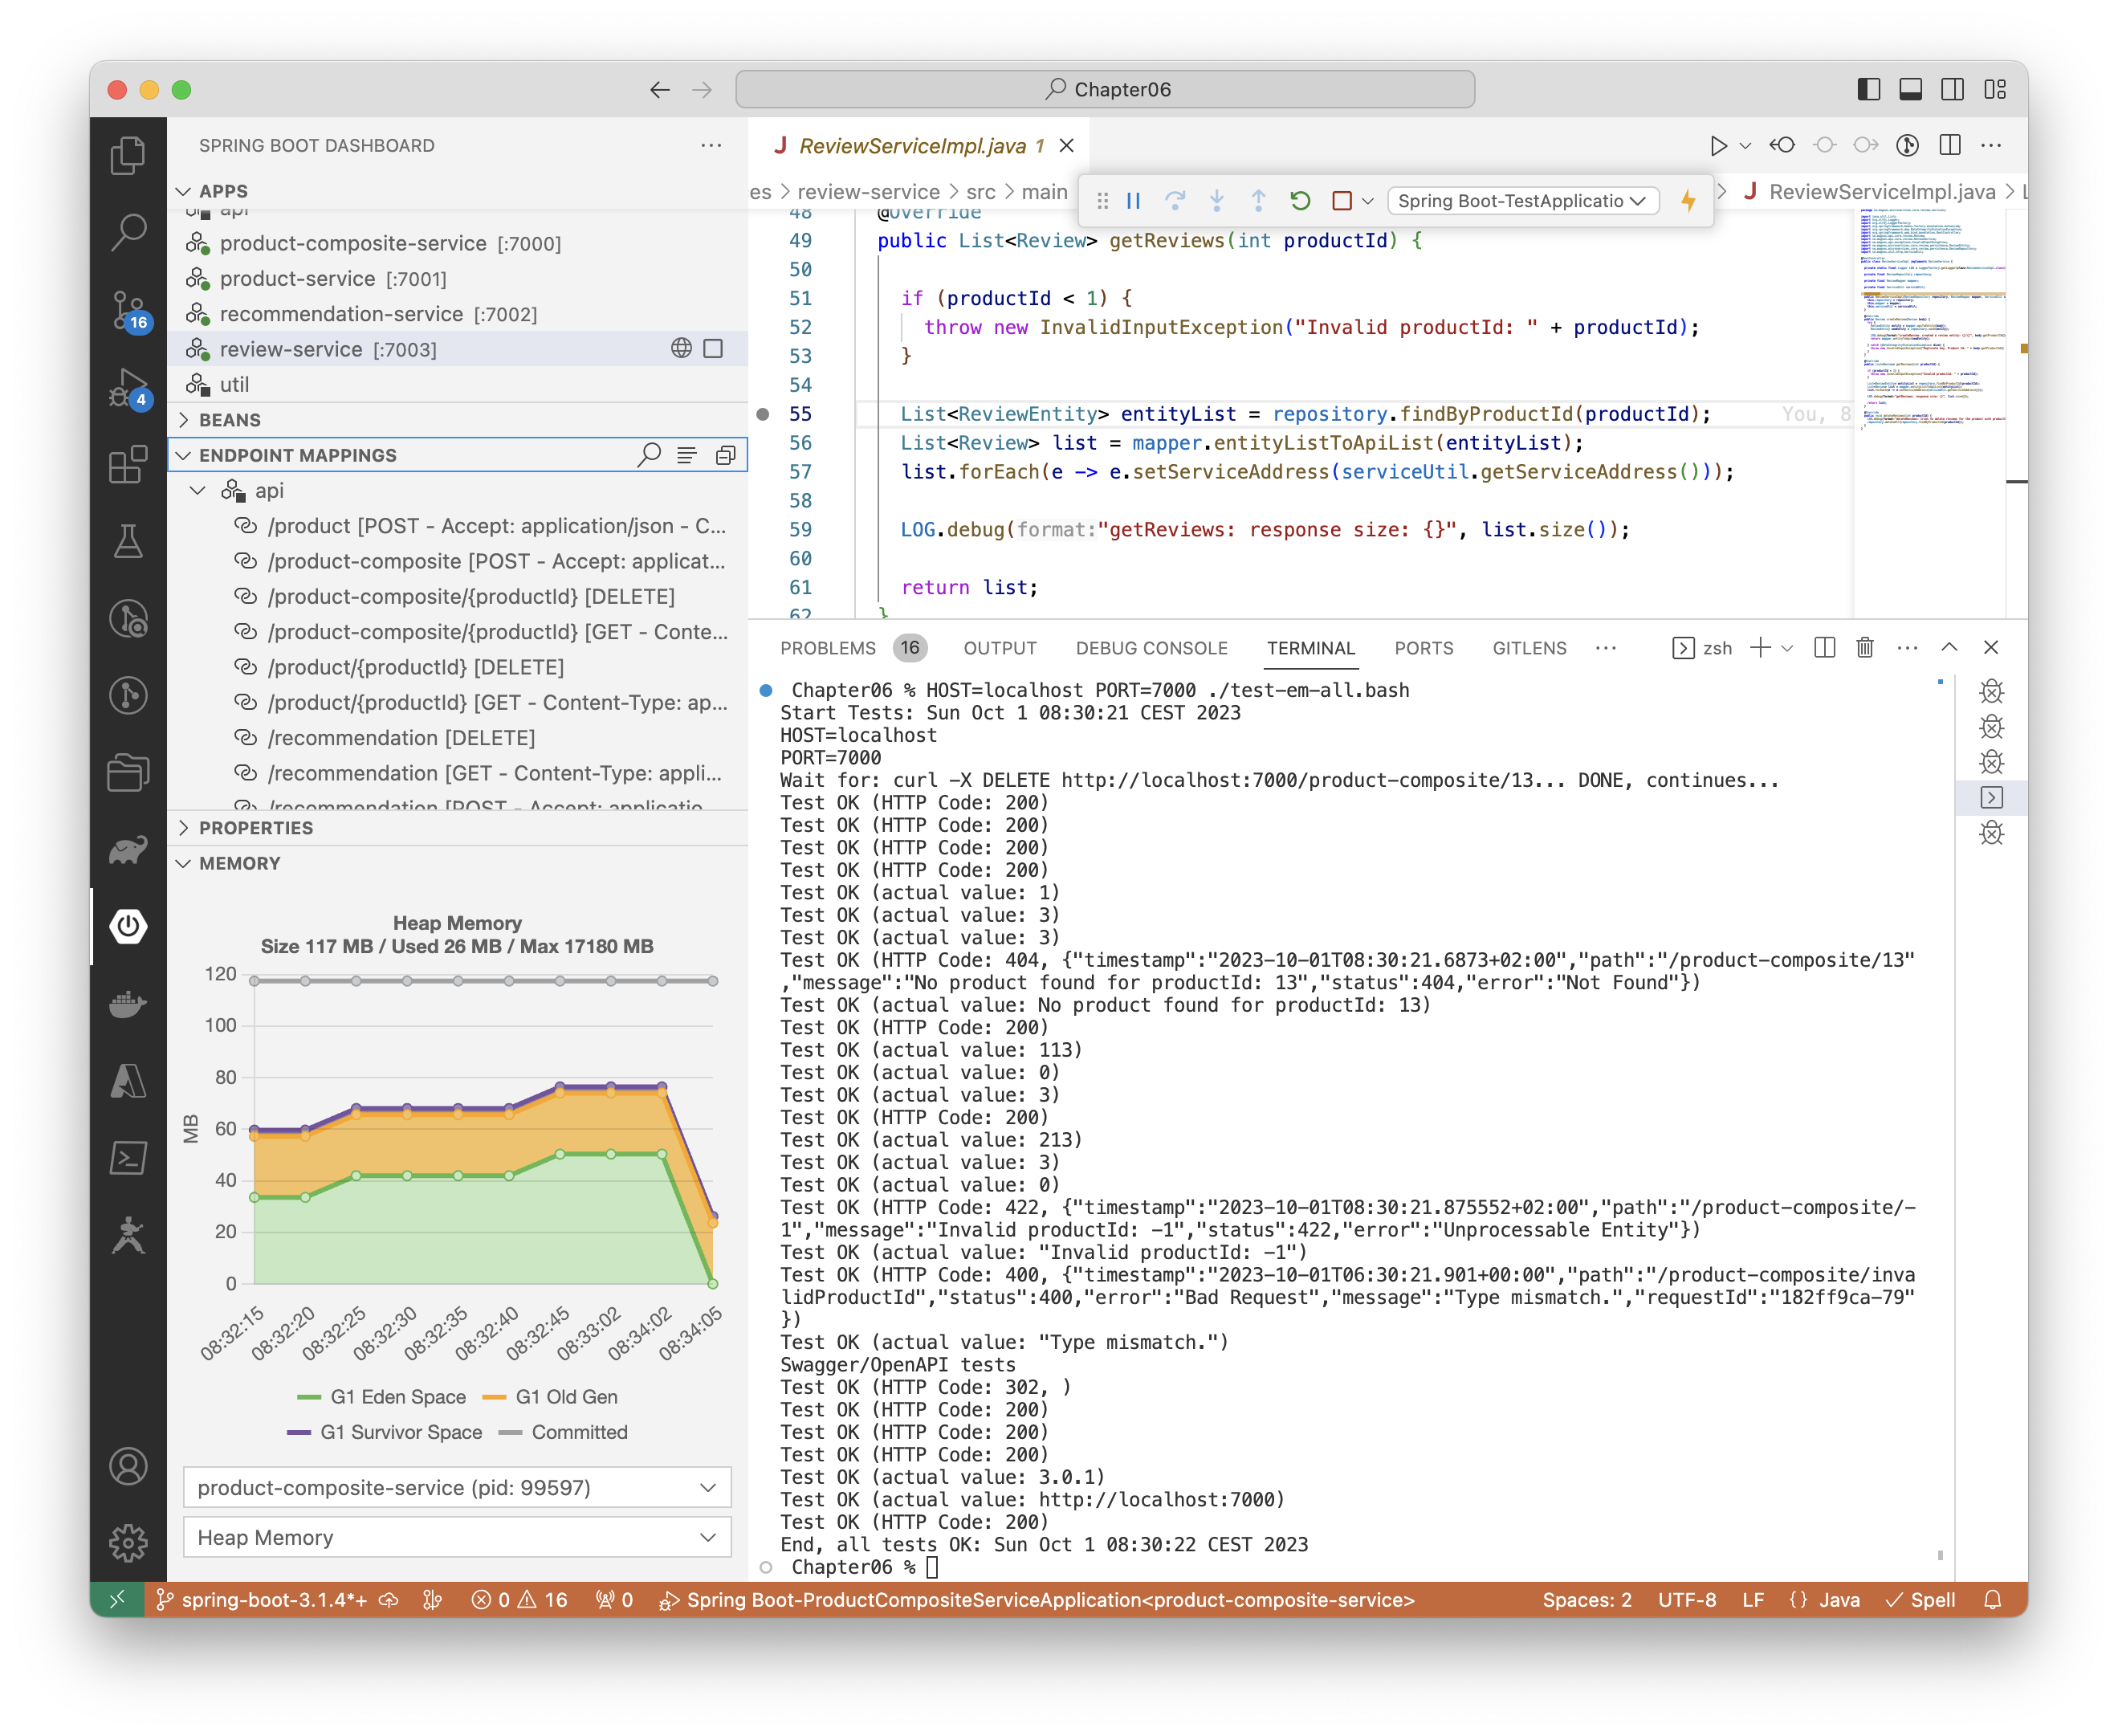
You can also run the test application within an IDE that supports launching Spring Boot applications such as Visual Studio Code with the Spring Boot Extension Pack extension installed.
After launching the test application in the Spring Boot Dashboard, you can run the end-to-end test script, test-em-all.bash, in a terminal window in Visual Studio Code. It can look like:
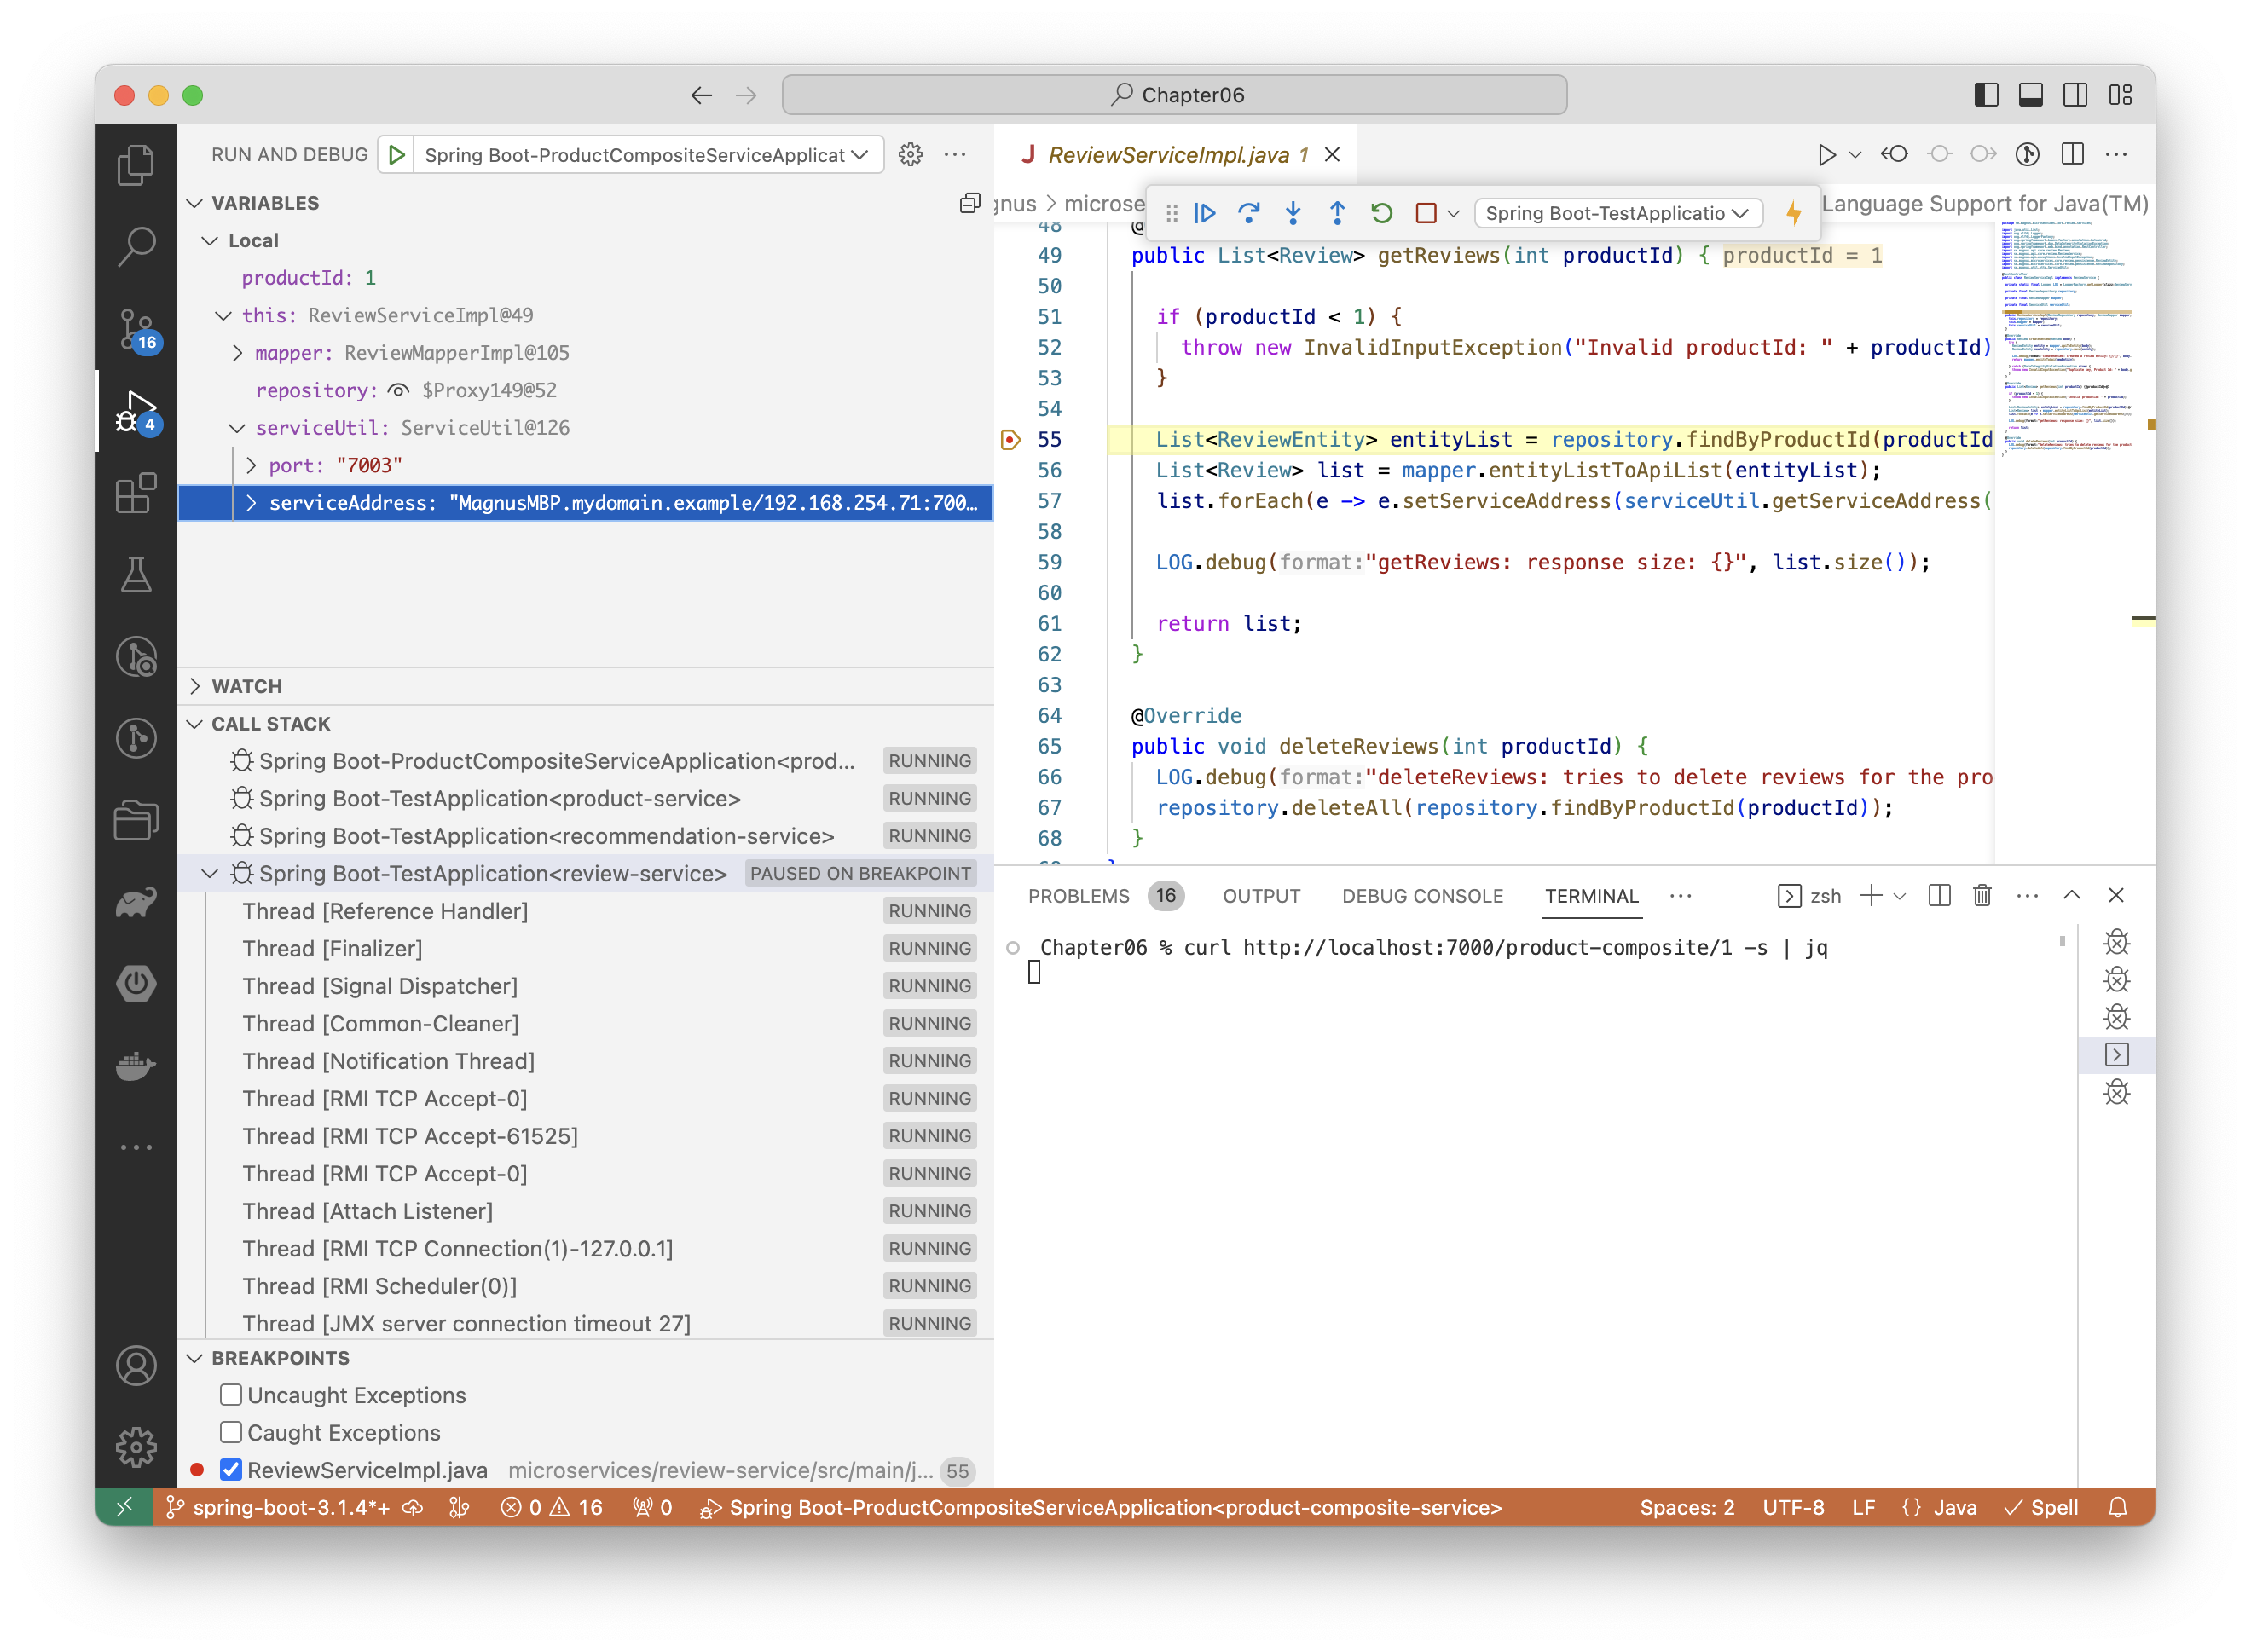
One additional benefit of using an IDE instead of a plain terminal is using its built-in debugger while running the test applications. For example, debugging the Review microservice can look like:
That’s all about the improved support for Testcontainers in Spring Boot 3.1. Next, let’s learn about SSL Bundles!
Setting up secure communication using SSL and TLS is complex by nature, and the fact that different libraries (and even major versions of the same library) require setting up the configuration in different ways, makes it even more complex and time-consuming.
To ease this burden, Spring Boot 3.1 introduces the concept of SSL bundles. SSL bundles provide a standardized way for configuring SSL and TLS trust artifacts, such as keystores, certificates, and private keys. An SSL bundle can be used by many communication libraries, such as REST clients using either a RestTemplate or a WebClient instance, a Web server, or a database client using, for example, MongoDB or Redis.
For more information, see https://spring.io/blog/2023/06/07/securing-spring-boot-applications-with-ssl
In the book, starting with Chapter 11, Securing Access to APIs, the Spring Cloud Gateway server uses an SSL configuration that looks like this:
server.ssl:
  key-store-type: PKCS12
  key-store: classpath:keystore/edge.p12
  key-store-password: password
  key-alias: localhost
Using Spring Boot 3.1, an SSL bundle for the Gateway server can be configured like this:
spring.ssl.bundle.jks.gateway:
  key:
    alias: localhost
  keystore:
    type: PKCS12
    location: classpath:keystore/edge.p12
    password: password
The Gateway server can specify what SSL bundle to use, i.e. the gateway-bundle declared above, by declaring:
server.ssl.bundle: gateway
The password is stored in plain text in Chapter 11, as shown above. In chapters 12 to 16, passwords are stored in an encrypted format using the Spring Cloud Configuration server’s encryption service. The encrypted version of the passwords looks like the following in the configuration of the SSL bundle:
password: '{cipher}d59274473b196cebe288f849c442eba34aa497d14a13e10a23f824489e1c23ec'
Finally, in chapters 17 to 23, they are provided at runtime using environment variables to better fit in a Kubernetes environment. The Docker Compose files have been adapted to passwords provided as environment variables and looks like this:
- SPRING_SSL_BUNDLE_JKS_GATEWAY_KEYSTORE_PASSWORD=${GATEWAY_TLS_PWD}
With SSL Bundles covered, let’s finally learn about the last new feature, support for auto-configuration of the Spring Authorization Server.
Spring Boot 3.1 adds support for auto-configuring the Spring Authorization Server.
Using Spring Boot 3.0, the dependency on the Spring Authorization Server is configured by the following:
   implementation 'org.springframework.boot:spring-boot-starter-web'
   implementation "org.springframework.security:spring-security-oauth2-authorization-server:1.0.0"
With Spring Boot 3.1 comes a starter dependency for the Spring Authorization Server that can be used to auto-configure the server like:
implementation 'org.springframework.boot:spring-boot-starter-oauth2-authorization-server'
With this, all new features in Spring Boot 3.1 that are of interest to this book are covered. Next up is a walkthrough of some new and resolved bugs.
Unfortunately, all new major versions of complex software like Spring Boot come with new bugs. In this section, we will go through new, partly fixed and bugs that have been resolved.
Since v4.0.3 of the Spring Cloud Configuration server, a new bug prevents properties from being correctly loaded from the config server. The bug affects Spring Cloud 2022.0.4, used with Spring Boot 3.1 in this blog post, and is described in https://github.com/spring-cloud/spring-cloud-config/issues/2293. To workaround this bug, all Spring Cloud clients have been downgraded to v4.0.2 by replacing:
implementation 'org.springframework.cloud:spring-cloud-starter-config'
with:
    implementation 'org.springframework.cloud:spring-cloud-starter-config'
    implementation 'org.springframework.cloud:spring-cloud-config-client:4.0.2'
in their build.gradle files. This affects the code examples in chapters 12 to 16.
In Spring Boot 3.0, native tests didn’t work out for the tests used in the book. For details, see Chapter 23, Native-Complied Java Microservices. With Spring Boot 3.1, native tests have improved and work for many tests, but not all.
Therefore, all test classes for the microservices in Chapter 23 have been revised, and tests that still fail when run as a native test have been annotated with @DisabledInNativeImage together with a comment describing the error that caused the test to fail.
The version of the Spring Cloud Eureka server used in the book, v4.0.0, contains a bug described in https://github.com/spring-cloud/spring-cloud-netflix/issues/4145. The Eureka server’s application class used in the book contains a workaround that looks like this:
  // Workaround for issue gh-4145 in Spring Cloud 2022.0.3
  // See https://github.com/spring-cloud/spring-cloud-netflix/issues/4145
  @RestController
  static class CustomErrorController implements ErrorController {

    private static final String ERROR_MAPPING = "/error";

    @RequestMapping(ERROR_MAPPING)
    public ResponseEntity<Void> error() {
      return ResponseEntity.notFound().build();
    }
  }
Since this bug is resolved in the version of the Eureka server used in Spring Cloud 2022.0.4, this workaround has been removed.
This completes the walkthrough of new and resolved bugs; let’s wrap this blog post with a short recap on how to run the end-to-end tests to verify that everything works as expected with Spring Boot 3.1.
To try out the source code in this book with Spring Boot 3.1, first ensure that Docker, Java 17, git, jq, curl are installed. For installation instructions, see Chapters 21 and 22. Then perform the following steps:
git clone https://github.com/PacktPublishing/Microservices-with-Spring-Boot-and-Spring-Cloud-Third-Edition.git
cd Microservices-with-Spring-Boot-and-Spring-Cloud-Third-Edition
git checkout SB3.1
cd ChapterNN
./gradlew build
docker-compose build
docker-compose up -d
./test-em-all.bash
Note: Replace ChapterNN with Chapter04 - Chapter23 depending on what chapter you want to test.
Look for a final log message that says:
End, all tests OK...
Tear down the microservice landscape with the command:
docker-compose down
For testing the source code changes with Kubernetes, Istio, and the EFK Stack, see instructions in chapters 17 - 20 in the book for setting up the Kubernetes cluster. For building native images with the source code changes, see instructions in Chapter 23, Native-Complied Java Microservices.
In this blog post, we have seen how to upgrade the source code in this book to Spring Boot 3.1 and use the end-to-end test script, test-em-all.bash to verify that everything works as expected. We have also learned about new and resolved bugs and, most importantly, how to use new features in Spring Boot 3.1, such as the support for Testcontainers at development time and SSL Bundles.