Blogg
Här finns tekniska artiklar, presentationer och nyheter om arkitektur och systemutveckling. Håll dig uppdaterad, följ oss på LinkedIn
Här finns tekniska artiklar, presentationer och nyheter om arkitektur och systemutveckling. Håll dig uppdaterad, följ oss på LinkedIn

This is the third part of the blog series “Faster startup with Spring Boot and CRaC”, where we will learn how to automate the build process for creating Docker images for CRaC-enabled applications, including how to warm up the application before the checkpoint. We will create CRaC images for reactive microservices based on Project Reactor and Kafka.
In the first blog post, we learned how to use CRaC to ten-fold the startup performance. In the second blog post, we learned how to warm up a Spring Boot application before taking the checkpoint and how to provide configuration at runtime when the application is restarted from the checkpoint.
In this blog post, we will focus on simplifying and automating the process of creating a Docker image for a CRaC-enabled application, or a CRaC image for short. This image contains the application’s jar file and the files created by the CRaC checkpoint.
Note: In the previous blog posts, we used a multi-stage-based Dockerfile to keep the build process contained within the Dockerfile. However, this introduced some unwanted complexity we will address in this blog post.
We will try out the automated build process on a group of cooperating reactive Spring Boot applications from my book Microservices with Spring Boot 3 and Spring Cloud.
The blog post is divided into the following sections:
Let’s start learning what is required to create CRaC images for reactive microservices.
The approach is the same as in the previous blog post, but applied to reactive microservices to improve scalability.
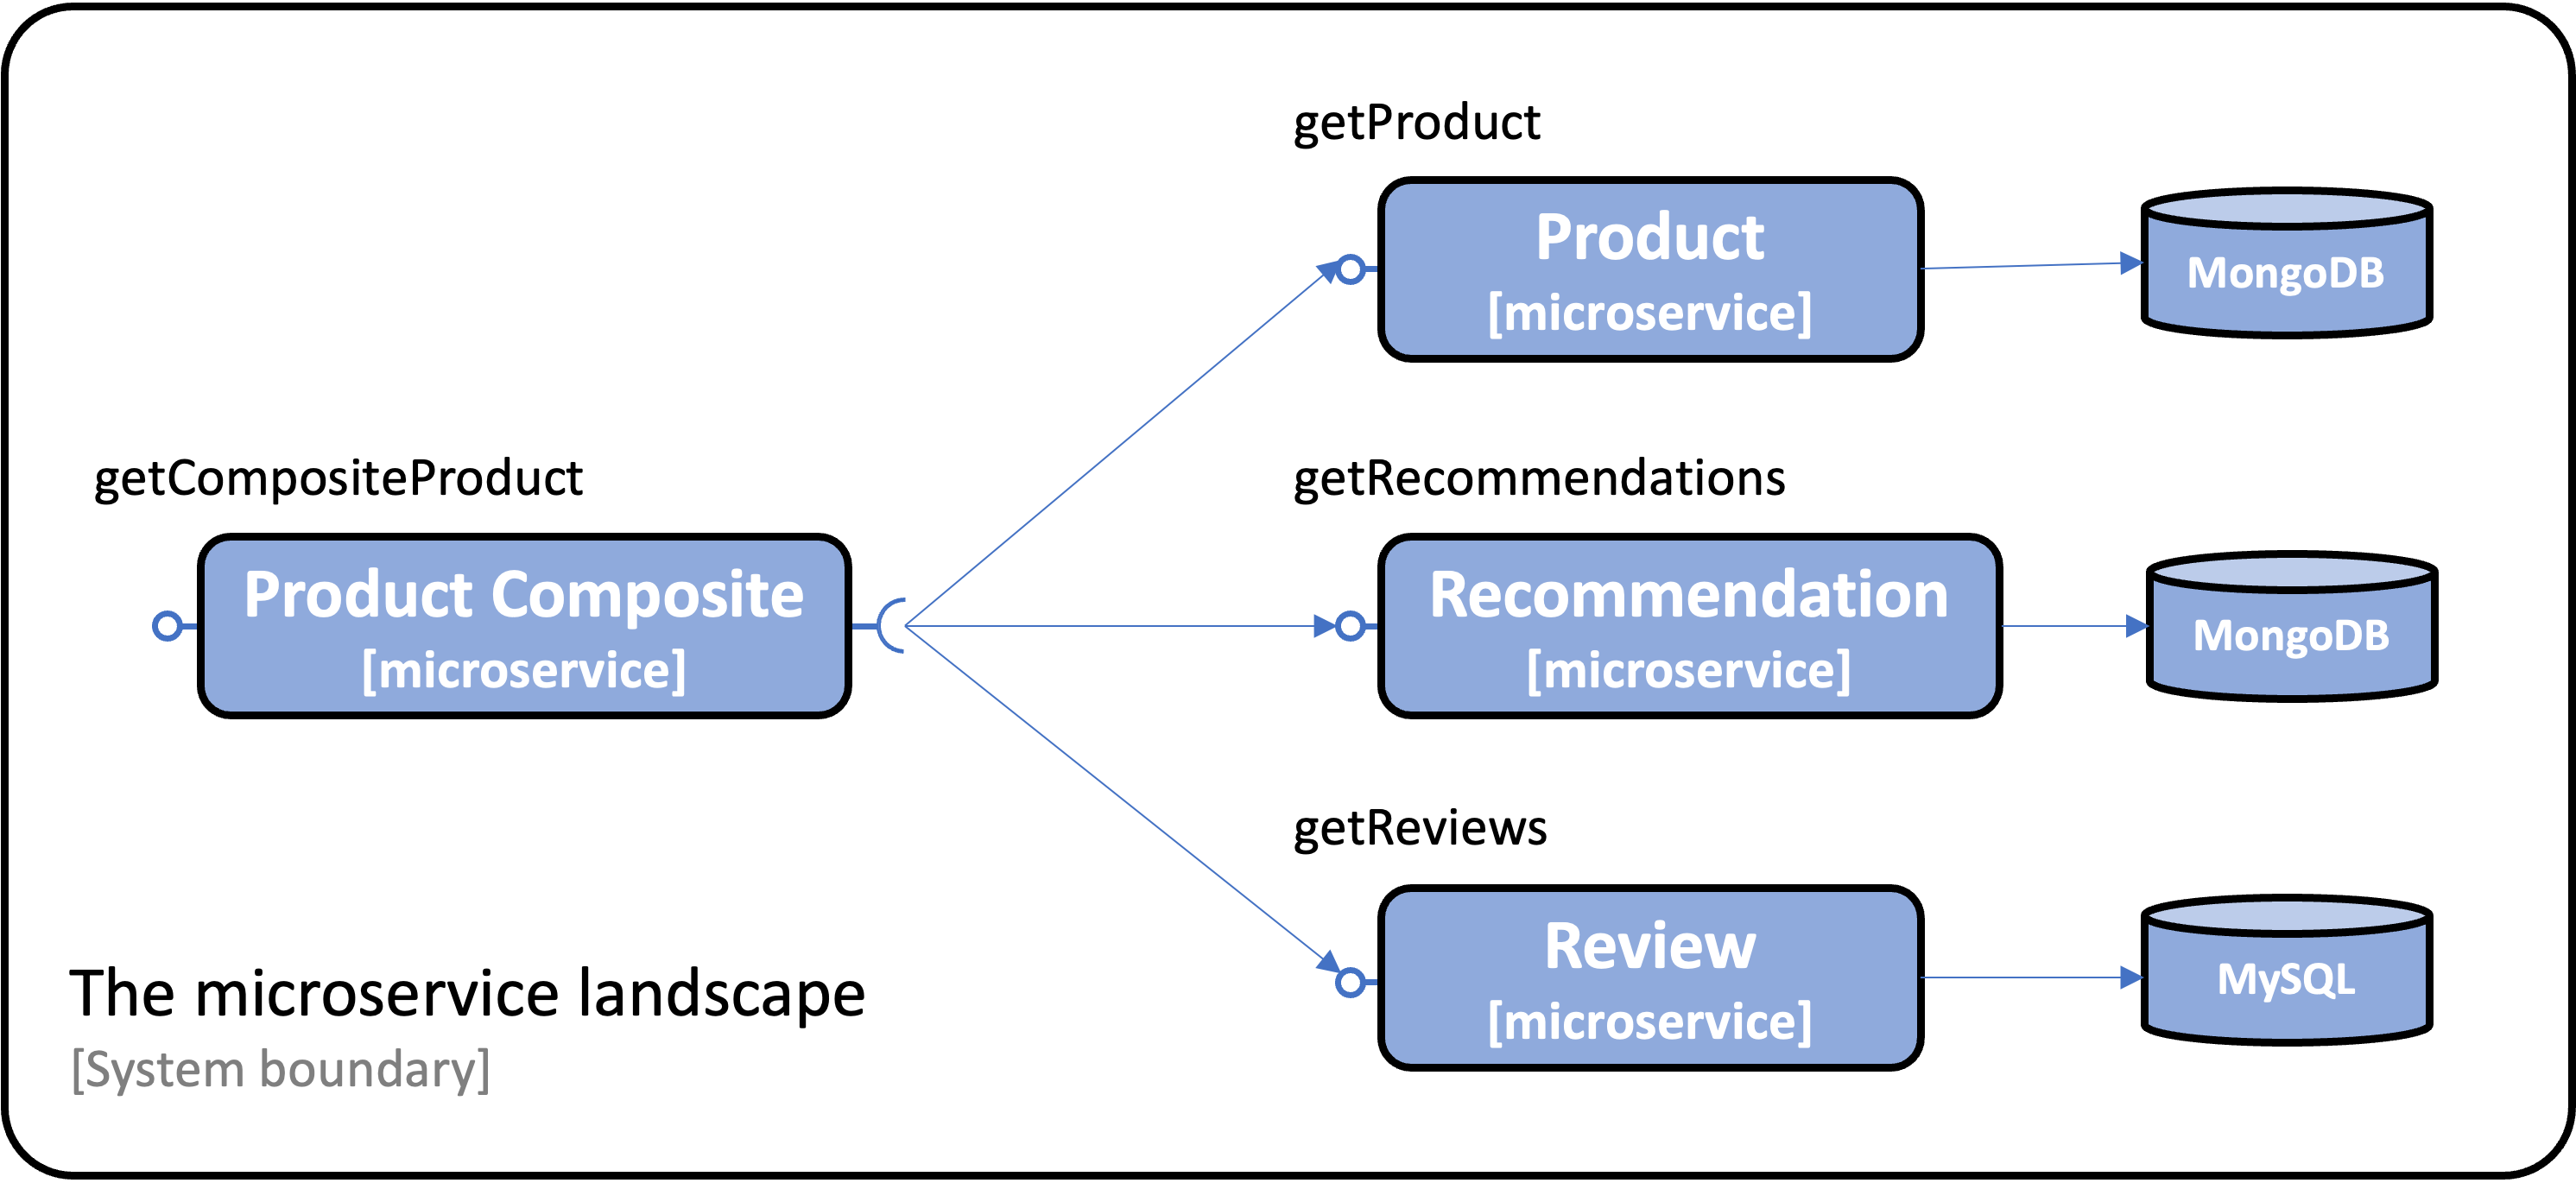
The system landscape consists of four microservices. Three store data in databases, while the fourth aggregates information from the others and exposes a REST API for external API consumers.
The book introduces a reactive programming model in Chapter 7, so the source code for this blog post is based on that chapter’s code.
Note: When I wrote the book, Virtual Threads were not available, so instead Project Reactor is used.
The system landscape is managed using Docker Compose. Docker Compose starts the microservices from CraC images, along with the databases and event streaming platform used by microservices.
For read-only services, the microservices communicate internally using synchronous REST APIs:
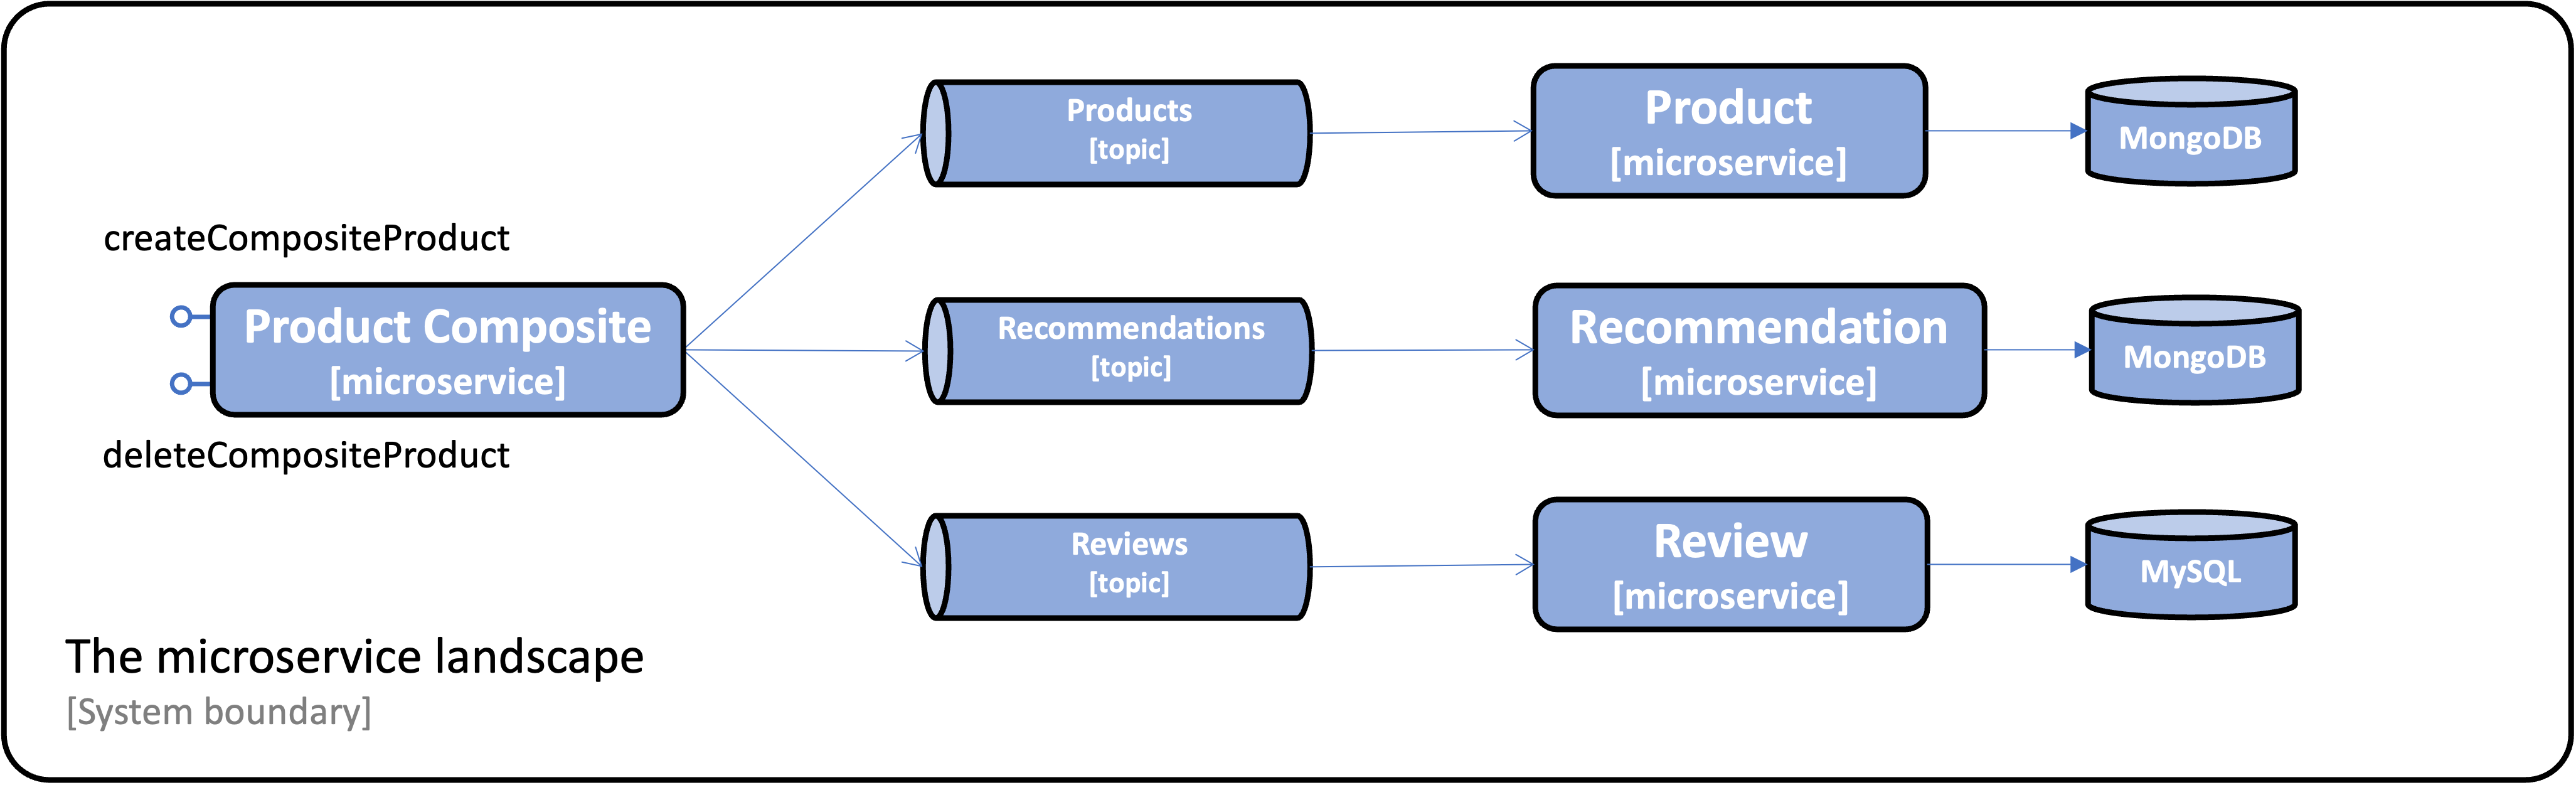
For updating services, event streaming is used by the microservices:
To prepare the source code in a Spring Boot application for CRaC, there are essentially two things to consider:
How to close and re-establish connections to external resources before and after a CRaC checkpoint and restore operation. In most cases, third-party (3PP) libraries are used to manage external resources, so the main concern is ensuring that the 3PP libraries being used support CRaC.
How to load runtime-specific configuration during a CRaC restore, i.e., when the application starts up from a CRaC checkpoint. We will rely on Spring Cloud’s Context Refresh functionality to reload the runtime configuration at CRaC restore time—see the previous blog post for details.
The same changes in the source code were applied as in the previous blog post regarding the dependencies to the CRaC-library and spring-cloud-starter for Spring Cloud’s Context Refresh functionality. However, a couple of new problems specific to reactive microservices were identified:
When writing this blog post, Spring Cloud Stream did not support CRaC; see the GitHub issue Can’t create CRaC checkpoint…. Therefore, Spring Cloud Stream has been replaced by Spring Kafka.
The problem with the MongoClient at CRaC restore described in the previous blog post also applies to the reactive counterpart. The problem is addressed similarly but is applied to the reactive MongoClient class, com.mongodb.reactivestreams.client.MongoClient.
Spring’s reactive WebClient needs to be configured in a specific way to support CRaC as documented in Spring’s smoke-test project for CRaC. See the WebClient-module for details. The recommended configuration is applied in the class WebClientConfiguration.java in Chapter07/microservices/product-composite-service.
The final result can be found in the Git branch SB3.2-crac-part3 in the book’s Git repository.
Now that we have covered the required code changes, we can start learning how to simplify and automate the process of creating CRaC images.
As already mentioned in the overview of this blog post, the use of multi-stage-based Dockerfiles in the previous blog posts introduced some unwanted complexity. This is caused by CRaC requiring additional Linux privileges, which a standard Docker build command does not allow. As a result, we had to use custom buildx builders, making the build process unnecessarily complex.
To eliminate this complexity, we can take a step back and look at what is required to build a CRaC image without considering the technical solution. What needs to be done is the following:
After some research and thinking, I realized that a more straightforward solution would be to split up the checkpoint and packaging of the CRaC image into two separate steps:
Step one that runs a Jar-based Java application in a container for warmup and checkpointing. Since the docker run command supports extended Linux privileges, we no longer need to rely on complex custom buildx builders.
Note: To be able to capture the checkpoint files after the checkpoint is performed, mapping a Docker volume to the checkpoint folder is essential since the application and its container will stop after the checkpoint.
Step two involves packaging the final CRaC-based Java application in a Docker image. This step will take the checkpoint folder from the previous step together with the application’s jar file and package them in a Docker image.
Note: One important note here is that the checkpoint needs to run in an Operating System and Java environment that is the same as where the restore later on is performed; otherwise, the restore is highly likely to fail, in many cases, with mysterious error messages.
To avoid these problems, the CRaC image will use the jar-based Docker image from the first step as its base image. Since the base image already contains the applications’s jar file, only the checkpoint files need to be added in the second step.
Finally, since I consider all four microservices to be part of the same release cycle, I want the build script to build CRaC images for all microservices when it runs. Therefore, the build script starts a shared training landscape to save build time, which all four microservices will use during their warmup phase.
With the decisions to simplify the build script explained, let’s look at the actual implementation.
The files used to build and test CRaC images are stored in the following folder structure:
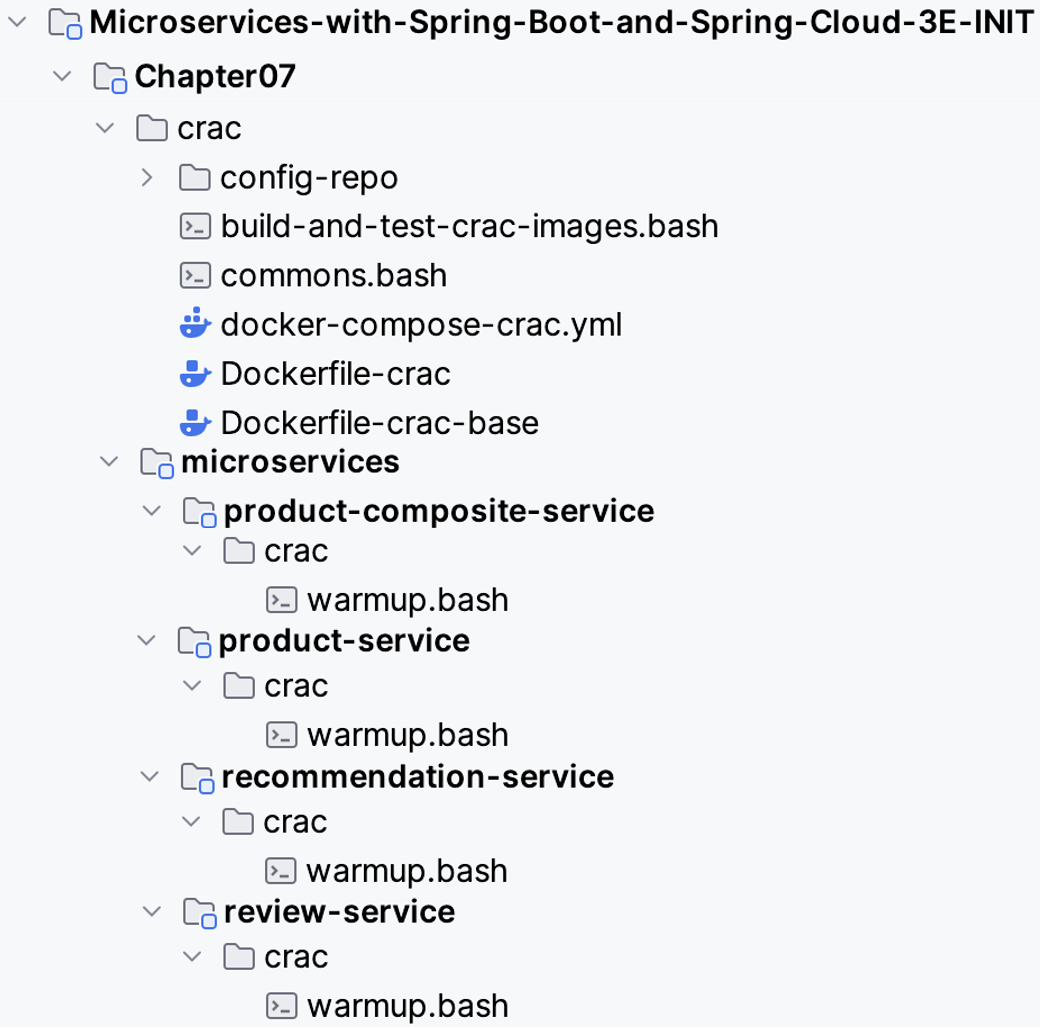
The main parts of the implementation can be found in the folder Chapter07/crac. The most important files are:
build-and-test-crac-images.bash is the entry point for the implementation. Contains parts that are specific to this blog post.
commons.bash contains reusable functions. They are expected to be reusable in other contexts without significant code changes. The essential function is buildCracImage, which does all the heavy lifting when building CRaC images.
Dockerfile-crac-base is used by the buildCracImage function to build a jar-based Docker image; it is also used as the base image for Dockerfile-crac.
Dockerfile-crac is used by the buildCracImage function to build the CRaC image.
docker-compose-crac.yml used by build-and-test-crac-images.bash to start a runtime environment where the CRaC images can be tested, i.e., simulating a runtime environment like a QA or production environment (which typically will be based on Kubernetes or OpenShift).
Also, the microservices-specific folders Chapter07/microservices/<NAME>/crac, contain each microservice’s warmup script, warmup.bash.
The most essential implementation details are the following:
build-and-test-crac-images.bash file performs regular build steps, i.e., no CRaC specific, delegating the CRaC specific build steps to the buildCracImage function in commons.bash. It performs the following steps:
buildCracImage function.Start a runtime environment using the CRaC images and run tests to verify that they work as expected.
Note: The Docker Compose file,
docker-compose-crac.yml, provides the containers running the CRaC images with the minimum required Linux privileges,CAP_CHECKPOINT_RESTORE, and a runtime-specific configuration file using a Docker volume. For example, the definition of the composite service looks like:
   product-composite-prod:
     image: hands-on/product-composite-crac
     cap_add:
       - CHECKPOINT_RESTORE
     volumes:
        - "./config-repo/prod/product-composite-configuration.yml:/runtime-configuration.yml"
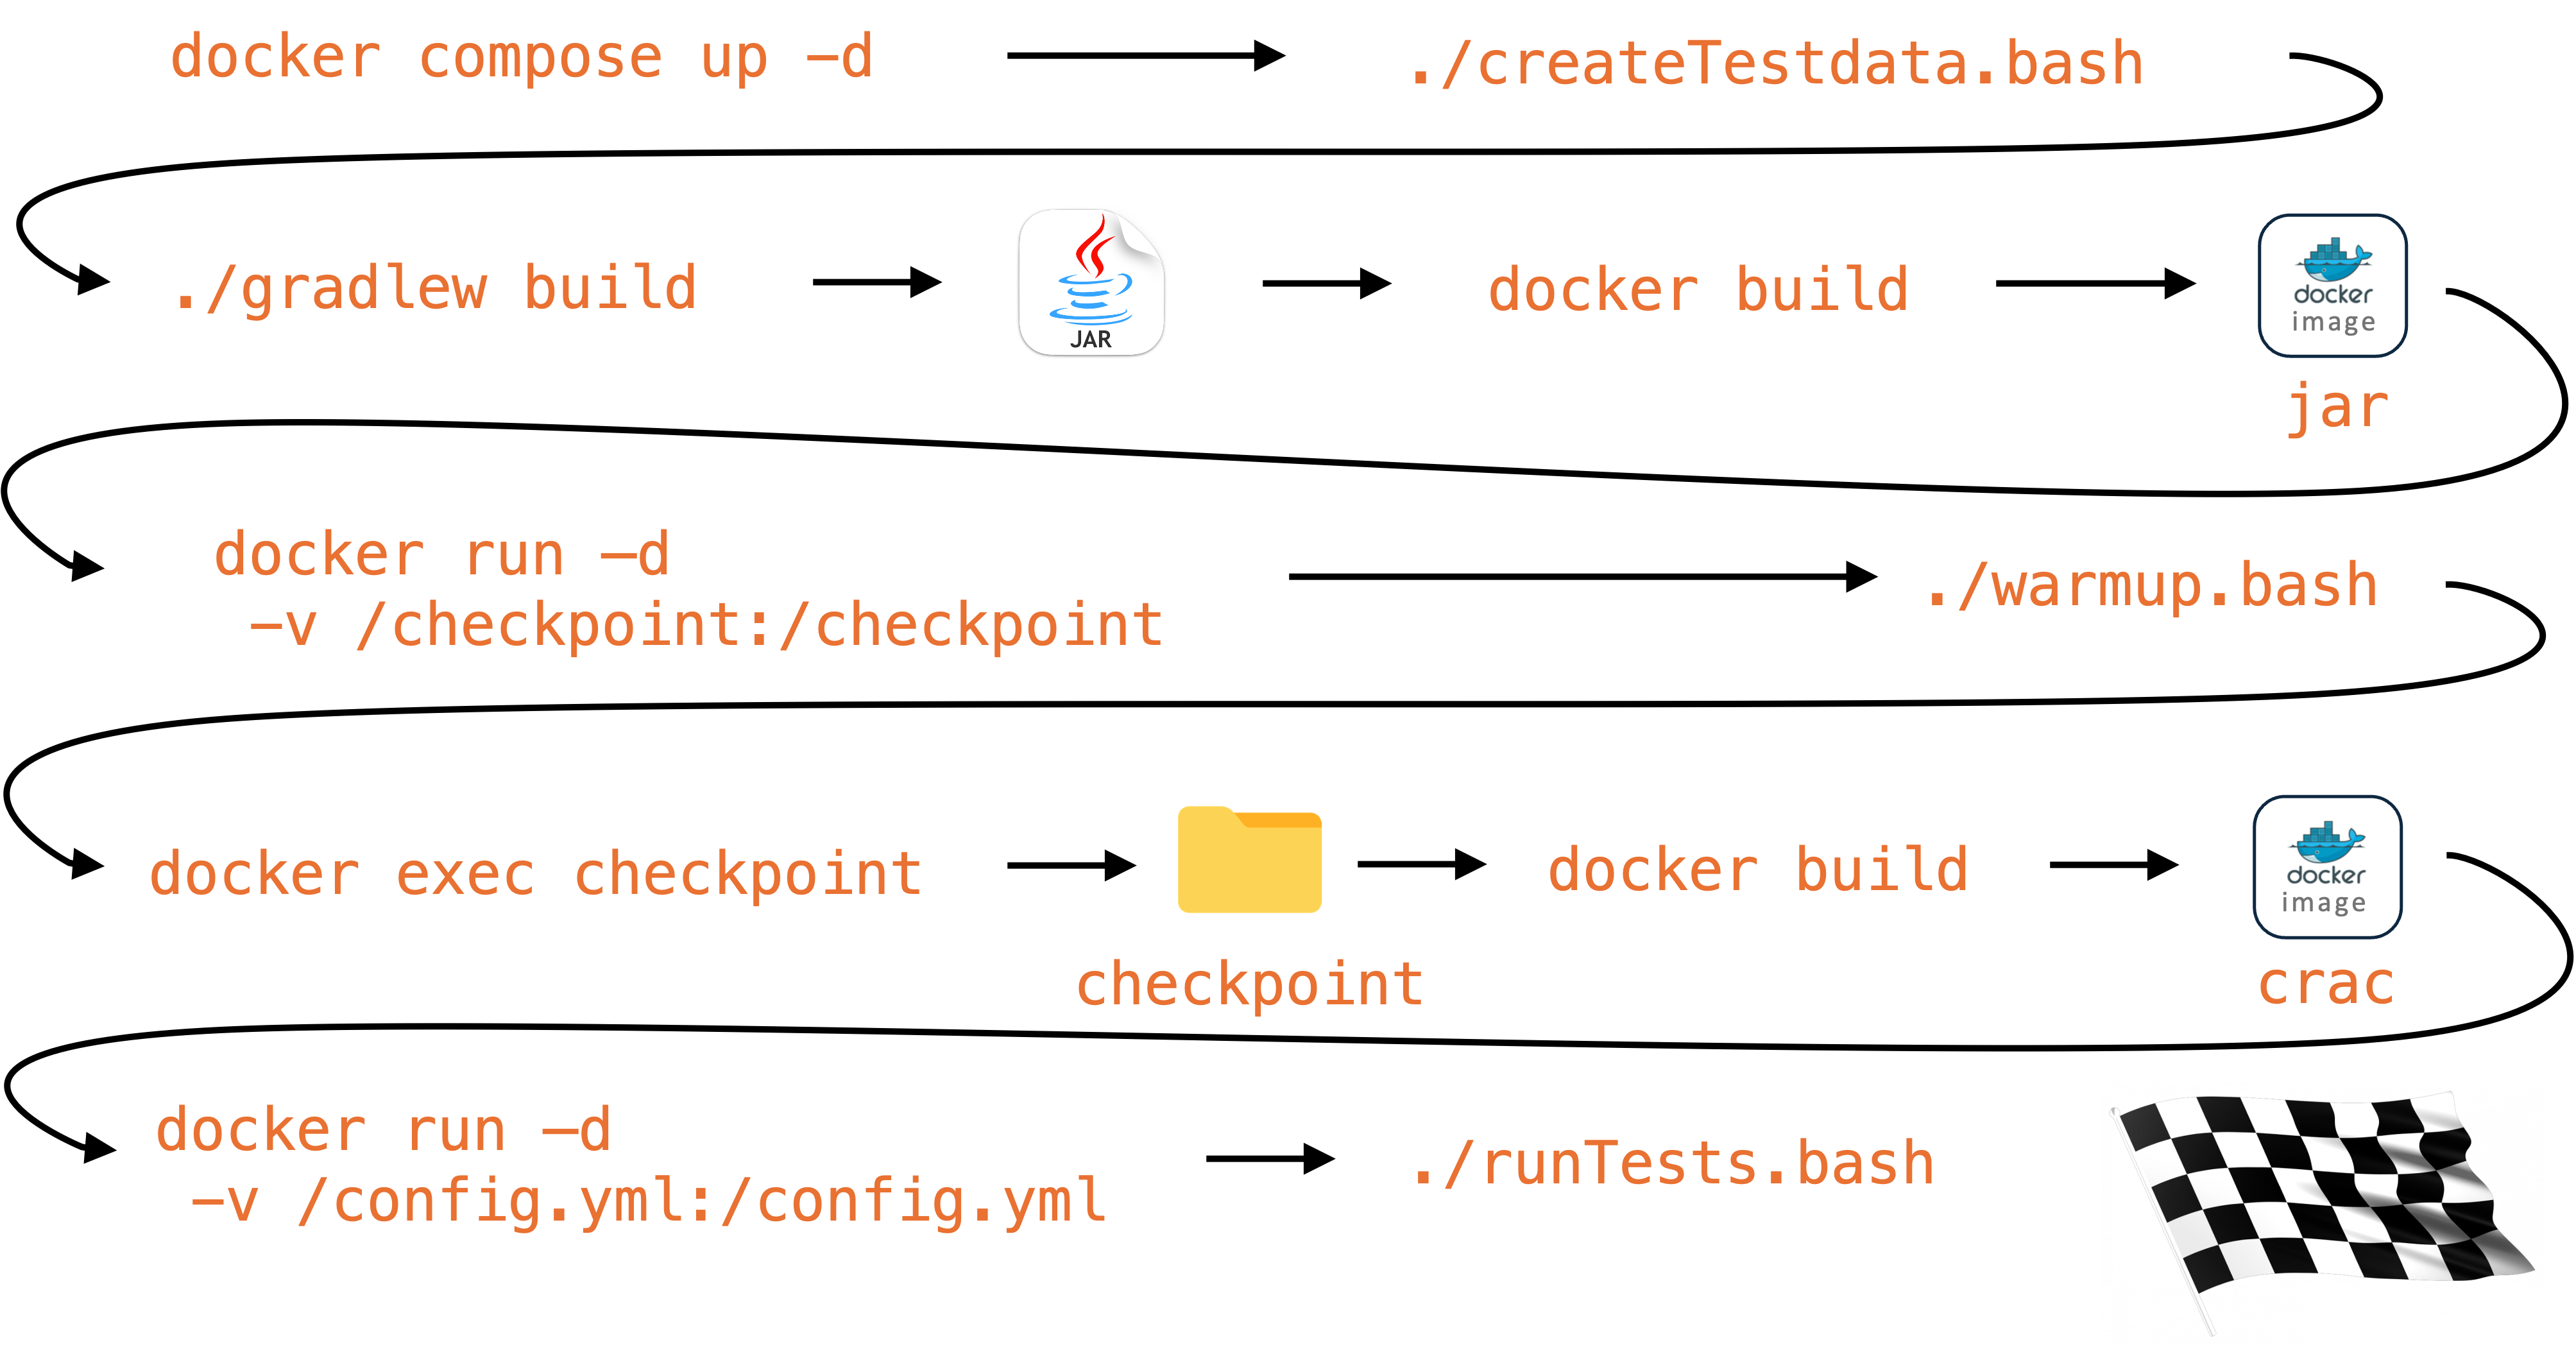
The buildCracImage function in commons.bash builds a CRaC image for a microservice by the following steps:
Build a base Docker image based on the application’s jar file:
docker build -f crac/Dockerfile-crac-base -t $baseImageTag $servicePath
Startup a Docker container, joining it in the training landscape’s network and mounting a volume to be able to get access to the checkpoint files after the checkpoint completes:
docker run -d --name crac-build -p 8080:$servicePort --network $network \
   --cap-add=CHECKPOINT_RESTORE --cap-add=SYS_PTRACE \
   -e SPRING_PROFILES_ACTIVE="$springProfiles" \
   -v $PWD/checkpoint:/checkpoint $baseImageTag \
   java -XX:CRaCCheckpointTo=checkpoint -jar app.jar
Runs a microservice-specific warmup script
$warmupScript
Takes the checkpoint. Since the checkpoint command executes asynchronously and then kills the container, the script waits for the container to stop:
docker exec crac-build jcmd app.jar JDK.checkpoint

until waitForContainerToStop crac-build; do
   echo "Waiting for the checkpoint to be ready..."
   sleep 1
done
Build the final CRaC image using the files from the checkpoint folder:
docker build -f crac/Dockerfile-crac -t $serviceTag .
The following image summarizes the build process:
With an understanding of how the implementation works, let’s try it out!
First, get the code and ensure you are using Java 21 (sample command provided using SDKman):
git clone https://github.com/PacktPublishing/Microservices-with-Spring-Boot-and-Spring-Cloud-Third-Edition.git
cd Microservices-with-Spring-Boot-and-Spring-Cloud-Third-Edition/Chapter07
git checkout SB3.2-crac-part3
sdk use java 21.0.3-tem
Next, run the build and test script:
crac/build-and-test-crac-images.bash
The script will write a log message like the following for each step it processes:
+-------------------------------------+
| #3: 07:27:41 - Build form source... |
+-------------------------------------+
The log messages for the different steps look like this:
#1: 07:27:41 - Cleanup from previously failed builds, if any...
#2: 07:27:41 - Remove CRaC Images to ensure they all are rebuilt...
#3: 07:27:41 - Build form source...
#4: 07:27:46 - Startup training landscape and populate with test data...
#5: 07:28:09 - Build CRaC images...
#6: 07:28:09 - Building CRaC image hands-on/product-composite-crac in microservices/product-composite-service...
#7: 07:28:18 - Building CRaC image hands-on/product-crac in microservices/product-service...
#8: 07:28:29 - Building CRaC image hands-on/recommendation-crac in microservices/recommendation-service...
#9: 07:28:41 - Building CRaC image hands-on/review-crac in microservices/review-service...
#10: 07:28:55 - Bring down the training landscape...
#11: 07:29:01 - Start up runtime landscape with CRaC images and run tests...
#12: 07:29:27 - End, all crac-images are built and tested successfully!
The most important part of all the log output is the differences in startup times for the jar-based and CRaC-based applications!
To find the startup times for the jar-based applications, look for Startup times for jar-based microservices; it should look like this:
Startup times for jar-based microservices:
... Started ProductCompositeServiceApplication in 2.526 seconds (process running for 3.027)
... Started ProductServiceApplication in 2.741 seconds (process running for 3.021)
... Started RecommendationServiceApplication in 2.743 seconds (process running for 3.026)
... Started ReviewServiceApplication in 3.721 seconds (process running for 4.035)
To find the startup times for the CRaC-based applications, look for Startup times for CRaC-based microservices; it should look like this:
Startup times for CRaC-based microservices:
product-composite-prod-1 ... Spring-managed lifecycle restart completed (restored JVM running for 292 ms)
product-prod-1           ... Spring-managed lifecycle restart completed (restored JVM running for 402 ms)
recommendation-prod-1    ... Spring-managed lifecycle restart completed (restored JVM running for 289 ms)
review-prod-1            ... Spring-managed lifecycle restart completed (restored JVM running for 287 ms)
Here is a summary of the startup times, along with calculations of how many times faster the CRaC-enabled microservice starts and the reduction of startup times in percentage:
| Microservice | jar-based | CRaC-based | CRaC times faster | CRaC reduced startup time |
|---|---|---|---|---|
| product-composite | 3.027 | 0.292 | 10.4 | 90% |
| product | 3.021 | 0.402 | 7.5 | 87% |
| recommendation | 3.026 | 0.289 | 10.5 | 90% |
| review | 4.035 | 0.287 | 14.1 | 93% |
On average, a ten-fold improved startup performance can be concluded from the above test!
If you want to try our CRaC images further, you can start the system landscape and run the standard verification script that comes with the book:
export COMPOSE_FILE=crac/docker-compose-crac.yml
docker compose up -d
./test-em-all.bash
When you are done with your tests, you can stop the system landscape with:
docker compose down
unset COMPOSE_FILE
This blog post focused on automating the build process for CRaC-enabled reactive Spring Boot applications using Docker. It simplifies CRaC image creation by splitting checkpointing and packaging into separate steps, avoiding the complexity of multi-stage Docker builds used in the previous blog posts. The automated process builds and warms up applications, captures checkpoints, and packages them in a Docker image for deployment.
Key enhancements:
In the next blog post, I intend to cover how to use CRaC with Spring Boot applications utilizing Java’s latest support for reactive development, including Virtual Threads and Structured Concurrency. Stay tuned…