Blogg
Här finns tekniska artiklar, presentationer och nyheter om arkitektur och systemutveckling. Håll dig uppdaterad, följ oss på LinkedIn
Här finns tekniska artiklar, presentationer och nyheter om arkitektur och systemutveckling. Håll dig uppdaterad, följ oss på LinkedIn


Four of us started the SpringOne2GX conference by participating in a two day tutorial on Cloud Foundry, a platform for cloud applications. This blog post compiles our first impressions of Cloud Foundry.
During the tutorial we run Cloud Foundry as a PaaS on Pivotal Web Services. Cloud Foundry can also be setup to run on premises, see Cloud Foundry documentation for more information on how to deploy Cloud Foundry on, for example, VMware vSphere and OpenStack.
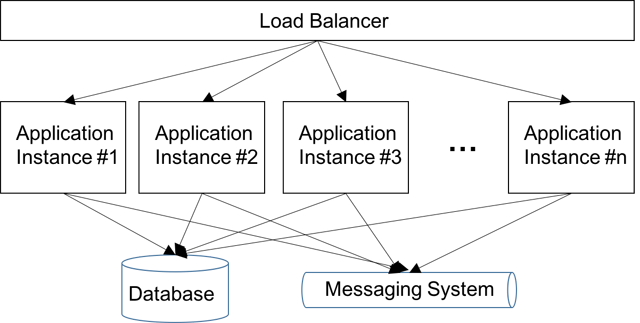
The findings below are baed on an assumption that we want to deploy and manage a typical Java application, e.g. that is deployed on a set of applications servers (e.g. Tomcat) with a load balancer in front and that uses a set of resources like databases and messaging systems. E.g.:

For an overview of Pivotal Web Services components see: Cloud Foundry Components.
All infrastructure required by an application can be setup in Cloud Foundry using a CLI, called cf. This means that the whole infrastructure can be setup using scrips, enabling us to create and recreate application infrastructures on demand, with the same result every time the script is executed, e.g. for different staging environments such as development, test, qa and production. This makes Cloud Foundry very well suited for DevOps setups.
First you have to authenticate yourself by the command cf login, like:
$ cf login
API endpoint: https://api.run.pivotal.io
Email> magnus.larsson.ml@gmail.com
Password>
Authenticating...

Targeted org mltrial
Targeted space development
…and Cloud Foundry will setup the CLI to work with your default environment, in this case the development space.
We are now ready to deploy out first application!
Cloud Foundry makes deployment of applications very simple and straightforward (we used Spring Boot based applications in the tutorial).
Before you deploy an application you specify its demands on the environment in a manifest-file, by default named manifest.yml. It can look something like:
applications:
- name: cf-spring-mvc-demo
  instances: 2
  memory: 512M
  host: cf-spring-mvc-demo-mlce
  domain: cfapps.io
  path: target/cf-spring-mvc-demo-0.0.1-SNAPSHOT.war
  env:
    property1: value1
I guess the file is more or less self explaining but some highlights:
instances is used to declare how many instances of the application that Cloud Foundry shall start up when the app is startedmemory specifies how much memory each app instance is allowed to consume.host + domain is used to specify the hostname of the application, i.e. the load balancer (e.g. the Cloud Foundry Router) will automatically be configured to route incoming requests to this hostname to one of the application instances.path specifies where the binaries of the app can be found.env allow us to setup environment specific variables for the application.The application can now be deployed with the command:
cf push
After the deploy is complete we can inspect the status of the application with the command:
$ cf app cf-spring-mvc-demo
...
     state     since                    cpu    memory           disk           details
#0   running   2015-09-16 01:42:58 AM   0.1%   511.7M of 512M   156.4M of 1G
#1   running   2015-09-16 07:09:59 AM   0.1%   491.3M of 512M   156.4M of 1G
…and the application homepage (or rest services if any) can be accessed on the URL http://cf-spring-mvc-demo-mlce.cfapps.io/. Requests to the application will be passed by the load balancer to the application instances in a round robin fashion.
Pivotal Web Services comes with a Marketplace that provides a number of services ready to be used by our applications with only a few cf-cli-commands:
$ cf marketplace

service          plans                                                                                description
3scale           free_appdirect, basic_appdirect*, pro_appdirect*                                     API Management Platform
cleardb          spark, boost*, amp*, shock*                                                          Highly available MySQL for your Apps.
cloudamqp        lemur, tiger*, bunny*, rabbit*, panda*                                               Managed HA RabbitMQ servers in the cloud
elephantsql      turtle, panda*, hippo*, elephant*                                                    PostgreSQL as a Service
memcachedcloud   100mb*, 250mb*, 500mb*, 1gb*, 2-5gb*, 5gb*, 30mb                                     Enterprise-Class Memcached for Developers
memcachier       dev, 100*, 250*, 500*, 1000*, 2000*, 5000*, 7500*, 10000*, 20000*, 50000*, 100000*   The easiest, most advanced memcache.
mongolab         sandbox                                                                              Fully-managed MongoDB-as-a-Service
newrelic         standard                                                                             Manage and monitor your apps
redis            dedicated-vm                                                                         Redis service to provide a key-value store
rediscloud       100mb*, 250mb*, 500mb*, 1gb*, 2-5gb*, 5gb*, 10gb*, 50gb*, 30mb                       Enterprise-Class Redis for Developers
searchly         small*, micro*, professional*, advanced*, starter, business*, enterprise*            Search Made Simple. Powered-by Elasticsearch
stamplay         plus*, premium*, core, starter*                                                      API-first development platform
Note: Only some of the available services are shown for brevity.
If you for example need a MySQL database pre-setup and configured for high availability you can use the ClearDB service.
First we provision it to our current space (my development environment) using a free plan called spark:
$ cf create-service cleardb spark mydb
Now we can bind the database to our application:
$ cf bind mlce-spring-music mydb
Since we are using a Spring Boot application and it only use one database, Cloud Foundry will be able to automatically inject a Datasource bean representing the mydb-database in our application!
$ cf services

name           service         plan       bound apps          last operation
mydb           cleardb         spark      mlce-spring-music   create succeeded
So with no further configuration we are good to go!
The application can be scaled either manually or automatically.
An application can be scaled manually either vertically, by increasing the memory usage, or horizontally, by increasing the number of instances, e.g.:
$ cf scale cf-spring-mvc-demo -m 1024M
Each application instance now can use 1 GB of memory.
$ cf scale cf-spring-mvc-demo -i 4
The application will now run in four instances and the load balancer have been updated automatically to spread the requests to all four instances.
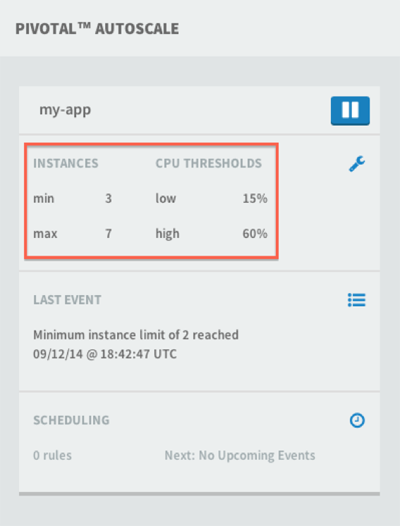
Pivotal provide an add-on service called a Autoscaler that can be used to direct Cloud Foundry to automatically scale up (and down) an application. It comes with a user interface that looks like:

As you can see within the red block in the picture above you can specify minimum and maximum number of instances and the CPU thresholds for when to add and decrease the number of instances.
The Cloud Foundry runtime monitors our application instances automatically and restarts them as needed if they (or the node they run on) fails and crashes.
Cloud Foundry also supports zero downtime upgrades of applications using both Blue-Green Deployment - and Canary Release-scenarios. See Cloud Foundry documentation on Blue-Green Deployment for details.
If an application instance or node crashes HTTP sessions on that application assistance are normally lost and users typical has to login again. Cloud Foundry can however be configured to replicate HTTP sessions either using Spring Session or the Java Buildpack that can customize the runtime to share HTTP sessions between application instances.
Cloud Foundry collects logs from our application instances. The logs can be monitored by the command:
$ cf logs
The cf logs command runs by default in tail-mode, e.g. runs and displays new logs until stopped.
If I want to redirect the logs to an external log management tool, e.g. the ELK-stack, I can, for example, setup a user defined service that redirect the logs to a syslog, e.g. using papertrailapp.com, that LogStash can use to pick up logs and send them to ElasticSearch for visualization in Kibana.
Redirect logs to a syslog can be done by a command like:
$ cf cups log-drain -l syslog://<URL-FROM-PAPERTRAIL>
The logs can be seen directly in papertrailapp.com like:

In the same way, monitoring can easily be enabled for an application. For example we can provision New Relic as our monitoring tool with:
$ cf create-service newrelic standard my-new-relic
…and we can bind our New Relic service to our application with:
$ cf bind mlce-spring-music my-new-relic
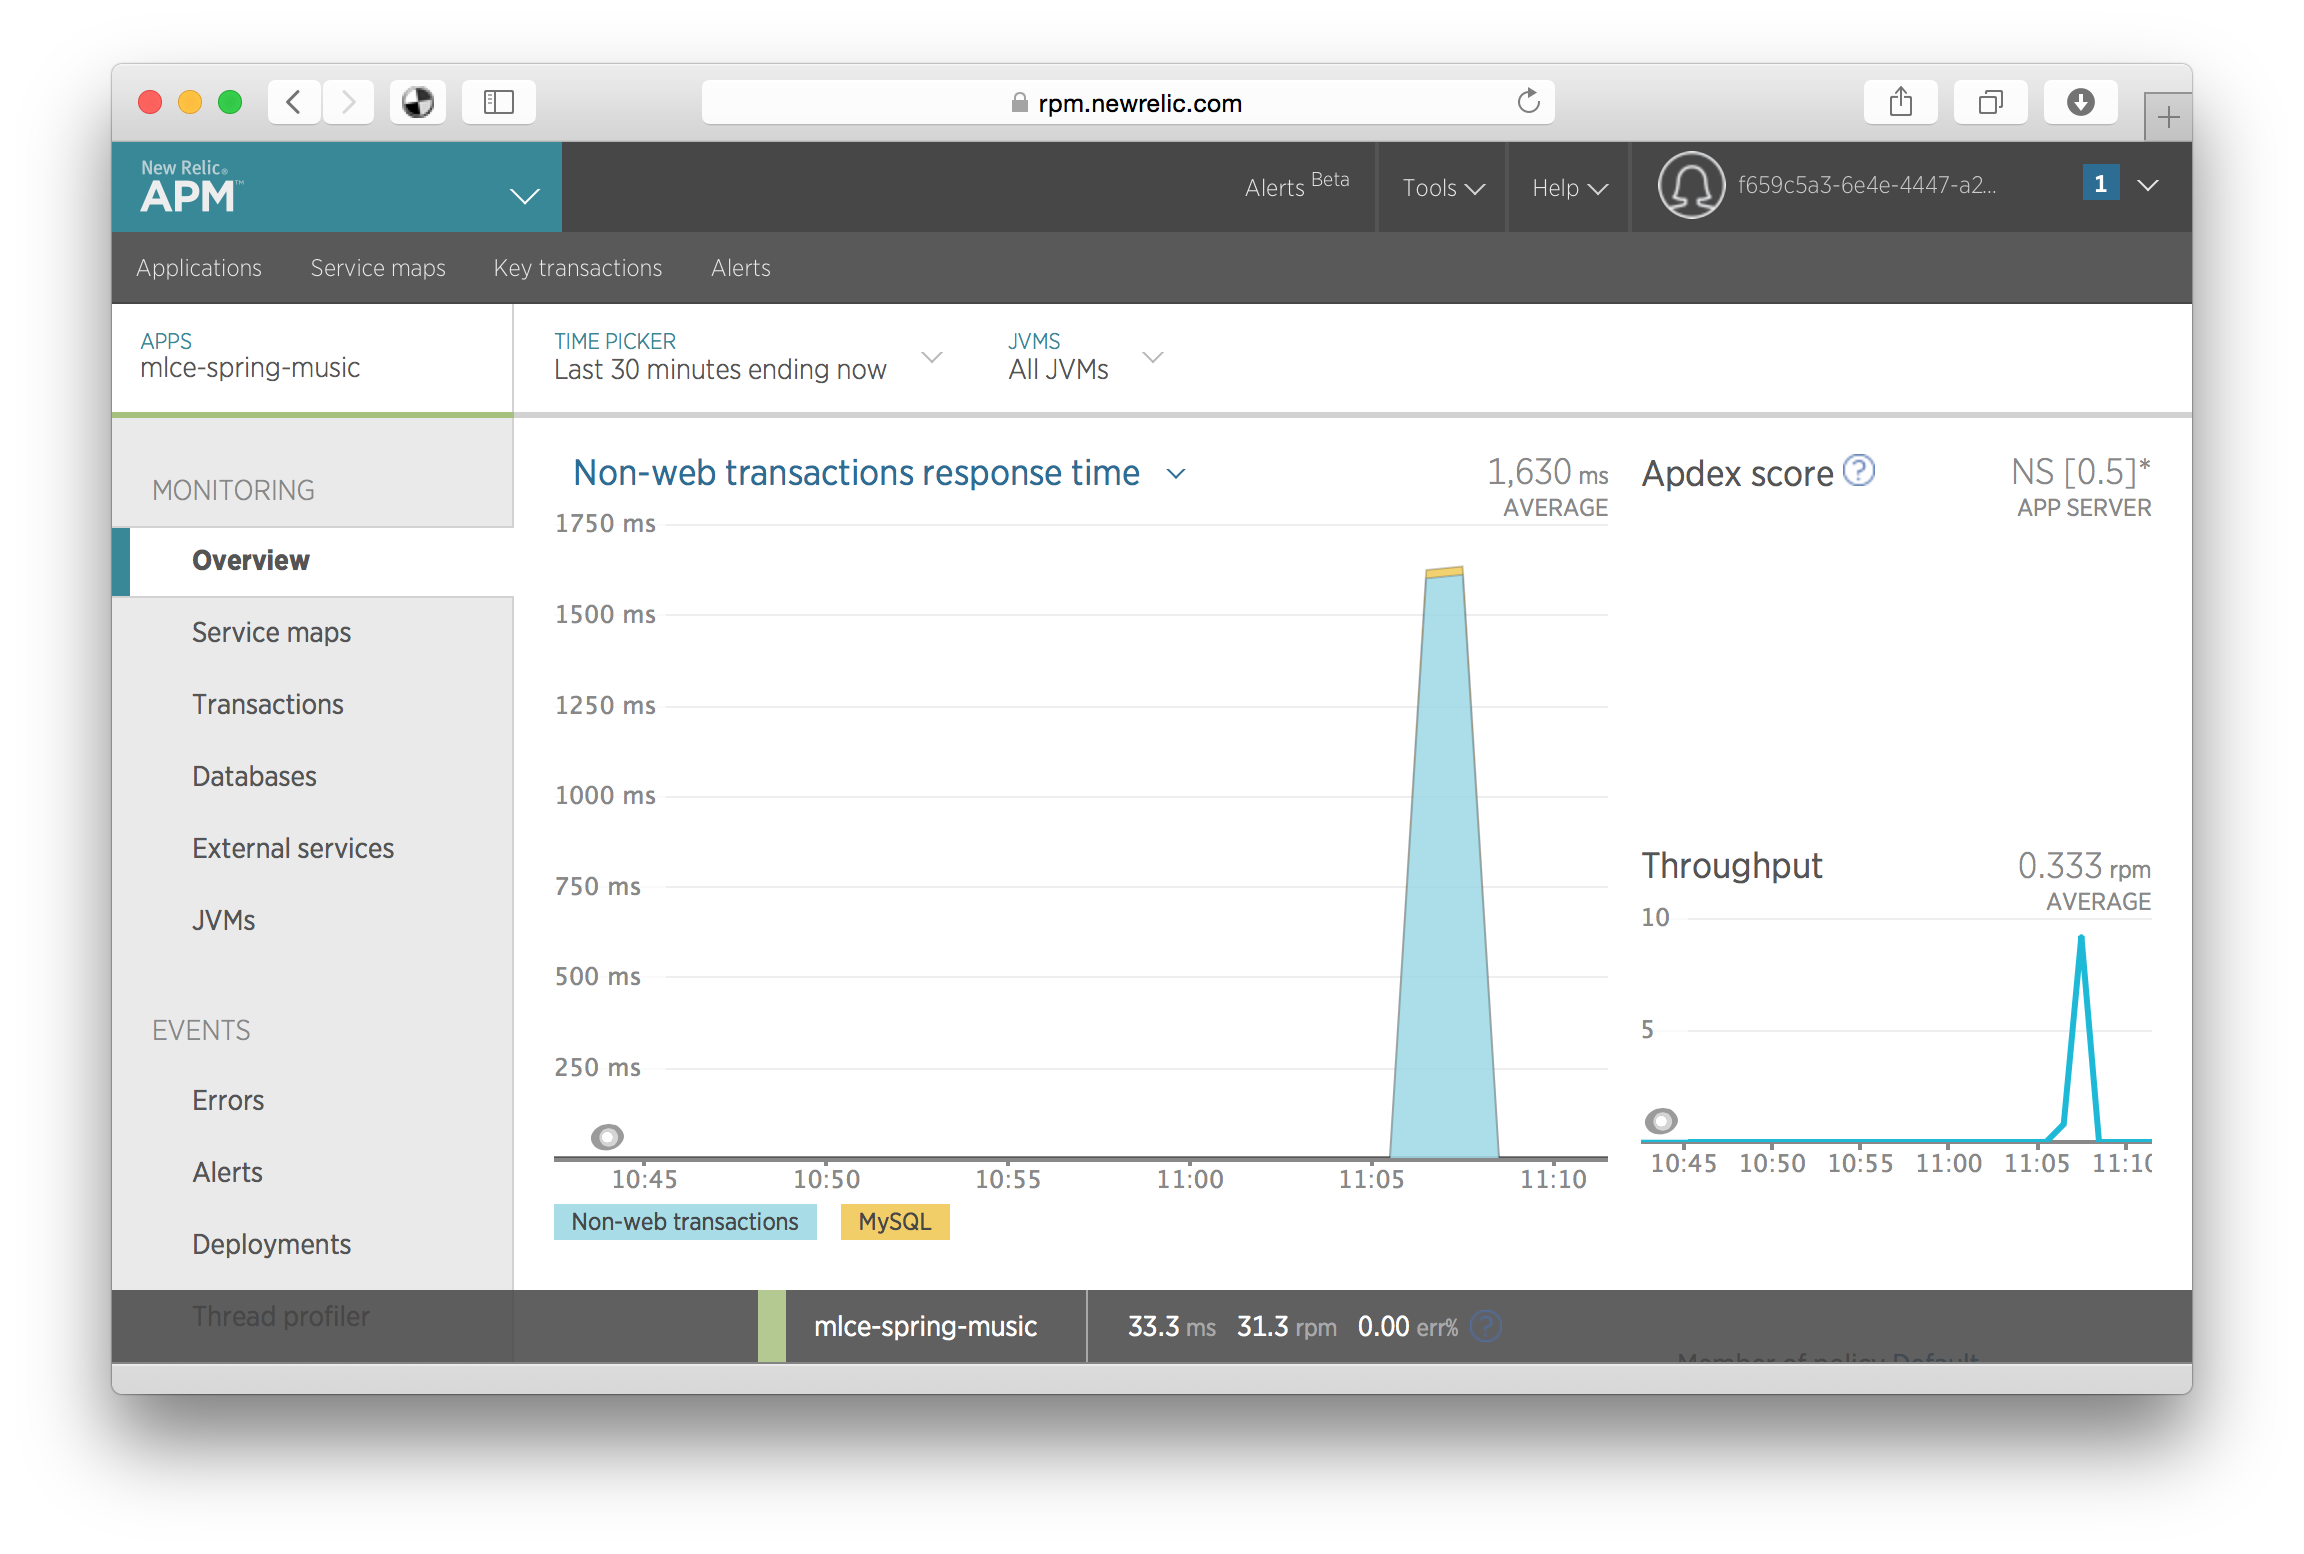
That’s all it takes, after using the application you can see graphs in the New Relic dashboard like for HTTP requests:

…and for database related work:

Cloud Foundry integrates very nicely with Spring Cloud and provides for example Spring Cloud Services for Pivotal Cloud Foundry that packages server-side components in the Spring Cloud projects, such as Spring Cloud Netflix Eureka and Hystrix Dashboard and Spring Cloud Config, and makes them available as services in the Marketplace.
This looks a lot like Docker containers, right? Yes, to some extent… Cloud Foundry, however, extends the functionality of plain Docker containers with, for example, its marketplace of ready to use services.
…and the best of it all…
Since Cloud Foundry 1.5, Cloud Foundry supports Docker!
We never got time to look into Cloud Foundries support for Docker during the tutorial, but that is added to the TO DO list :-)
So how do I as a developer verify that my application works as expected when deployed in Cloud Foundry? Deploying it to a development space in a common Cloud Foundry installation is of course one option, but it typically not what a developer want…
…and installing Cloud Foundry locally is known for being very messy and resource consuming, neither an option…
There is however a new option, recently released, called Lattice. Similar to Cloud Foundry but smaller and far easier to install locally. Look out for another blog post regarding Lattice!