Blogg
Här finns tekniska artiklar, presentationer och nyheter om arkitektur och systemutveckling. Håll dig uppdaterad, följ oss på LinkedIn
Här finns tekniska artiklar, presentationer och nyheter om arkitektur och systemutveckling. Håll dig uppdaterad, följ oss på LinkedIn

What was a given three years ago when I started working on the material used in this blog series has in many ways changed or evolved and I’ve also learnt a lot on the way. I’ve come to realize that the Go code and how the microservices are built and deployed were long due a substantial overhaul. Read on for a primer on go modules, go-chi, testify and other Go-related stuff I’ve come to really like and adopt.
In this and an upcoming part of the blog series, we’ll do a major overhaul of both our Go code and how we write, build and deploy our microservices to Docker Swarm.
In this blog post, we’ll update our core Go-based microservices to use more idiomatic coding style, go modules, a new project structure, revamped configuration, a new HTTP router and revised unit-testing.
Just a quick recap on the make-believe system landscape consisting of five discrete microservices deployed on Docker in swarm mode:
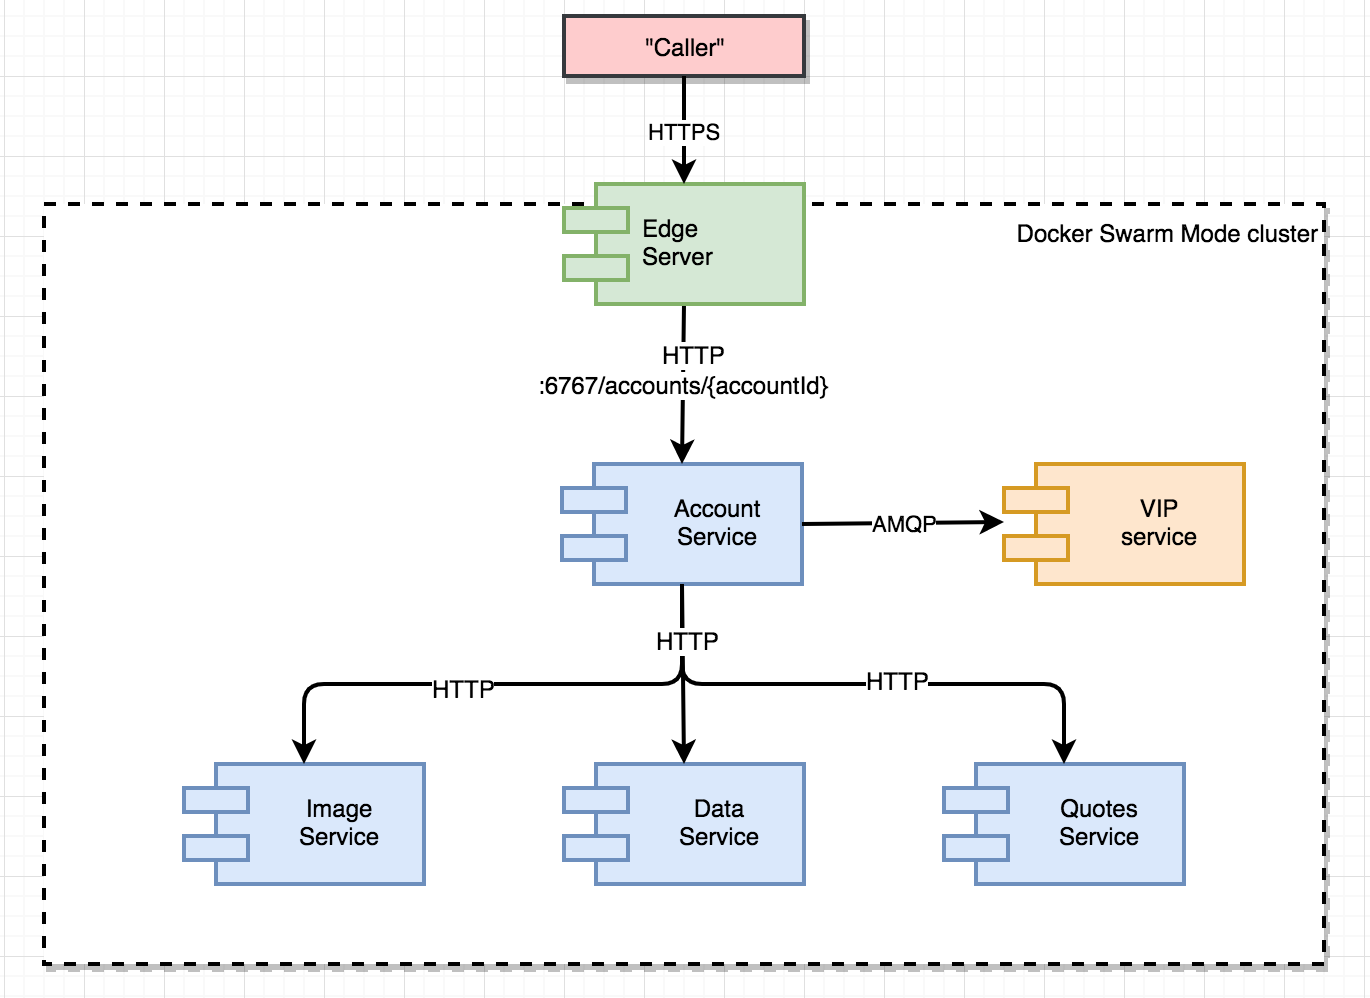
There’s also a whole bunch of supporting services (database, message broker, monitoring tools) omitted from the figure that we’ll revisit in Part 17.
The finished source code can be cloned from github:
> git clone https://github.com/callistaenterprise/goblog.git
> git checkout P16
When I started coding Go back in late 2015, most examples and tutorials I read typically put the main.go file in the root of the source tree and then introduced various packages for things like “model”, “service” etc.
Example:
- main.go
- service/handlers.go
- service/handlers_test.go
- model/account.go
However, I never really felt fully comfortable with that approach, so when I sometime later discovered golang-standards/project-layout, I’ve gradually adopted that layout for new projects as well as updating some existing ones.
After updating the microservices with the golang-standards project layout, the code is structured like this:
- cmd/[servicename]/main.go
- internal/app/service/handlers.go
- internal/app/service/handlers_test.go
- internal/app/model/account.go
Note the [servicename] placeholder which will be replaced per-service, for example cmd/accountservice/main.go.
By standardizing where to find the main.go file, it makes it easier to write clean build scripts as well as adding additional executables related to the microservice at hand - migrations for example.
The root folder for each microservice is now much cleaner, typically having only a Makefile and the new go.mod and go.sum files from go modules. (more on those later)
The new layout also affects build scripts, Dockerfiles etc which will be revisited later as well.
(Please note that I’m not following all the recommendations in the standard project layout to the letter)
The first major change to the codebase is making all our microservices as well as the common code into go modules. Go modules was introduced in Go 1.11 as the official dependency management tool and I personally am quite happy with it given its relative simplicity and useful toolset.
Using go modules also has the upside of not forcing your codebase to live beneath a GOPATH anymore, so now one can just clone the source of this blog series to any folder and start building it.
Adding go module support is quite easy. With the accountservice as an example:
> cd accountservice
> export GO111MODULE=on
> go mod init github.com/callistaenterprise/goblog/accountservice
> go build
That’s all there is to it. By the way, in Go 1.13 go modules are supposed to be turned on by default, so no more need to set the GO111MODULE env var.
The commands above should have created two files in the root of the accountservice directory: go.mod and go.sum.
go.mod:
module github.com/callistaenterprise/goblog/accountservice

go 1.12

require (
	github.com/callistaenterprise/goblog/common v0.0.0-20190713133714-ded5832e931e
	github.com/gorilla/mux v1.7.3
	github.com/graphql-go/graphql v0.7.8
	github.com/graphql-go/graphql-go-handler v0.2.3
	github.com/graphql-go/handler v0.2.3 // indirect
	github.com/myesui/uuid v1.0.0 // indirect
	github.com/opentracing/opentracing-go v1.1.0
	github.com/prometheus/client_golang v1.0.0
	github.com/sirupsen/logrus v1.4.2
	github.com/smartystreets/goconvey v0.0.0-20190710185942-9d28bd7c0945
	github.com/spf13/viper v1.4.0
	github.com/stretchr/testify v1.3.0
	gopkg.in/h2non/gock.v1 v1.0.15
)
The go.mod file has been generated by the go tools. It starts by specifying the unique identifier of your module, which by convention usually is the absolute path to it’s source-control repository and possibly subfolder.
The neat thing here is that the go tools have scanned your source code and generated the require block listing all direct (e.g. libraries you explicitly have imports for in your code) and also indirect dependencies, i.e. dependencies of your direct dependencies.
For example, we can see that the UUID generator library github.com/myesui/uuid v1.0.0 is declared as an indirect dependency. We can ask the go tools which dependency that’s pulling in that indirect dependency.
> go mod why github.com/myesui/uuid v1.0.0
  # github.com/myesui/uuid
  github.com/callistaenterprise/goblog/accountservice/internal/pkg/model
  github.com/callistaenterprise/goblog/common/model
  github.com/twinj/uuid
  github.com/twinj/uuid.test
  github.com/myesui/uuid
The listing above shows us that the model package of our accountservice is importing our common/model package, which in it’s turn is pulling in github.com/twinj/uuid and so on.
Note the github.com/callistaenterprise/goblog/common/model. While we have the common folder in the root of our checked-out code, we’re actually pulling in the code for github.com/callistaenterprise/goblog/common/model directly from the latest published commit on the master branch from github.
This means that any local changes performed in /common won’t affect a locally built accountservice before the changes to common has been pushed to github.
If that sounds rather inconvenient when developing - it is. Luckily, the go modules tools allows us to declare an override for how dependencies are resolved using the replace directive.
For local development, one can add this one-liner to go.mod in order to resolve the common module from a relative path on our local file-system instead:
module github.com/callistaenterprise/goblog/accountservice

go 1.12

replace github.com/callistaenterprise/goblog/common => ../common

require (
    github.com/callistaenterprise/goblog/common v0.0.0-20190713133714-ded5832e931e
    ....
)
This is not meant to be an in-depth explanation of Go modules. Just a quick introduction and one of the more prominent changes in the overhaul of the code and infrastructure tools for the blog series!
In hindsight, I adopted some bad patterns when I first started to code Go. I relied too much on exported variables or package-scoped state instead of proper encapsulation into structs and definition of behaviour using interfaces.
Now, main.go is responsible for creating the core struct(s) that provides the various functionalities our services require. Here’s an example from the dataservice where the DB client is injected into a Handler struct, which in its turn is passed with a configuration struct as arguments to a NewServer constructor function:
func main() {
    ...
    cfg := cmd.DefaultConfiguration()
	arg.MustParse(cfg)

	gormclient := dbclient.NewGormClient(cfg) // create DB client
	handler := service.NewHandler(gormclient) // create Handler struct with HTTP handler funcs

	server := service.NewServer(handler, cfg) // create HTTP server with handler and config injected
	server.SetupRoutes()
	...
}
A quick look at the Handler struct and its companion constructor function, which encapsulates the actual business logic in its methods and whatever dependencies or state the application needs to fulfill its business requirements. In the case of the dataservice to orchestrate calls to the database using the IGormClient.
type Handler struct {
    dbClient  dbclient.IGormClient
    myIP      string
    isHealthy bool
}

func NewHandler(dbClient dbclient.IGormClient) *Handler {
	myIP, err := util.ResolveIPFromHostsFile()
	if err != nil {
		myIP = util.GetIP()
	}
	return &Handler{dbClient: dbClient, myIP: myIP, isHealthy: true}
}
The most common pattern of constructor functions is to return a pointer to the created struct. Note also how we can embed some code into the constructor function to look-up our own IP.
GetAccount hasn’t changed much, the main difference being that it’s now a method on the Handler struct and that the dbClient embedded in the struct is used instead of a package-scoped one.
func (h *Handler) GetAccount(w http.ResponseWriter, r *http.Request) {

	// Read the 'accountId' path parameter
	var accountID = chi.URLParam(r, "accountId")
	account, err := h.dbClient.QueryAccount(r.Context(), accountID)
	...
}
We’ll look at how this change facilitates easier unit-testing in section 7.
Given 12-factor and the general shift towards the use of environment variables as configuration injected as “secrets” into the runtime docker container, I’ve decided to stop using Spring Cloud Config or any other config-server.
My last projects (Go or Java-based projects) runs in production on either OpenShift, Docker Swarm or Kubernetes. In all instances, we’ve been using env vars injected as “secrets” as configuration, either by the built-in support in K8S / OpenShift, or through HashiCorps Vault.
While my own experience may be anecdotal, I do think it works quite well and thus I’m migrating all the microservices in this blog series to use env vars as configuration.
Just as a recap, the old method used command-line flags hard-coded into our Dockerfile(s) in order to pass the “bootstrap” config to the service, e.g. where to find the config server that held the actual config parameters, e.g:
ENTRYPOINT ["./accountservice", "-configServerUrl=http://configserver:8888", "-profile=test", "-configBranch=P16"]
The new solution will be based on the excellent go-arg library that does exactly what I want in just a few lines of code. I want:
Example from our accountservice:
// Config is our root config struct. Note usage of go-arg struct tags.
// The env part is optional, allows explicit mapping of env var to struct field.
// Otherwise, the library automatically maps "SNAKE_CASE" env vars to struct fields in "PascalCase".
type Config struct {
	ZipkinServerUrl string `arg:"env:ZIPKIN_SERVER_URL"`
	ServerConfig
	AmqpConfig
}

// HTTP config for our service
type ServerConfig struct {
	Port string `arg:"env:SERVER_PORT"`
	Name string `arg:"env:SERVICE_NAME"`
}

// AMQP / RabbitMQ connection URL
type AmqpConfig struct {
	ServerUrl string `arg:"env:AMQP_SERVER_URL"`
}

// DefaultConfiguration specifies default values and returns a pointer to a struct populated with our defaults.
func DefaultConfiguration() *Config {
	return &Config{
		ZipkinServerUrl: "http://zipkin:9411",
		ServerConfig: ServerConfig{
			Name: "accountservice",
			Port: "6767",
		},
		AmqpConfig: AmqpConfig{
			ServerUrl: "amqp://guest:guest@rabbitmq:5672/",
		},
	}
}
Then, in our main.go, all the viper stuff is now gone and replaced by these few lines:
func main() {
	logrus.SetFormatter(&logrus.JSONFormatter{})
	logrus.Infof("Starting %v\n", appName)

	// Initialize config struct and populate it froms env vars and flags.
	cfg := cmd.DefaultConfiguration()
	arg.MustParse(cfg)

	initializeTracing(cfg)
	.... truncated for brevity...
}

func initializeTracing(cfg *cmd.Config) {
    // Note how we pass the cfg as argument and use the field on the struct now rather that viper.GetString("...")
	tracing.InitTracing(cfg.ZipkinServerUrl, appName)
}
Passing configuration is a breeze now. Our Dockerfile should never use command-line args directly, e.g we’re down to:
ENTRYPOINT ["./accountservice"]
For running locally, we can use command-line args to override defaults or env vars:
> ./bin/accountservice --port=1337 --environment=loadtest
When using docker compose for testing locally or in test environments, we typically have separate compose files for each environment. One example:
services:
  accountservice:
    image: someprefix/accountservice
    environment:
      ENVIRONMENT: "test"
      AMQP_SERVER_URL: amqp://user:password@rabbitmq:5672/
    ...
For staging/production, the env vars are typically injected from “secrets” by your container orchestrator or some other mechanism. This is not in scope for this blog post.
There’s nothing wrong with gorilla which was my router of choice when I originally wrote the HTTP code for the microservices in this blog post. However, lately I’ve grown really fond of go-chi due to it’s fluent DSL which makes it very easy to compose middlewares (compatible with http.Handler) and declare routes, including setting up sub-routers.
Here’s some example routes using go-chi from the blog series, see inlined comments:
// Server is a struct that encapsulates HTTP config, the router instance
// and the handler struct having the actual handler methods
type Server struct {
	cfg *cmd.Config
	r   *chi.Mux
	h   *Handler
}

// SetupRoutes creates a new chi router and then uses the fluent DSL to set up our routes,
// including middlewares
func (s *Server) SetupRoutes() {
	s.r = chi.NewRouter()

	// Setup global middlewares (i.e. HTTP filters), note that order of declaration matters!
	// These are recommended ones from go-chi
	s.r.Use(middleware.RequestID)
	s.r.Use(middleware.RealIP)
	s.r.Use(middleware.Logger)
	s.r.Use(middleware.Recoverer)
	s.r.Use(middleware.Timeout(time.Minute))

	// Sub-router for /accounts
	// Note use of With(...) for adding middlewares for Zipkin tracing and Prometheus monitoring
	s.r.Route("/accounts", func(r chi.Router) {
	    r.With(Trace("GetAccount")).
			With(Monitor(s.cfg.Name, "GetAccount", "GET /accounts/{accountId}")).
			Get("/{accountId}", s.h.GetAccount) // LOOK HERE!

		... other routes omitted for brevity ...
	})
	...
}
The Get(“/{accountId}”, s.h.GetAccount) is where the GET /accounts/{accountId} route is attached to its handler method GetAccount(w http.ResponseWriter, r *http.Request) on the new Handler struct we looked at in section 4.
The _Trace(..) middleware we’ve defined ourselves:
func Trace(opName string) func(http.Handler) http.Handler {

    // Returns function having the correct middleware signature
	return func(next http.Handler) http.Handler {

	    // Returns the actual middleware "worker" function.
	    // Note how opName from the partent scope is embedded in the returned func.
		return http.HandlerFunc(func(rw http.ResponseWriter, req *http.Request) {
			span := tracing.StartHTTPTrace(req, opName)
			defer span.Finish()
			ctx := tracing.UpdateContext(req.Context(), span)
			next.ServeHTTP(rw, req.WithContext(ctx))
		})
	}
}
go-chi middlewares accepts functions having the func(http.Handler) http.Handler signature. Since we need some custom state in this middleware (the opName in this particular case), we need to perform some function wrapping to embed the opName into the returned middleware.
The separation of the routes from the handlers makes it much easier to unit-test the router, which brings us to our next change; how we unit-test.
Before this update, I used goconvey for all my unit test. While I still think Goconvey is awesome for BDD-style tests, for plain unit-tests I think a more “basic” approach using just plain go-style testing and the stretchr/testify/assert module provides a slightly better developer experience.
For mocking outgoing HTTP requests (from the accountservice to the other services, for example), I’m still into gock.
For mocking out dependencies injected into our structs (such as service.Handler), I’ve come to really appreciate mocks generated by gomock for a given interface as they provide type-safe mocking of methods and a clean DSL for setting up various expectations, side-effects and return values.
First, one needs to install mockgen:
go get github.com/golang/mock/gomock
go install github.com/golang/mock/mockgen
After that generating a mock for a given interface is just a simple one-liner. Example from the dataservice where a mock is generated for all interfaces in cockroachdb.go, i.e. the IGormClient:
mockgen -source internal/pkg/dbclient/cockroachdb.go -destination internal/pkg/dbclient/mock_dbclient/mock_dbclient.go -package mock_dbclient
Setting up the behaviour of a mock in a unit test is then really simple.
mockRepo := mock_dbclient.NewMockIGormClient(ctrl)
mockRepo.EXPECT().
    QueryAccount(gomock.Any(), "123").
    Return(model.AccountData{ID: "123", Name: "Person_123"}, nil).
    Times(1)
In this example, we tell the mock to expect a single call to the QueryAccount method with anything as the first parameter and the string “123” as the second one. If such an invocation is received by the mock, the specified AccountData struct and nil error is returned.
Since we’ve moved to a struct- and “dependency injection” based architecture for our go services, it’s actually much easier to set up the tests.
Here’s an example unit-test of the dataservice, beginning with a simple setup() function:
// Run this first in each test, poor substitute for a proper @Before func
func setup(mockRepo dbclient.IGormClient) *Server {
	tracing.SetTracer(opentracing.NoopTracer{})
	h := NewHandler(mockRepo)
	s := NewServer(h, cmd.DefaultConfiguration())
	s.SetupRoutes()
	return s
}
Note how we create a service.Handler instance with our MockIGormClient as argument, and how the handler then is passed to the NewServer constructor function along with the default config.
Here’s the actual “happy path” unit test for the QueryAccount method:
func TestQueryAccount(t *testing.T) {
	ctrl := gomock.NewController(t)
	defer ctrl.Finish()
	mockRepo := mock_dbclient.NewMockIGormClient(ctrl)
	mockRepo.EXPECT().QueryAccount(gomock.Any(), "123").Return(model.AccountData{ID: "123", Name: "Person_123"}, nil).Times(1)

	s := setup(mockRepo)

	req := httptest.NewRequest("GET", "/accounts/123", nil)
	resp := httptest.NewRecorder()

	s.r.ServeHTTP(resp, req)

	account := model.AccountData{}
	_ = json.Unmarshal(resp.Body.Bytes(), &account)

	assert.Equal(t, 200, resp.Code)
	assert.Equal(t, "123", account.ID)
	assert.Equal(t, "Person_123", account.Name)
}
Some notable changes to how the test (and most other tests in the blog series) is written:
Another popular approach to testing in Go is table-driven tests. I’m personally a bit divided on table-driven testing, but I’m planning on using TDT when I get to integration testing in Part 18.
In this installment of the blog series, we’ve refactored most of the codebase to better comply with idiomatic go coding styles, go modules, 12-factor configuration and cleaner tests.
In the next part, I’ll continue the overhaul by introducing Makefiles and Docker compose / Docker stack for building and deploying.
Please help spread the word! Feel free to share this blog post using your favorite social media platform, there’s some icons below to get you started.
Until next time,
// Erik