Blogg
Här finns tekniska artiklar, presentationer och nyheter om arkitektur och systemutveckling. Håll dig uppdaterad, följ oss på LinkedIn
Här finns tekniska artiklar, presentationer och nyheter om arkitektur och systemutveckling. Håll dig uppdaterad, följ oss på LinkedIn

This is the third blog post describing how to update the tools and frameworks used in the 2’nd edition of my book. In this blog post, we will learn how to develop, build and deploy microservices on a Mac with Apple silicon, i.e., an ARM64-based computer.
Table of Contents
The long-winding project to get all examples in my book to run on a Mac with Apple silicon is finally completed! Since I got my MacBook Pro M1 in December of last year, I have been working on getting all examples to run on it. One important goal of my project has been to ensure that no Intel x86_64-based programs or Docker images are required. The point of having a high-performance ARM64-based computer is partly lost if I have to run x86_64-based tools and Docker containers through emulation programs such as Rosetta 2 for macOS programs or qemu for Docker images. So the goal has been to run all Spring-based source code examples using ARM64 versions of Kubernetes, Istio, GraalVM, etc. as illustrated by the following figure:
 .
.
Besides using a local ARM64-based computer, there is an even more compelling option for deploying ARM64-based microservices in the cloud. Amazon, Azure, and Google Cloud provide ARM64-based VMs with significantly better price performance than x86_64-based alternatives.
For example, see:
Also, since ARM64 processors are more energy efficient than x86_64 alternatives, some electricity can be saved using ARM64 processors. Something that seems like a good idea these days.
The work focused on tracking when tools and Docker images used in the book were available for ARM64 and then trying them out and fixing problems as discovered by tests. The final piece of the puzzle was the v1.15 release of Istio, adding support for ARM64-based computers!
However, two of the tools used in the book do not work on ARM64:
The hyperkit driver used on an x86_64-based Mac does not work on Apple silicon, as described here and here. Therefore, the docker driver is used instead. The docker driver is used in the same way as for WSL2 under Windows in the book.
Spring Boot uses Cloud Native Buildpacks to create native images and package them into Docker images for our microservices. Unfortunately, Cloud Native Buildpacks currently do not support ARM64; see Add support for arm64. To overcome this limitation, a homegrown multistage Dockerfile is used to build and package native images in a Docker image. See section Source code changes below for details.
Before looking into the source code changes required and how to try out the examples on Apple silicon, we will learn how to detect if a program or container runs on ARM64 or X86_64.
In this section, we will learn how to check if the tools and Docker containers we use are based on ARM64 or x86_64.
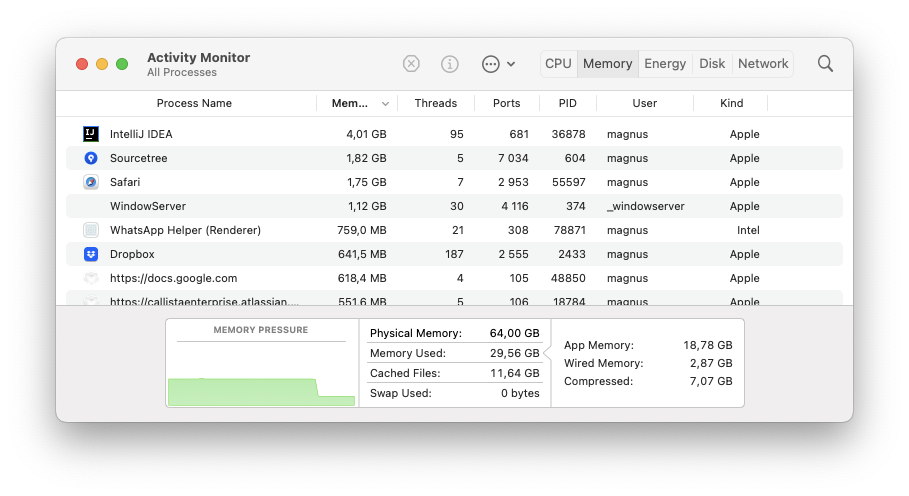
To check the hardware architecture for an application in macOS, we can use the Activity Monitor. First, ensure that the Kind column is selected. The Kind value will be Apple for ARM64-based applications and Intel for x86_64-based applications. For example, in the screenshot below, we can see that Whatsapp is an x86_64 application, while the other applications execute as native ARM64 applications.
To check a command line tool, like kubectl, the file command can be used like the following:
file /opt/homebrew/bin/kubectl
The response will end with either arm64 or x86_64, like:
/opt/homebrew/bin/kubectl: Mach-O 64-bit executable arm64
/usr/local/bin/kubectl: Mach-O 64-bit executable x86_64
To find out the full path for a tool, the
whichcommand can be used likewhich kubectl. It will respond with/opt/homebrew/bin/kubectl.
Finally, to check a Docker container, you can run the uname -m command to determine the hardware architecture for the container’s operating system. The command will return aarch64 for ARM64 or x86_64.
For containers that are based on a
scratchor adistrolessimage, there is nounamecommand available, so this will not work.
For example, to check a running mysql container started by Docker Compose, the following command can be used:
docker-compose exec mysql uname -m
It will return aarch64.
To check a Docker image with no container running, we can start a container just for running the uname -m command. For example, testing it on an older version of MySQL Docker image that does not support ARM64:
docker run -it --rm mysql:5.7 uname -m
It will return x86_64.
Having covered how to detect the hardware architecture used, we will go through the source code changes required to work on Apple silicon.
The source code for this blog post is found in the Git branch ARM64-AppleSilicon in the book’s Git repo. Since each chapter builds on the previous chapter, only the following chapters have been updated:
The main change in the source code is the addition of a Dockerfile that, as described above, can create Docker images with natively compiled microservices.
Besides the new Dockerfile, the following changes have been applied:
confluentinc/cp-kafka:7.2.1confluentinc/cp-zookeeper:7.2.1mysql:8.0.30Testcontainers have been upgraded to v1.16.2
To fix a problem with Netty’s use of the DNS native resolver on Apple Silicon (as described here), the following dependency has been added to the build.gradle files:
implementation group: 'io.netty', name: 'netty-resolver-dns-native-macos', classifier: 'osx-aarch_64'
When native compiling the Review microservice, the charset CP1252, used by MySQL, is not included. To overcome this problem, MySQL is configured in config-repo/review.yml to use UTF8 instead.
Actually,
UTF8mb4is used, for details see here.
As already mentioned, since Cloud Native Buildpacks currently do not support ARM64, a multi-step Dockerfile, Chapter23/Dockerfile-native-image, is used as a workaround. The Dockerfile first creates a native image in a build step; then, the target Docker image is built based on a distroless base image and the native image created in the build step. Finally, a shared library, required by the native image, is copied from the build stage into the target Docker image.
The build step is divided into multiple commands to optimize the use of the caching mechanism provided by the Docker build command. The source code files that can be assumed to change the least are processed first.
The build step uses the “GraalVM Community Edition” as its base image and looks like this:
FROM ghcr.io/graalvm/graalvm-ce:ol8-java17-22.1.0 as builder

# 1. Install the native compiler
RUN gu install native-image

WORKDIR "/app"

# 2. Download the gradle distribution
COPY gradlew ./
COPY gradle/ gradle/
RUN ./gradlew --version

# 3. Resolve dependencies for the util and api projects
COPY settings.gradle ./
COPY api/settings.gradle api/build.gradle api/
COPY util/settings.gradle util/build.gradle util/
RUN ./gradlew :util:dependencies

# Build argument for the name of the microserivce
ARG SERVICE_NAME

# 4. Resolve dependencies for the microservice
COPY microservices/${SERVICE_NAME}/settings.gradle microservices/${SERVICE_NAME}/build.gradle microservices/${SERVICE_NAME}/
RUN ./gradlew :microservices:${SERVICE_NAME}:dependencies

# 5. Add the source code for api, util and the microserivce projects
COPY api/src/  api/src/
COPY util/src/ util/src/
COPY microservices/${SERVICE_NAME}/src/ microservices/${SERVICE_NAME}/src/

# 6. Run the GraalVM native compiler
RUN ./gradlew :microservices:${SERVICE_NAME}:nativeCompile
The code performs the following steps:
./gradlew --version command.api and util projects are copied, and their dependencies are resolved.The first time this Dockerfile is used to build a native image, it takes some time to download Gradle and resolve all dependencies. But for recurring builds, this structure makes the build process efficient. If changes are made to the files in one of the src - folders, only the native compiler will be invoked. If any build files are updated, their dependencies will be resolved, and all the following commands in the Dockerfile will be executed.
The second step that creates the runtime Docker image looks like this:
FROM gcr.io/distroless/base as runtime-distroless

ARG SERVICE_NAME

# Copy the native image and libz from the builder
COPY --from=builder app/microservices/${SERVICE_NAME}/build/native/nativeCompile/${SERVICE_NAME} /application
COPY --from=builder /lib64/libz.so.1 /lib/libz.so.1

EXPOSE 8080

ENTRYPOINT ["/application"]
The runtime Docker image is based on a minimal distroless base image and copies the native image together with the shared library required by the native image from the build step; that’s it!
Note that this Docker image will only be applicable on a ARM64 based container runtime, i.e. it does not support multiple architecture Docker images out of the box. There is a discussion ongoing on how to support cross compilation support in the GraalVM community, see [native-image] Cross compilation support? for more information.
With the source code changes described, it is finally time to try it out!
Before trying out the source code examples from the book, we must install the required tools. They can be installed on an Apple silicon-based Mac in the same way as for an x86_64-based, described in Chapter 21. This blog post uses the same versions of the tools as in the previous two blog posts:
One thing to note is that
brewinstalles the tools in another folder on Apple silicon,/opt/homebrew/bin, compared to/usr/local/binused on a x86_64 based Mac. If you want to learn more see this blog post: Using Homebrew on M1 Mac.
Also, the commands used to build, test and deploy the source code examples are almost the same. As mentioned above, the docker driver for Minikube must be used since the hyperkit driver is bound to x86_64. In addition, the docker driver requires port forwarding, as described in chapters 15 and 17.
The minikube start command is the same as for WSL2/Windows:
minikube start \
--profile=handson-spring-boot-cloud \
--memory=10240 \
--cpus=4 \
--disk-size=30g \
--kubernetes-version=v1.25.0 \
--driver=docker \
--ports=8080:80 --ports=8443:443 \
--ports=30080:30080 --ports=30443:30443
Also, the test command used in Chapter 17 must be updated to reflect the port forwarding:
HOST=minikube.me PORT=8443 USE_K8S=true ./test-em-all.bash
For a summary of the commands required to test with Kubernetes in Chapter 17 and with Kubernetes, Istio, and the EFK stack in Chapter 20, see the blog post Upgrade to Kubernetes 1.25 and Istio 1.15.
In the sections below, we will go through the following:
To try out chapter 14, see the previous blog post Upgrade to Spring Boot 2.7 and Spring Native 0.12. But instead of using the Git branch SB2.7, the branch ARM64-AppleSilicon is used.
To summarize, run the following commands:
git clone https://github.com/PacktPublishing/Microservices-with-Spring-Boot-and-Spring-Cloud-2E.git
cd Microservices-with-Spring-Boot-and-Spring-Cloud-2E
git checkout ARM64-AppleSilicon
cd Chapter14
./gradlew build
docker-compose build
docker-compose up -d
./test-em-all.bash
Then, look for a final log message that says:
End, all tests OK
Also, lookup startup times for the Java VM-based microservices with the command:
docker-compose logs product-composite product recommendation review | grep "Started"
Expect a result like:
chapter14-review-1 ... Started ... in 14.123 seconds
chapter14-product-1 ... Started ... in 13.085 seconds
chapter14-recommendation-1 ... Started ... in 13.097 seconds
chapter14-product-composite-1 ... Started ... in 13.582 seconds
The microservices start up in around 14 seconds. To be compared with the startup times for the native images based microservices below.
Before tearing down all the containers, verify that they are ARM64 based. For example, for the product microservice, run the command:
docker-compose exec product uname -m
Expect it to respond with aarch64.
Tear down the microservice landscape with the command:
docker-compose down
Instead of building the native images using the standard Spring Boot command:
./gradlew :microservices:$name-service:bootBuildImage
We have to run the a docker build command like:
docker build -f Dockerfile-native-image --build-arg SERVICE_NAME=$name-service -t hands-on/native-$name-service:latest .
So, to summarize, run the following commands to test with GraalVM’s native compile using Docker Compose:
cd ../Chapter23
./gradlew build

docker build -f Dockerfile-native-image --build-arg SERVICE_NAME=product-composite-service -t hands-on/native-product-composite-service:latest .

docker build -f Dockerfile-native-image --build-arg SERVICE_NAME=product-service -t hands-on/native-product-service:latest .

docker build -f Dockerfile-native-image --build-arg SERVICE_NAME=recommendation-service -t hands-on/native-recommendation-service:latest .

docker build -f Dockerfile-native-image --build-arg SERVICE_NAME=review-service -t hands-on/native-review-service:latest .

COMPOSE_FILE=docker-compose-kafka-native.yml docker-compose up -d
USE_K8S=false HOST=localhost PORT=8443 HEALTH_URL=https://localhost:8443 ./test-em-all.bash
As before, look for a final log message that says:
End, all tests OK
Now, lookup startup times for the native image-based microservices:
docker-compose logs product-composite product recommendation review | grep "Started"
Expect results
chapter23-product-1 ... Started ... in 0.59 seconds
chapter23-review-1 ... Started ... in 0.448 seconds
chapter23-product-composite-1 ... Started ... in 0.366 seconds
chapter23-recommendation-1 ... Started ... in 0.544 seconds
Around 0.5 seconds per native image container, to be compared to the 14 seconds per Java VM container. A significantly faster startup time!
Before tearing down all the containers, verify again that they are ARM64 based. Since the natively compiled microservices are based on a distroless Docker image, i.e., they don’t have the uname tool installed. But we can try it on any of the other containers, such as the Kafka container:
docker-compose exec kafka uname -m
Expect it to respond with aarch64.
Tear down the microservice landscape with the command:
COMPOSE_FILE=docker-compose-kafka-native.yml docker-compose down
In this blog post, we will learn how to develop, build and deploy microservices on a Mac with Apple silicon, i.e., an ARM64-based computer. The main obstacle that prevented us from using ARM64-based computers has been the availability of ARM64-compatible versions of the tools and Docker images used in the book. The remaining problem, with no support for Cloud Native Buildpacks on ARM64, was fixed by a homegrown multi-stage Dockerfile.