Blogg
Här finns tekniska artiklar, presentationer och nyheter om arkitektur och systemutveckling. Håll dig uppdaterad, följ oss på LinkedIn
Här finns tekniska artiklar, presentationer och nyheter om arkitektur och systemutveckling. Håll dig uppdaterad, följ oss på LinkedIn

This post is part one of a series about using Ansible to automate the setup of our local development environment. In this part, we will look at the building blocks of Ansible and write our first automation tasks.
Who doesn’t like a nice, clean workspace? Like a tidy physical desktop, free from stacks of coffee cups, old dishes, and candy wrappers, which can make you feel more productive and focused, a clean and organized development environment can do the same for your digital self.
Do you, instead of bliss, find yourself battling the chaos of temporary folders, configuration files, and orphaned libraries that only seem to multiply with every new application you test and uninstall?
While maintaining a well-organized environment can help you stay in control, remaining neat and orderly day-to-day, searching for, tidying up, and trying to keep the bloat at bay is sometimes not very practical or might even be impossible.
Then what can we do about it? Enter Anisble, the savior of our woes, offering a clean slate approach, lettings you start fresh, but without forcing you to remember which settings to update, what knobs to dial in, and which unused features to turn off every time you reinstall your machine.

Caution: Ansible’s setup, configuration, and scripting rely on YAML; if this causes alarm, please close your eyes until you’ve finished reading this post.
The solution we are looking into today is Ansible, an IT automation tool written and maintained by Red Hat. Ansibles’ claim to fame might focus more on server provisioning and application deployment, but what is your local environment, if not a smaller, more compact infrastructure? And just like our infrastructure, we want to raise cattle, not pets. Ideally, we want to replicate our environment on any machine with the least friction, similar to how we containerize our applications.
And like containers, we want to be able to package, version, and redeploy our environment between machines, consolidate our work, save it off-site, and not have it tied up with the host itself.
To achieve this, we will create an automated, version-controlled, idempotent configuration that will take us from a freshly installed machine to a ready-to-go development environment with the press of a button or, to be more precise: the execution of a script.
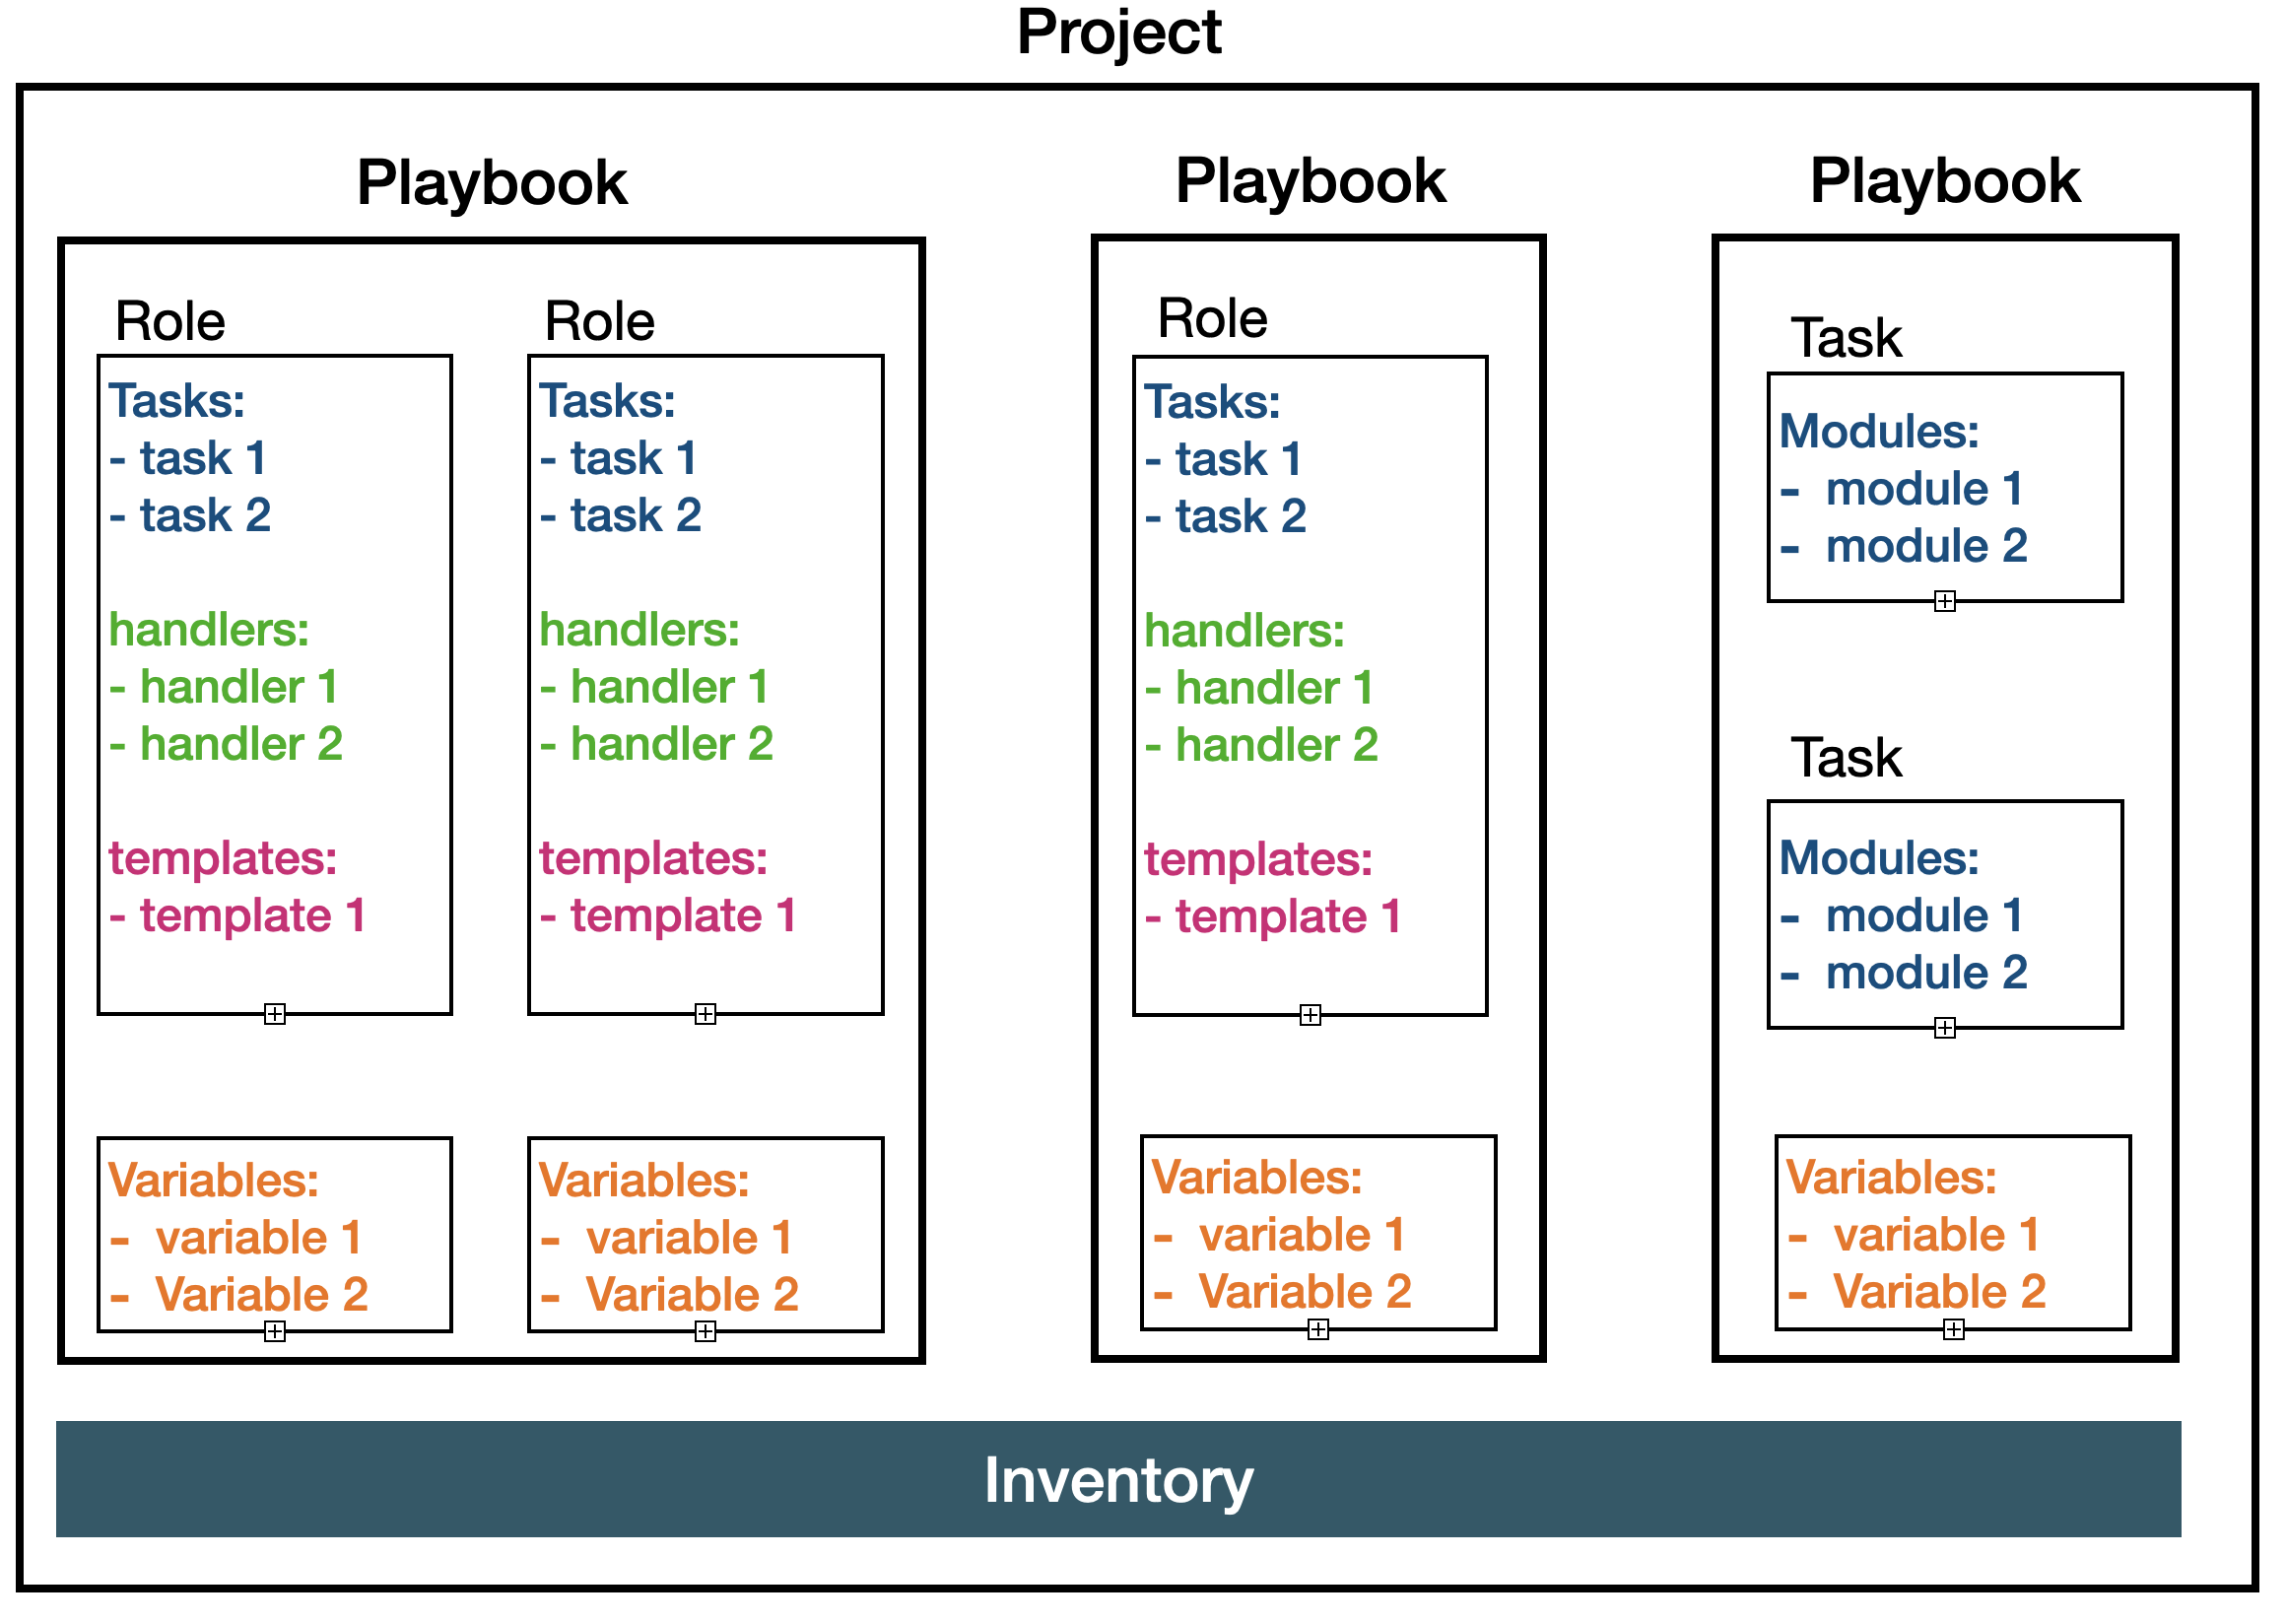
Let us start by exploring the building blocks of Ansible:
Inventory: The inventory is a file or a collection of files that define the hosts (servers, network devices) that Ansible manages.
Playbooks: Playbooks are the heart of Ansible. They define the automation tasks, configurations, and orchestration on the inventory hosts.
Tasks: Tasks are Ansible’s smallest unit of work. They are a series of actions on the target hosts, using modules to provide functionalities.
Modules: Modules are the units of code that Ansible executes. With modules, we perform our actions, such as installing packages, managing files, and configuring services. There are hundreds of built-in modules, and you can create custom ones.
Roles: Roles are a way to organize and reuse Ansible content. They encapsulate tasks, variables, templates, files, and handlers in a standardized structure, making sharing and reusing code across projects easier.
Templates: Templates are text files that can contain dynamic content using the Jinja2 templating engine. They allow you to generate configuration files based on variables, making it easy to create configurations based on host and other variables.
Handlers: Handlers are a subset of tasks that are only triggered when a specific event occurs, such as a change in the configuration of a service. They are commonly used to restart services at the end of a task.
Ansible Galaxy: a community-driven hub and repository for sharing Ansible collections and roles for others to reuse and extend.
In this post, we will be focusing on the core components of Ansible: inventory, playbooks, tasks, and modules, saving the organizational-focused parts for a later time.
Playbooks are the main body of work within Ansible and, together with the inventory, comprise the core of our setup.
To create a new playbook, we need to create a YAML file with a descriptive name with the following contents:
init-osx.yml
---
- name: Bootstrap OSX dev machine
  hosts: all

  tasks:
   - name: Print message
    debug:
    msg: Hello world
This file describes a playbook with a single task: “print message,” which uses a built-in module to print out our message to the terminal.
We have also specified an attribute
hosts: all
which tells Ansible to execute our command on all machines (hosts) we have set in our inventory
inventory
localhost ansible_connection=local
The inventory manages the collection of hosts we want to apply, and since we are focusing on just our local machine, we keep this config simple.
Once we have our hosts set, the playbook ready, and a task automated, we can run this with the following command:
ansible-playbook -i inventory init-osx.yml
Which should give us a response similar to this:
 PLAY [Bootstrap OSX dev machine] *******************************************************************************************************

TASK [Gathering Facts] *****************************************************************************************************************
ok: [localhost]

TASK [Print message] *******************************************************************************************************************
ok: [localhost] => {
    "msg": "Hello world"
}

PLAY RECAP *****************************************************************************************************************************
localhost                  : ok=2    changed=0    unreachable=0    failed=0    skipped=0    rescued=0    ignored=0
Here we can see:
So far, so good, so let’s add a couple of tasks that do some actual work to automate our setup.
First, we create a task folder and our first task inside it.
tasks/dotfiles.yml
---
- name: Download chezmoi
  shell: 'sh -c "$(curl -fsLS get.chezmoi.io)" '

- name: Move to PATH
  command: "mv ./bin/chezmoi /usr/local/bin/chezmoi"

- name: Initialize dotfiles repo
  command: "chezmoi init --apply "
This task will help us initialize our dotfiles using a dotfile manager called chezmoi. Ansible will perform the task in three steps, and as we can see, using two different built-in modules: shell and command.
Both are similar and used to execute commands on the host, the command one being the preferred, safer option. On the other hand, the shell has the benefit of actual execution via a shell and, therefore, can access environment variables, process operators like < > &, and more.
Here we also have our first usage of variables in Ansible; instead of hardcoding the GitHub repo we want to init from, we can make our module infer that value from an external source.
Primitive variables such as the string used here, we denote by a variable name surrounded by two sets of braces:
{{ variable-name }}
But where do we get the value of our variable from?
In a simple, focused case such as this, we can create a file containing our default values in the root of our playbook.
default.config.yml
---
github_name: your-github-username
Now, this value will be available for all of our tasks in this playbook and, unless overwritten, will be used in place of the variable.
Let’s add another task and look at other ways of working with variables.
Create a new task file with the following content:
fonts.yml
---
- name: "[Fonts]: Check if fonts are installed."
  command: ls {{ ansible_user_dir }}/Library/Fonts/
  register: current_fonts

- name: "[Fonts]: Set fonts variable"
  set_fact:
    fonts:
      - name: FiraCode
        archive: https://github.com/tonsky/FiraCode/releases/download/6.2/Fira_Code_v6.2.zip
        directory: ttf
        files:
          - FiraCode-Bold.ttf
          - FiraCode-Light.ttf
          - FiraCode-Medium.ttf
          - FiraCode-Regular.ttf
          - FiraCode-Retina.ttf
      - name: Monoid
        archive: https://github.com/JB-Dmitry/monoid/blob/master/Monoid-0.61-with-IntelliJ-support.zip?raw=true
        directory: ""
        files:
          - Monoisome-Regular.ttf
          - Monoid-Retina.ttf
          - Monoid-Bold.ttf
          - Monoid-Italic.ttf
  when: fonts is undefined

- name: "[Fonts]: Create a directory if it does not exist."
  ansible.builtin.file:
    path: "/tmp/fonts-{{ item.name }}"
    state: directory
    mode: "0755"
  loop: "{{ fonts }}"
  when: current_fonts == ""

- name: "[Fonts]: Download and Extract font files."
  unarchive:
    src: "{{ item.archive }}"
    dest: "/tmp/fonts-{{ item.name }}"
    remote_src: true
  loop: "{{ fonts }}"
  when: current_fonts == ""

- name: "[Fonts]: Install fonts from repositories"
  copy:
    src: "/tmp/fonts-{{ item.0.name }}/{{ item.0.directory }}/{{ item.1 }}"
    dest: "{{ ansible_user_dir }}/Library/Fonts/{{ item.1 }}"
  loop: "{{ fonts | subelements('files') }}"
  when: current_fonts == ""

- name: "[Fonts]: Remove repositories"
  file:
    path: "/tmp/fonts-{{ item.name }}"
    state: absent
  changed_when: false
  loop: "{{ fonts }}"
  when: current_fonts == ""
This task will let us download and install fonts from both the FiraCode and Monoid font-families. The first thing to note is using a built-in variable called {{ ansible_user_dir }} . Ansible sets this variable during the gathering_facts phase and is globally available inside the playbook. If you are interested in what other facts Ansible has gathered about the system, we can create a small task to print them all with this:
  tasks:
    - name: Print all available facts
      ansible.builtin.debug:
        var: ansible_facts
Using the built-in variable to reach our home folder, we issue an “ls” command, looking into our user’s Libraries fonts folder. We then register the result inside a local variable called (current_fonts).
The current_fonts variable is then checked for each of our modules using the “when” conditional statement and is one of the ways we can keep our configuration idempotent.
“When” is used to determine if a specific module should run; for instance, there is no need to download a new set of fonts if they are already in place.
If applicable (no values set before), we move on and generate our facts. The facts we set using the “set_facts” module are an object containing a list of 2 items. These items in term have a couple of attributes:
To iterate through our objects, we make use of the built-in “loop” module, which will traverse over the top layer objects and return a variable called “item” that contains the result of our loops, so to get the name of our font objects we call {{ item.0.name }}
Then we use a second, nested loop to iterate over our files attribute inside each font item.
Creating a nested loop looks like this:
{{ fonts | subelements(‘files’) }}
And once we have separated our data into an outer and inner loop, we access our variables in the following way.
To get a hold of our variable name in fonts.[1..n].name
{{ item.0.name }}
And later iterate through our files name nested inside fonts.[1..n].files[1..n]
{{ item.1 }}
With these modules, we move our fonts from the temporary folder to our library to install them and later clean up and delete the temporary directories.
All we need to do now is add this task to our playbook.
  tasks:
    - name: Dotfiles
      import_tasks: tasks/dotfiles.yml
      tags: ["dotfiles"]
    - name: Fonts
      import_tasks: tasks/fonts.yml
      tags: ["dotfiles"]
Then execute it, same as before
ansible-playbook -i inventory init-osx.yml
And with that, we have a simple Ansible playbook to automatically fetch and initiate our dotfiles from GitHub and install a set of nice fonts we can use.
Before we end, let’s take a quick look at some configs we can apply to customize our Ansible experience. First is linting, which we handle via a .ansible-lint file.
.ansible-lint
---
skip_list:
  - experimental
  - fqcn-builtins
A list of rules we don’t want the linter to warn about. Here we are removing warnings about using “fully qualified collection name,” so instead of writing “ansible.builtin.command,” we can write “command.”
For more extensive configuration, there is the option to generate an inactive config file using the following command:
ansible-config init –disabled > ansible.cfg
We can then use this file as a starting point for any configuration we want for the playbook. We can set configurations such as if and how you want Ansible to gather facts about the host, output format, timeouts, how to deal with errors, and much more.

And with that, we now have a solid starting point for automating our local environment!
Today we’ve merely scratched the surface, exploring the building blocks and executing basic playbooks.
In our upcoming post, we will use our new knowledge and delve deeper into the power of roles for creating self-contained sets of tasks, complete with isolated configurations and rulesets.
We’ll also investigate Ansible templates to generate our config files based on host variables and other conditions and tap into the Ansible community to reuse existing roles and collections, eliminating the need to reinvent the wheel for common, already-solved tasks.