Blogg
Här finns tekniska artiklar, presentationer och nyheter om arkitektur och systemutveckling. Håll dig uppdaterad, följ oss på LinkedIn
Här finns tekniska artiklar, presentationer och nyheter om arkitektur och systemutveckling. Håll dig uppdaterad, följ oss på LinkedIn

Taking a quick look at building a backend-driven web GUI using htmx and Go templ.
Disclaimer: I am NOT a frontend developer and my styling skills are nonexistent.
Anyone remember how we did web frontends in the early/mid 2000? Pure HTML, perhaps with small bits of Javascript/Coffeescript, maybe with some Flash/Shockwave or Java Applet thrown into the mix. It was horrible. Few other core areas of mainstream software development has evolved as much as frontend development - from those early days of “pure” markup, through server-rendered PHP/JSP/ASP, jQuery, GWT onto more modern Javascript-based frameworks such as Angular, Vue and React. The speed of innovation has been breathtaking and as a person primarily focusing on backend development and architecture, I eventually kind of lost track of all the frameworks, css-compilers, frontend package managers and build tools necessary to build modern frontends.
About 5 years ago I started working full-time with Go-based applications. Some of these have had frontends, which our team has built using those rather complex frontend frameworks such as React, Vue or Angular. Go code has sometimes served the scripts and markup files built by npm build, but other than that, I’ve done next to no “real” frontend development in Go - an important reason being that there really hasn’t been any suitable server-side frameworks available for Go for building frontend apps served from the server.
Sure, Go has its html/template package. But in all honesty, that package isn’t practical to build proper server-side rendered HTML apps with, especially when complexity and project size increases.
However - two emerging but unrelated software frameworks seems to offer a really intriguing way for Go-based backend (or perhaps full-stack) developers to create modern server-driven HTML apps using Go and HTML templating:


(Funny coincidence that their respective logotypes are similar)
Let’s take a quick look at htmx and templ! After that we’ll get to the juicy part - how to build something with those two using Go!
The full source code for my little demo project can be found here.
htmx is a library (a Javascript one, actually) that according the official docs:
“… allows you to access modern browser features directly from HTML, rather than using javascript.”
Sure, that sounds nice. But what does that actually mean from a developer’s perspective? I’d say it means that a HTML page that imports the htmx library can offer a lot of reactivity, styling, CSS-transitions, backend API calls, web socket/SSE integration etc without having to write a single line of Javascript. Instead, htmx evolves around custom HTML tag attributes that will offer us as developers functionality we’ve previously would have needed to write Javascript for, often according to the patterns used in the framework used in your frontend project such as React.
Let’s take a really simple example, the good ol’ HTML button. Either a <button/> or an <input type="submit"/>. My frontend skills isn’t quite up-to-date, but in 2010, you’d probably use an onClick listener that invoked a Javascript function that used some jQuery and xhr to collect data from the frontend and then would send it to the server.
With htmx, you’ll use attributes instead:
<button class="btn btn-info"
        hx-get="/all"
        hx-trigger="click"
        hx-target="#questions">All questions
</button>
The button above will on “click” execute a HTTP GET call to the server’s /all endpoint, where the returned response body will replace the contents (innerHTML) of the HTML element identified by the CSS selector specified by hx-target.
A very crucial part of htmx manifests itself here - rather than expecting some kind of JSON data in the response (a list of questions, for example) that the frontend code can extract and render as it sees fit, htmx expects the server to return the HTML markup we want to have in the designated target element. E.g, traditionally, the server’s API would return something like:
{
  "questions": [
    {"from":"Elvis","text": "Is javascript awesome?"},
    {"from":"Garth","text": "Did you really say that?"}
  ]
}
with htmx, we instead expect the server to have rendered the HTML:
<div class="container">
    <div>From: Elvis</div>
    <div>Question<br/>
        <pre>Is javascript awesome?</pre>
    </div>
</div>
<div class="container">
    <div>From: Garth</div>
    <div>Question<br/>
        <pre>Did you really say that?</pre>
    </div>
</div>
(of course, the HTML above is obviously quite bonkers, but should serve as a clear example of the distinction between an API serving data or serving server-rendered markup.)
htmx can handle a ton more of stuff such as HTML5 form validation, history management, CSS animations, fine-grained Ajax etc. We’ll see a few more examples shortly.
As stated in the previous section, htmx expects the server to deliver rendered markup as response to API calls. Rendering HTML on the server has been around forever, it’s what we did using Perl/PHP/VBScript/JSP etc. back in the days, often mixing imperative code with markup. Here’s a PHP example:
<!DOCTYPE html>
<html>
    <head>
        <title>PHP Test</title>
    </head>
    <body>
        <?php echo '<p>Hello World</p>'; ?>
    </body>
</html>
With Go, we’ve (more or less) only have had the option of using the html/template together with net/http to parameterize templates with values, a rather clunky experience in a frontend world that has moved on to composition of configurable components.
Enter templ:
“Create components that render fragments of HTML and compose them to create screens, pages, documents, or apps.”
Templ works by defining templates in .templ files that the templ binary compiles into Go code. Let’s start by mimicking the PHP example above (with a small addition) using two templ templates, one we call Index and another we call Hello:
package views

import "time"

templ Hello(name string) {
	<p>{ name }</p>
}

templ Index(currentDate time.Time) {
<!DOCTYPE html>
<html>
    <head>
        <title>Templ test, the date is {currentDate.Format("2006-01-02")}</title>
    </head>
    <body>
        @Hello("World")
    </body>
</html>
}
Note how we - with type safety! - can pass variables to templates and how we can compose a full page by injecting templates into one another using the @ prefix.
Inside the .templ file and its templates, we see a somewhat strange mix of markup and Go code. We have a package declaration, we can import go packages, we can declare go functions - and we can use Go code (that is a string or that returns strings) inside the templates.
We can also use if, for and switch statements. Let’s define a BulletList templ template:
templ BulletList(name string, values []string) {
	<h4>Name of list: {name}</h4>
	for _, val := range values {
		<li>{ val }</li>
	}
}
If we modify our Index template slightly, we can include the bullet list as well.
    <body>
        @Hello("World")
        @BulletList("Actors", []string{"Tom", "Kate", "Lance"})
    </body>
These .templ files needs to be compiled into ordinary Go code before we can use them. By installing the templ binary:
go install github.com/a-h/templ/cmd/templ@latest
and making sure $GOROOT/bin is on our $PATH, we can run the following from our project’s root directory:
$ templ generate ./...
Processing path: /Users/username/apps/questions-admin-app
Generated code for "/Users/username/apps/questions-admin-app/internal/app/views/hello.templ" in 3.024964ms
Generated code for 1 templates with 0 errors in 3.054964ms
The resulting hello_templ.go file is generated right next to the .templ file. It’s generated code that we really don’t need to bother ourselves with the internals of. The important part is that the entry point for our templates now are ordinary Go functions returning templ.Componet:
func Hello(name string) templ.Component {
... a lot of generated code ...
}
Using the generated templates in rendering can be done in a few different ways, including rendering to a io.Writer or by using a http.Handler. A basic example:
func TestHello(t *testing.T) {
	Index().Render(context.Background(), os.Stdout)
}
This test will print:
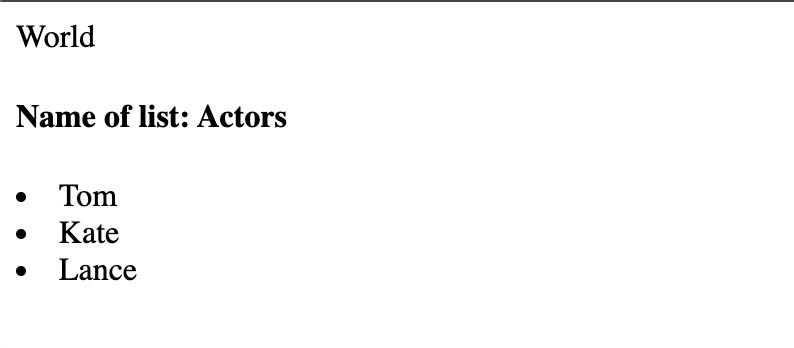
<!doctype html><html><head><title>Templ test, the date is 2024-01-01</title></head><body><p>World</p><h4>Name of list: Actors</h4><li>Tom</li><li>Kate</li><li>Lance</li></body></html>
The output shown using a web browser should look something like:
Using the chi HTTP router we can use the templ.Handler function:
    r := chi.NewRouter()
	r.Get("/", func(w http.ResponseWriter, r *http.Request) {
		templ.Handler(views.Index()).ServeHTTP(w, r)
    })
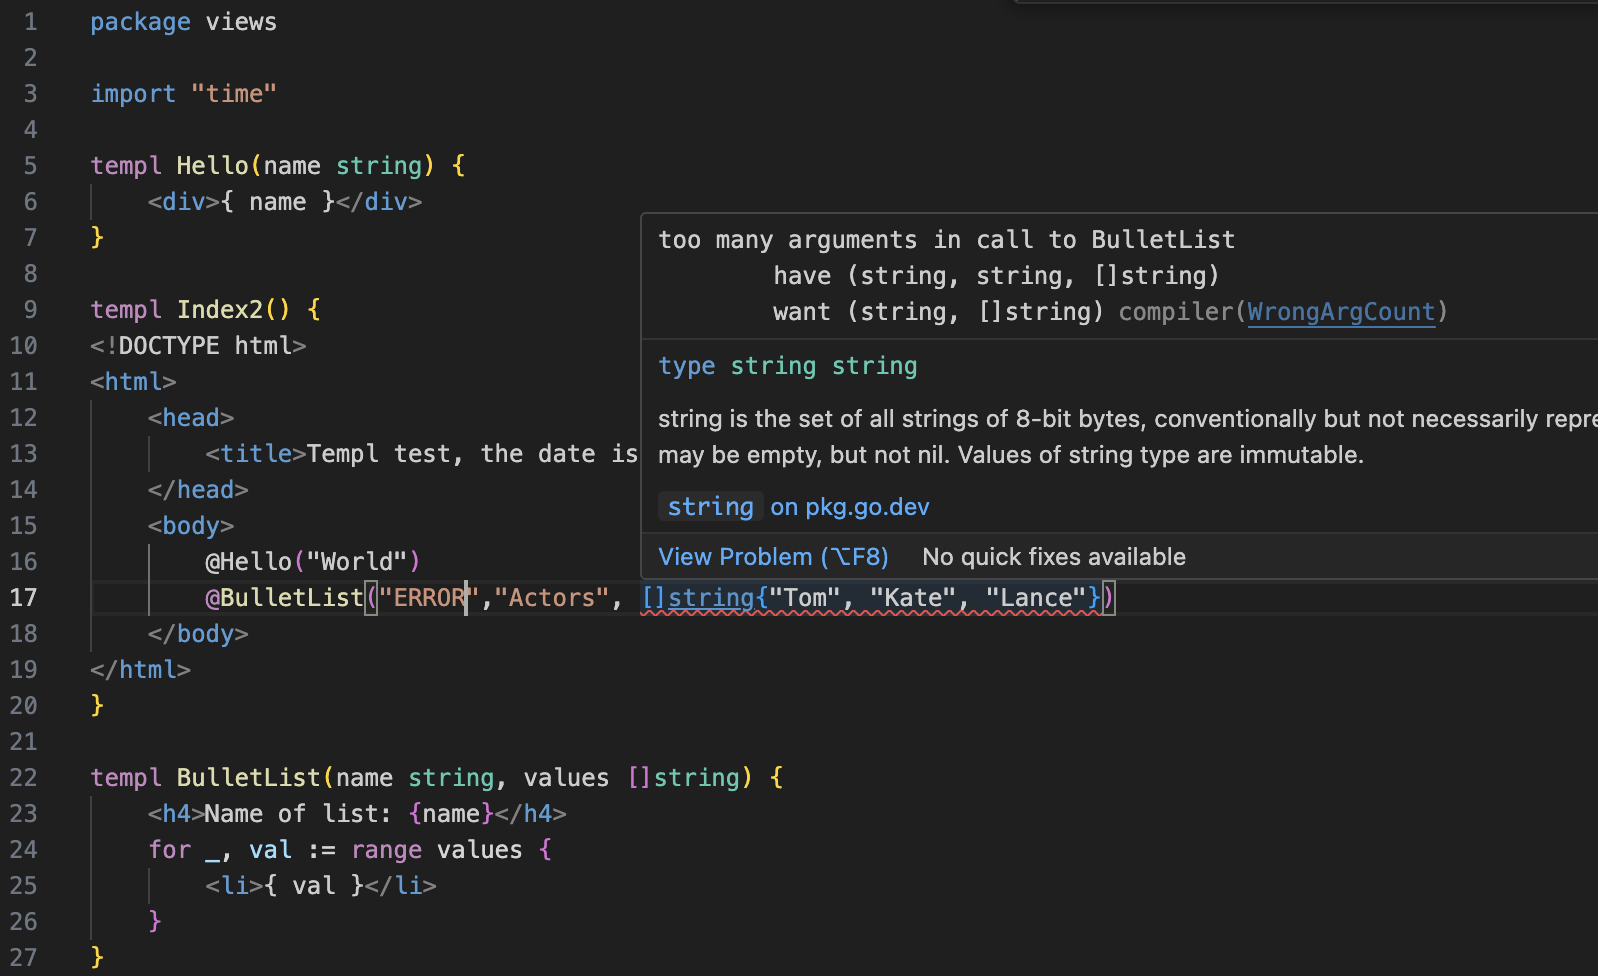
templ has awesome documentation and also has some good developer tooling including .templ file formatting and a VSCode plugin for .templ files. A VSCode example where I’ve deliberately introduced an error:
templ also supports hot-reload that detects changes to .templ files, which triggers a recompile of them and optionally also restarts of your Go program. An example of the latter:
templ generate --watch --cmd="go run cmd/templ-demo/main.go"
The above command will recursively watch for changes to any .templ files in the project’s file system and after recomplilation, executes the command specified by --cmd.
So, the natural next step is to combine htmx and templ to build a more realistic application. Inspired by a colleague’s upcoming Cadec Talk, I decided to do some kind of presenter’s online question management application. The idea is that conference/talk attendees can enter questions for presenters using some application/mobile app. The demo app for this blog post will then display the questions and provide necessary functionality to answer or manage questions. A bit like the classic To-do list app. Just for fun, I also added social (Google) based login to the app.
I did not follow the example templ application structure. I’ve organized my code according to this structure:
Talks can have 0..n questions, which can have 0…n answers:
+-----------+      +-----------+       +----------+
|   Talk    |-----*| Question  |------*|  Answer  |
+-----------+      +-----------+       +----------+
For the sake of this blog post, data is represented as simple Go structs stored in a slice:
type InMem struct {
	db []app.Question
}
where app.Question has app.Talk and []app.Answer as fields. All entity types use string-based UUIDs as their “primary keys”. User identity including talk presenters are represented by their email address.
In a real scenario, one should be able to use whatever persistent DB one likes, be it relational, document or perhaps even graph-based.
Perhaps adding a real authentication solution to this app was a bit over-enthusiastic, but since all presenters at our conference has @callistaenterprise.se email addresses, I thought it would be cool to use real logins through Google.
This was quite easy to accomplish with Go using the Gothic go module for social logins. While Gothic can be configured for use with a large number of Identity Providers, I settled on Google only.
Setting up Gothic evolves around the following activities:
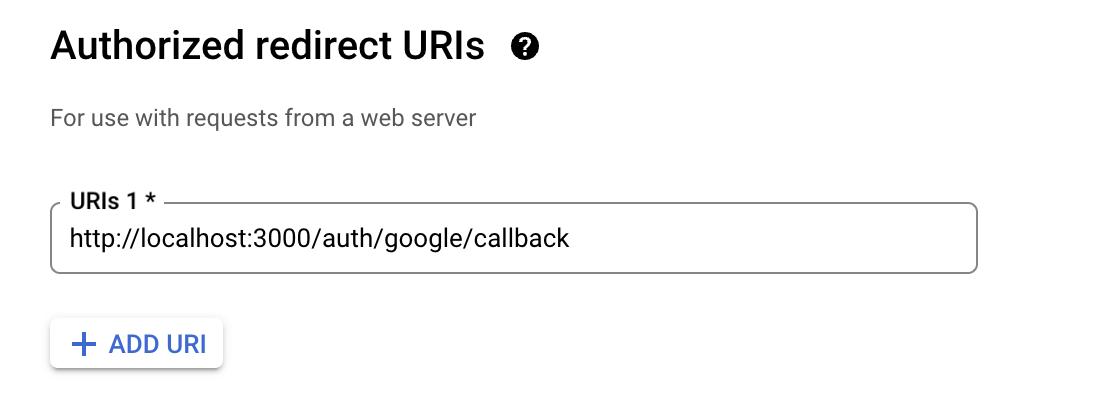
Client ID. This was relatively straightforward, the important part (for development) is to set up the correct redirect_uris and taking note of your app’s Client ID and client secret.
 .
..credentials file.Google’s OpenID/OAuth2-based login consists of three discrete steps. First the app must redirect the User-Agent (your browser) to Google with some parameters including that redirect_uri. After the user has authenticated with Google, Google redirects the user back to our app’s redirect_uri with an authorization code, that our backend can use to fetch the user object through a back-channel request to Google.
Luckily for us, almost all the complexity above is handled by Gothic. What we need to do is some boilerplate, including setting up a session storage mechanism.
cookieStore := gsessions.NewCookieStore([]byte("very-very-secret"))
cookieStore.MaxAge(86400) // 1 day
cookieStore.Options.Domain = "localhost"
cookieStore.Options.Path = ""
cookieStore.Options.HttpOnly = true  // HttpOnly should always be enabled
cookieStore.Options.Secure = false   // Set to false when running locally over plain HTTP

gothic.Store = cookieStore

// Read Google auth credentials from .credentials file.
clientID, clientSecret := readCredentials()

goth.UseProviders(
    google.New(clientID, clientSecret, "http://localhost:3000/auth/google/callback", "email", "profile"),
)
Next, we need two callback handlers. One that is invoked when our user clicks our login button which constructs the initial redirect to Google, and another to handle the callback.
    r := chi.NewRouter()
	r.Get("/auth", authStartHandler())
	r.Get("/auth/{provider}/callback", authCallbackHandler(session))
// authStartHandler inits the authentication and redirects the user to Google
func authStartHandler() func(w http.ResponseWriter, r *http.Request) {
	return func(w http.ResponseWriter, r *http.Request) {
		gothic.BeginAuthHandler(w, r)
	}
}
A very important lesson I learned setting this up is that the gorilla/sessions cookieStore used by Gothic is ONLY used as session storage during the interactions with Google. Once we’ve gotten hold of the user object in the handler above, we need a different session management solution for keeping the user object around. For this, I picked the super-simple golangcollege/sessions go module.
It’s set up similarly to gorilla/sessions used by Gothic:
	// User session mgmt, used once gothic has performed the social login.
	var session *sessions.Session
	var secret = []byte("some-secret")
	session = sessions.New(secret)
	session.Lifetime = 3 * time.Hour
Further down in our server’s init code, we use a chi middleware to Load session data for every request:
	// Set-up chi router with middleware
	r := chi.NewRouter()
	r.Use(middleware.Logger) // <-- Standard chi request logger
	r.Use(session.Enable)    // <-- Makes sure session data is available for each request.
Then, see how we store the user fetched from Google in our application’s session store:
// authCallbackHandler accepts the callback request from Google and completes the authentication. The user info is available in the `user` variable.
func authCallbackHandler(session *sessions.Session) func(w http.ResponseWriter, r *http.Request) {
	return func(w http.ResponseWriter, r *http.Request) {

		user, err := gothic.CompleteUserAuth(w, r)
		if err != nil {
			http.Error(w, err.Error(), http.StatusUnauthorized)
			return
		}

		// Store user's email in session!
		session.Put(r, "email", user.Email)
		session.Put(r, "view", "all") // <- used to know if user wants to display all questions or only those for their own talk.

		http.Redirect(w, r, "/", 302)
	}
}
Remember that login button I mentioned?

This page has been created using templ and is served from our Index page if the user hasn’t logged in. Let’s take a look at it!
package views

templ Login() {

<div class="container">
    <div class="jumbotron text-center text-success">
        <h1><span class="fa fa-lock"></span> Questions admin app</h1>
        <p>Login or Register with:</p>
        <a href="/auth?provider=google" class="btn btn-danger"><span class="fa fa-google"></span> Sign in with Google</a>
    </div>
</div>
}
The contents are based on a Gothic example. Do note that this template does NOT include any imports of CSS or htmx Javascripts - for the styling to work, it needs to be injected into another template - the Index one:
package views

import "github.com/eriklupander/templ-demo/internal/app"

templ Index(email string, questions []app.Question) {
<html>
    <head>
       <title>Google SignIn</title>
       <meta charset="utf-8"/>
       <link rel="stylesheet" href="https://stackpath.bootstrapcdn.com/bootstrap/4.4.1/css/bootstrap.min.css"/> <!-- load bulma css -->
       <link rel="stylesheet" href="https://stackpath.bootstrapcdn.com/font-awesome/4.7.0/css/font-awesome.min.css"/> <!-- load fontawesome -->
       <style>
           body        { padding-top:70px; }
       </style>
       <script src="https://unpkg.com/htmx.org@1.9.9" integrity="sha384-QFjmbokDn2DjBjq+fM+8LUIVrAgqcNW2s0PjAxHETgRn9l4fvX31ZxDxvwQnyMOX" crossorigin="anonymous"></script>
   </head>
   <body>
   if email == "" {
        @Login()
   } else {
        @Dashboard(email, questions)
   }
   </body>
</html>
}
The index page imports Bootstrap CSS and htmx. It’s been passed the email address of the currently logged in user and the questions applicable to that user. If not logged in, email is empty and the @Login template is rendered instead of the @Dashboard.
Where does email and questions come from? Remember, this is rendered entirely on the server. The handler for / looks like this:
func indexPage(session *sessions.Session, db *store.InMem) func(w http.ResponseWriter, r *http.Request) {
	return func(w http.ResponseWriter, r *http.Request) {
		email := session.GetString(r, "email")
		if email != "" {
			if session.GetString(r, "view") == "mine" {
				templ.Handler(views.Index(email, db.AllForAuthor(email))).ServeHTTP(w, r)
			} else {
				templ.Handler(views.Index(email, db.All())).ServeHTTP(w, r)
			}
			return
		}
		// If not logged in
		templ.Handler(views.Index("", nil)).ServeHTTP(w, r)
	}
}
As plainly seen, email comes from session.GetString while the questions are fetched from our db depending on the view attribute in the session.
There’s no htmx here (yet), but all-in-all, this showcases how we use Go HTTP handlers with templ templating to render our Index page with different code-paths depending on whether the user has logged in yet or not.
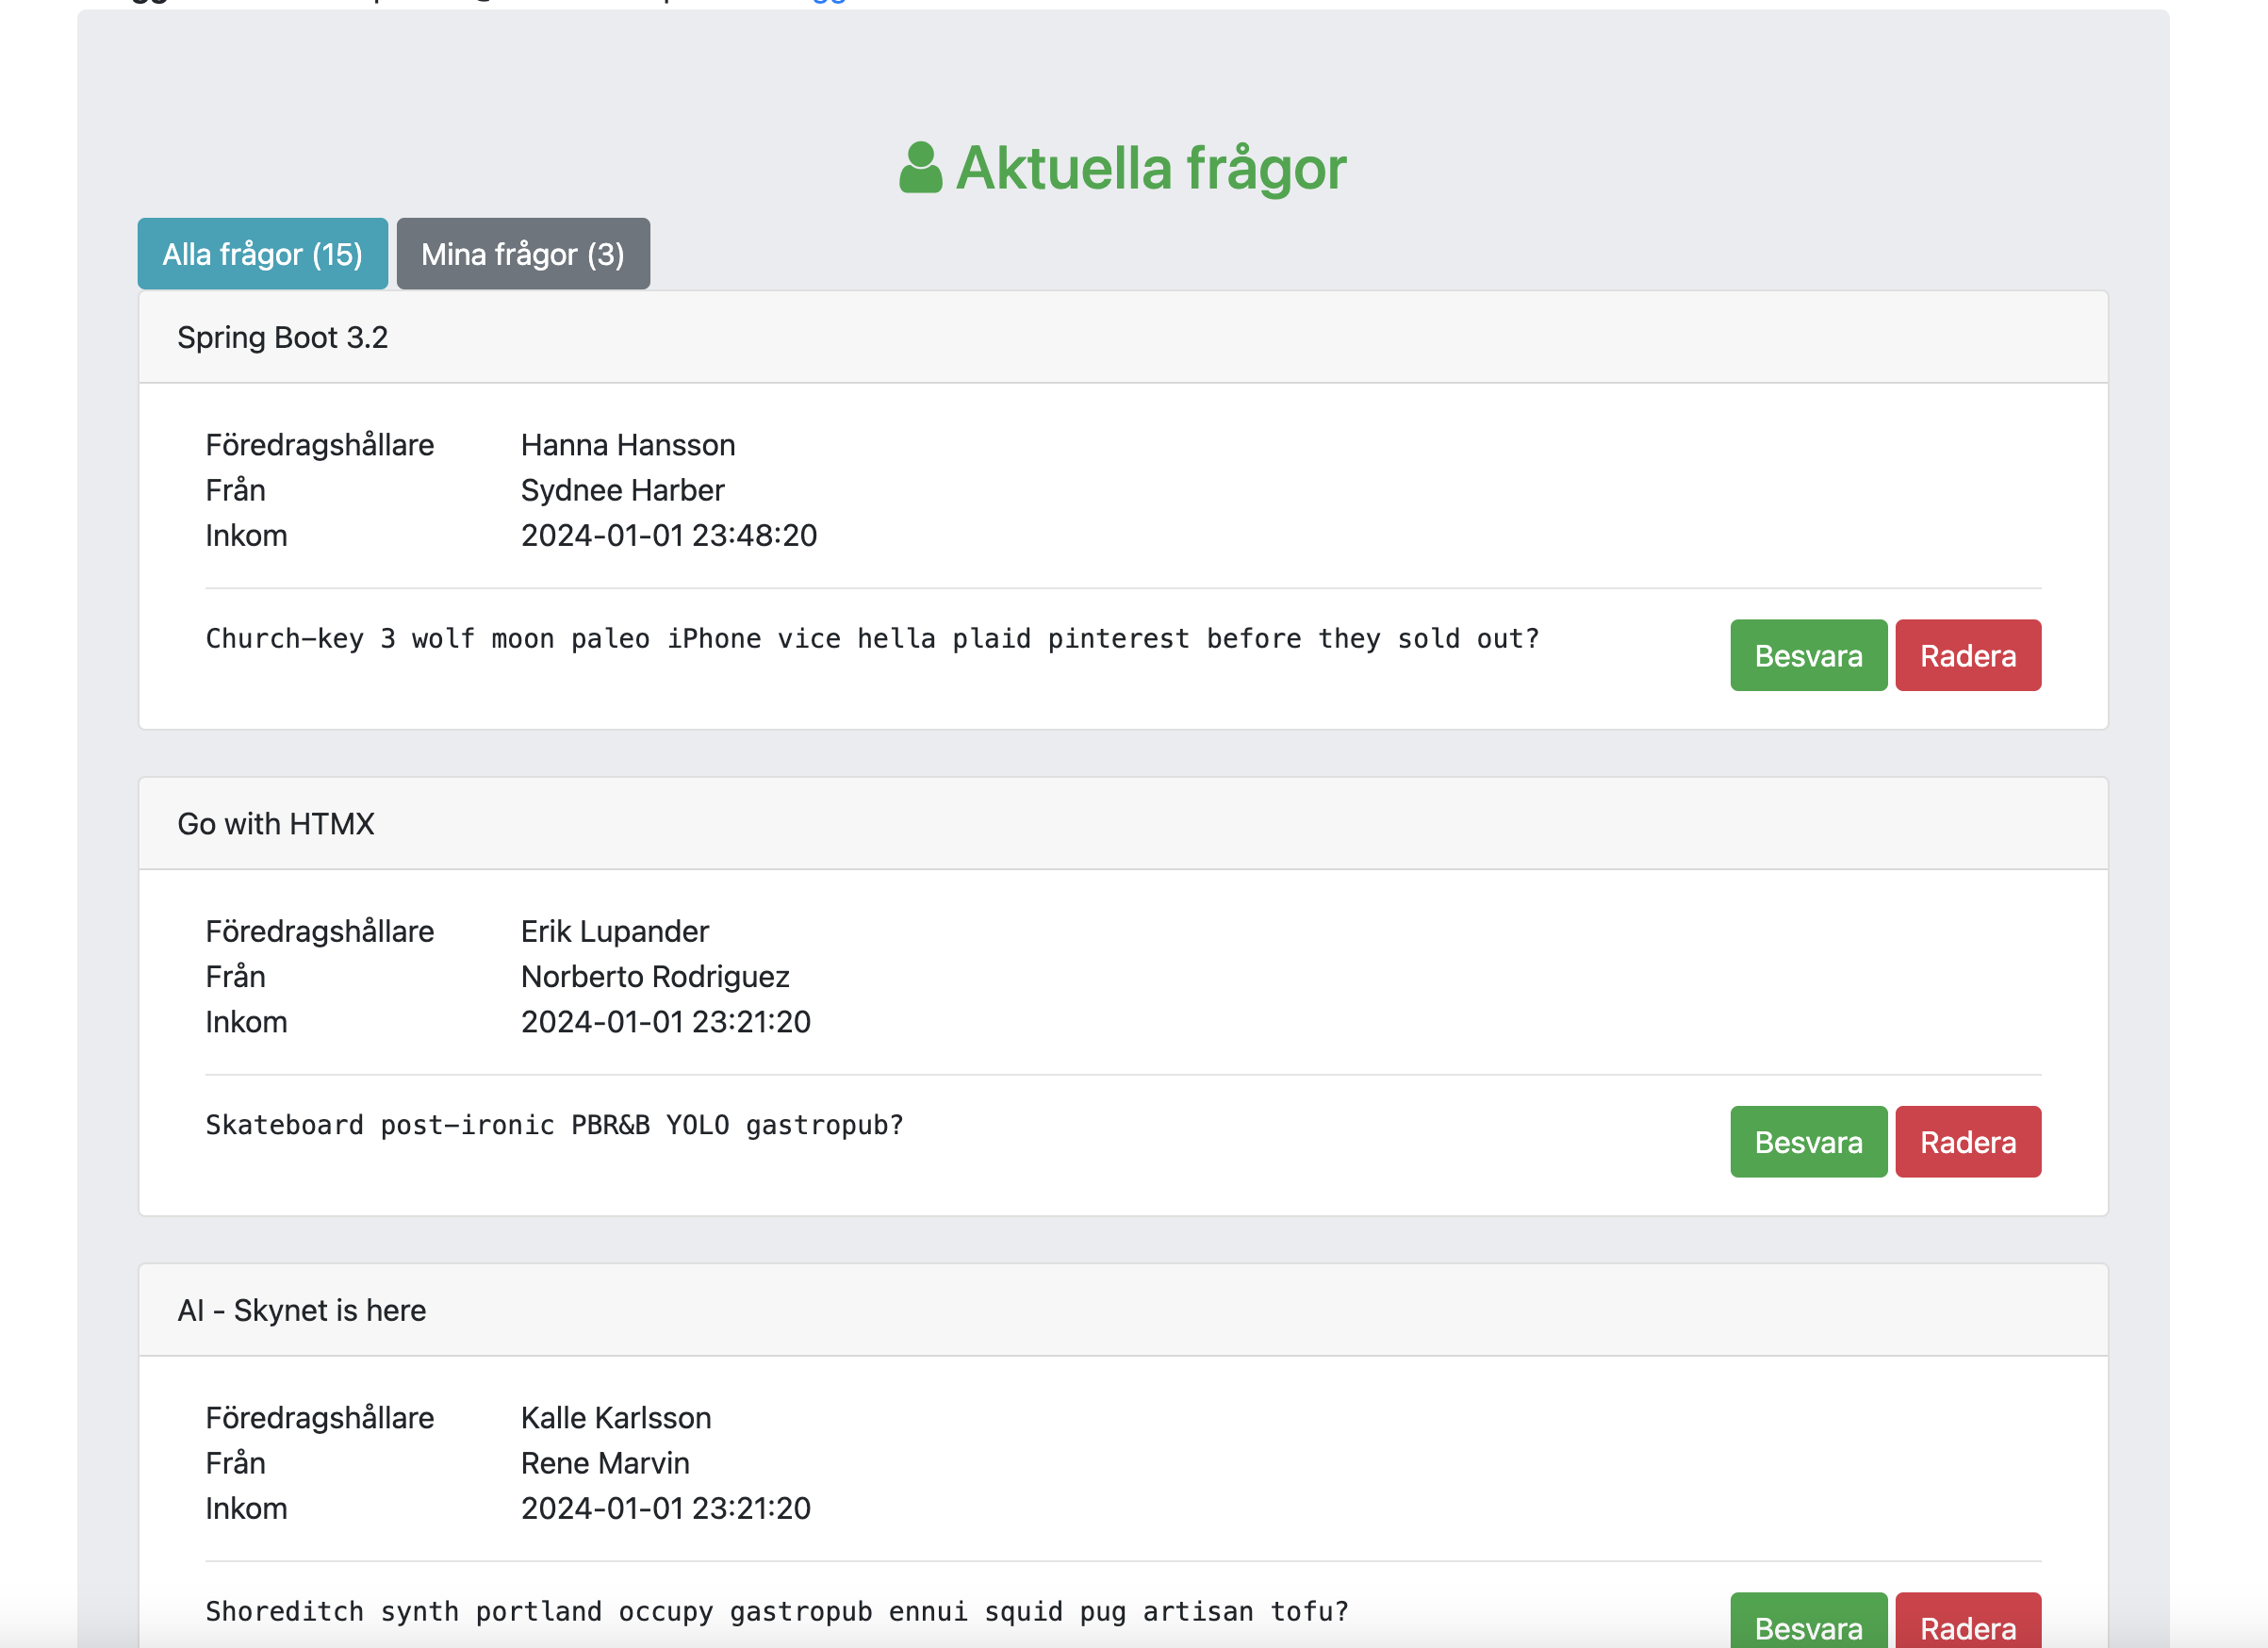
The dashboard (with fake data re-seeded using gofakeit on each app start) looks like this:
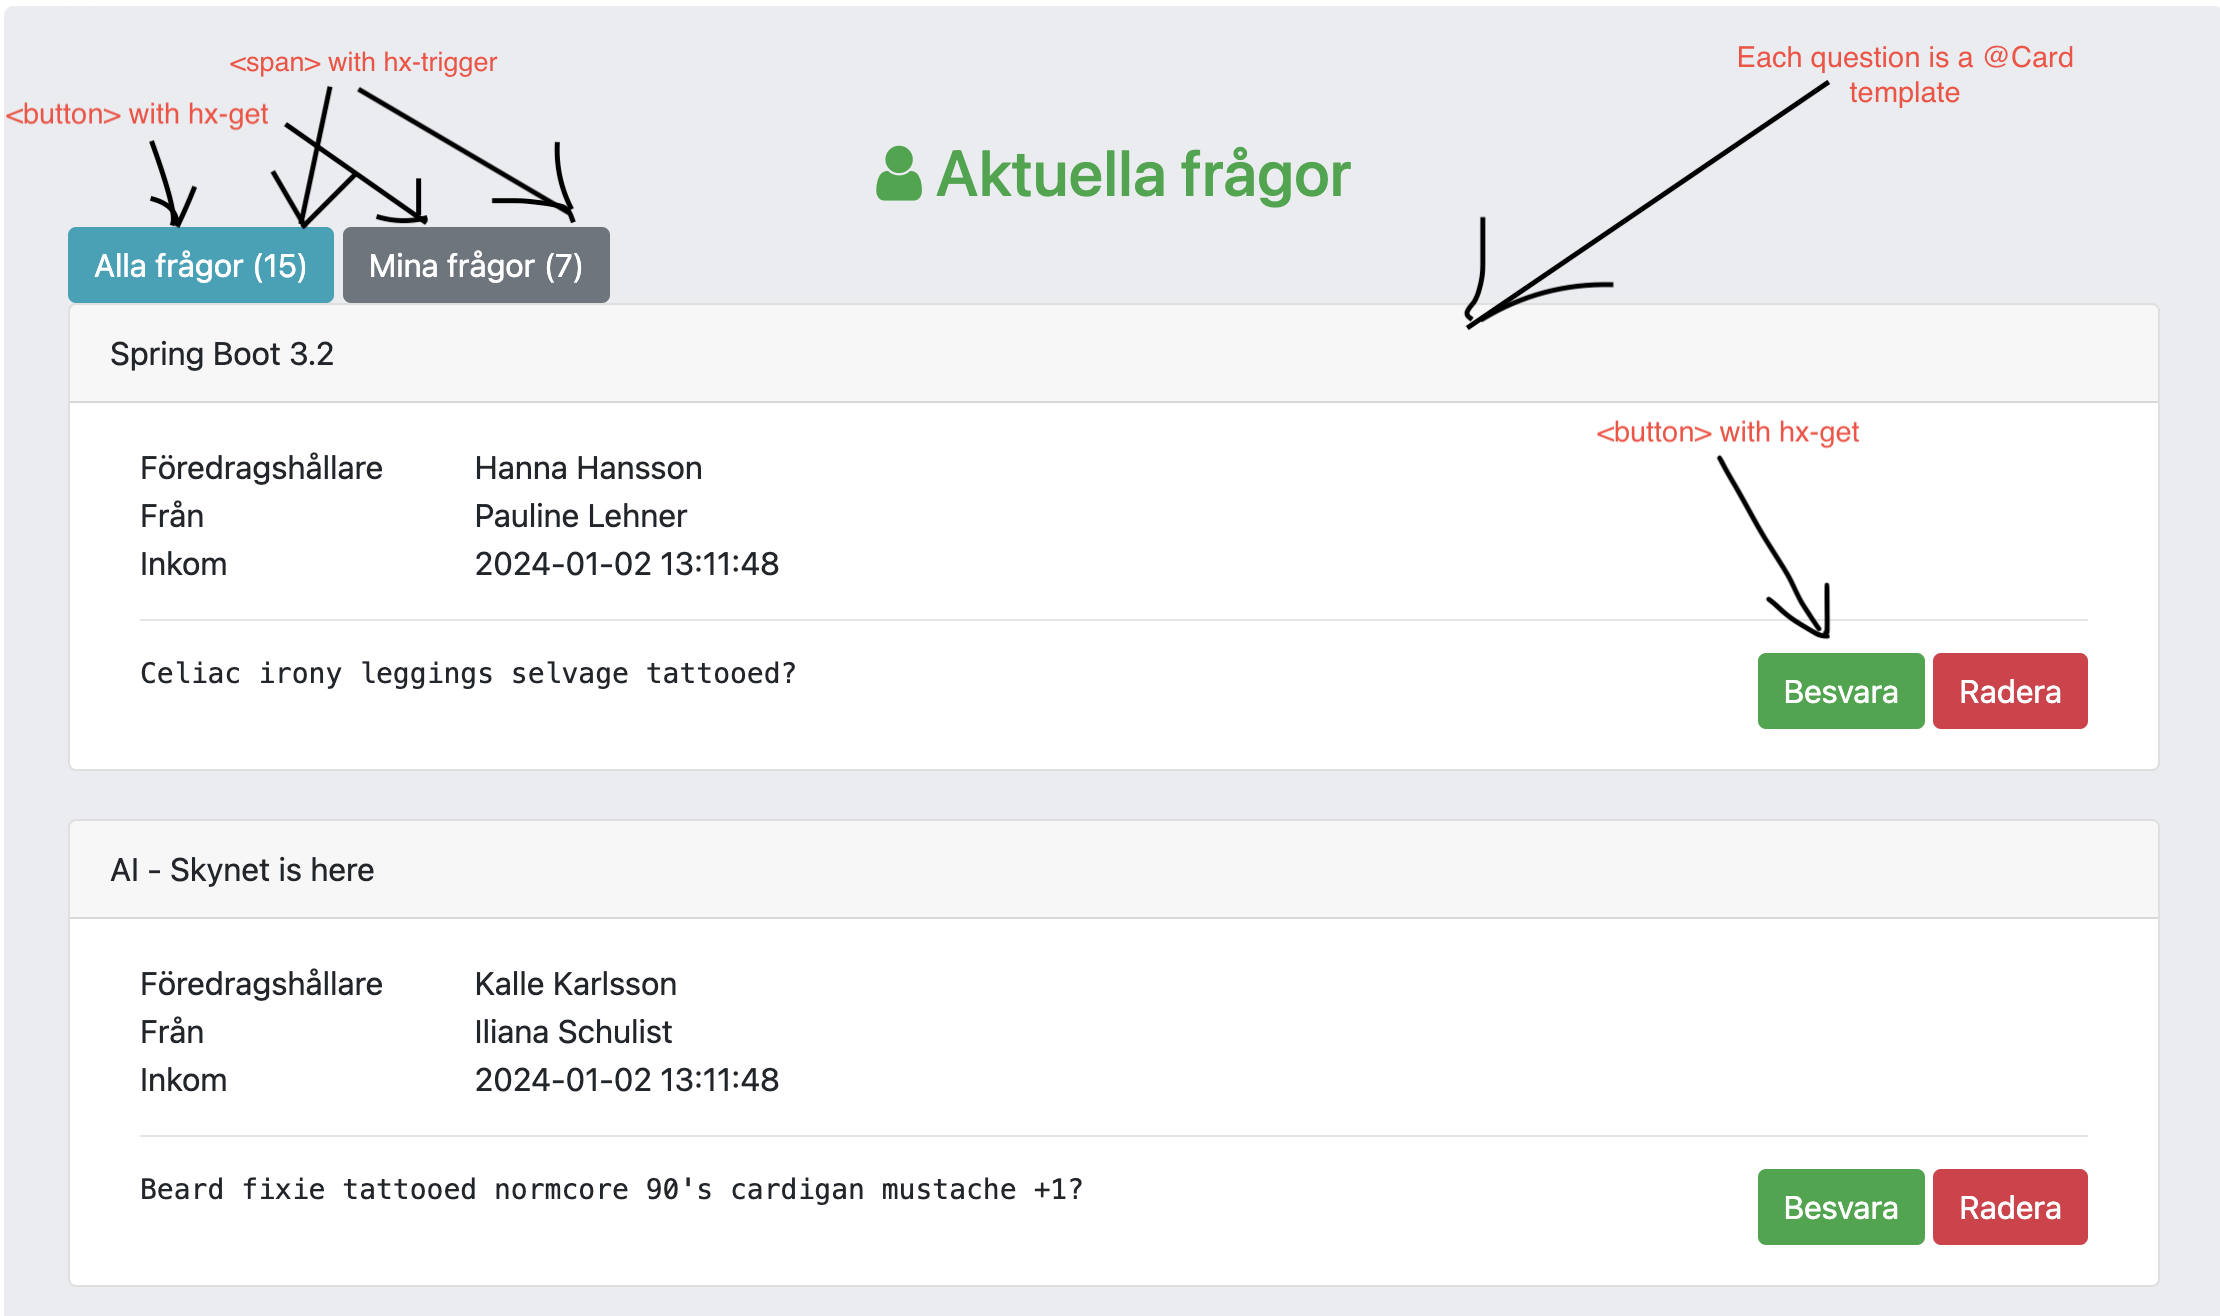
Let’s start with something simple. Those two buttons (with counters) at the top can be pressed to either load all questions or only questions associated with the Talk matching the email address the user logged in with.
The templ for those buttons comes from the @Dashboard template. The
<button class="btn btn-info"
    hx-get="/all"
    hx-trigger="click"
    hx-target="#questions">Alla frågor
</button>

<button class="btn btn-info"
    hx-get="/mine"
    hx-trigger="click"
    hx-target="#questions">Mina frågor
</button>
hx-get="/all" tells htmx to issue an Ajax GET request to /all when clicked.hx-trigger="click" tells htmx to trigger this event when the element is clicked. This is really handy, you can use this on any element, not just buttons and links.hx-target="#questions" tells htmx (this is REALLY important) to render the returned HTML in the element identified by the CSS selector expression.On the server, the handler for /all looks like this:
func allQuestionsHandler(session *sessions.Session, db *store.InMem) func(w http.ResponseWriter, r *http.Request) {
	return func(w http.ResponseWriter, r *http.Request) {
		email := session.GetString(r, "email")
		if email == "" {
			http.Error(w, "not logged in", 401)
			return
		}
		questions := db.All()
		session.Put(r, "view", "all")
		templ.Handler(views.Questions(questions)).ServeHTTP(w, r)
	}
}
First, the handler code makes sure we’re logged in. Next, all questions are retrieved from the DB. Finally, we update our view attribute in the session to use “all” and then we render the response (server-side!) using the Questions template. The resulting HTML is sent in the response body and htmx will update the <div id="questions"></div> element present in our Dashboard template.
This is really cool and IMHO also a very simple way of working with user interfaces.
The Questions template uses a for statement and the Card template.
templ Questions(questions []app.Question) {
    <div id="questions">
        for _, q := range questions {
            @Card(q)
            <br/>
        }
    </div>
}
This mixing of Go code with markup is a bit reminiscent of the PHP/JSP/ASP I wrote 15-20 years ago, but feels way more powerful since we can compose our views using various templates, re-render selected parts of our page etc. I like it!
Those numbers next to our buttons were omitted from the last section. They are actually <span/> elements inside the <button> innerHTML that executes their own calls to the backend to retrieve those numbers.
Alla frågor <span hx-get="/countall" hx-trigger="every 5s" hx-target="this">
The htmx attributes above will result in a GET request to /countall every 5 seconds, where the returned markup replaces whatever content is currently inside of the <span/>. Pretty neat. We can see these calls in our server log:
2024/01/02 14:14:35 "GET http://localhost:3000/countall HTTP/1.1" from [::1]:51731 - 200 5B in 116.314µs
2024/01/02 14:14:35 "GET http://localhost:3000/countmine HTTP/1.1" from [::1]:51732 - 200 4B in 50.149µs
2024/01/02 14:14:40 "GET http://localhost:3000/countall HTTP/1.1" from [::1]:51732 - 200 5B in 136.694µs
2024/01/02 14:14:40 "GET http://localhost:3000/countmine HTTP/1.1" from [::1]:51731 - 200 4B in 79.35µs
While not terribly efficient (a web socket or SSE event should be better), it’s simple enough.
The handler code for /countall should be familiar by now:
func countAllHandler(db *store.InMem) func(w http.ResponseWriter, r *http.Request) {
	return func(w http.ResponseWriter, r *http.Request) {
		all := len(db.AllInStatus(app.StatusOpen))
		_, _ = w.Write([]byte(" (" + strconv.Itoa(all) + ")"))
	}
}
I’ve been a bit lazy here. First, I don’t check if the user is logged in (since the number of questions in rather insensitive). Secondly, I’m not using a real template to create the response content. Instead, some simple string interpolation is written directly to the response. A template for this would be extremely simple:
import "strconv"

templ Counter(count int) {
({ strconv.Itoa(count) })
}
I kind of like the flexibility that Go with templ offers. You can use non-templating mechanisms if you want to.
<form>Pressing the green “Besvara” (answer) button opens a form where anyone logged in can submit an answer. The “Besvara” button looks like this:
<button class="btn btn-success"
    hx-get={"/answer?id=" + question.ID }
    hx-trigger="click"
    hx-target="body">Besvara</button>
Here’s a thing I don’t like. htmx has provisions for automatically detecting input fields etc in forms, but I haven’t found a nice way to assign a row-specific parameter to a button except using that slightly clunky hx-get={"/answer?id=" + question.ID } construct. It’s important to note that hx-get="/answer?id={ question.ID }" does NOT work due to something about how templ rendering works.
The handler for /answer reads the query parameter value, loads the question and renders the AnswerQuestion template, replacing the body element’s contents.
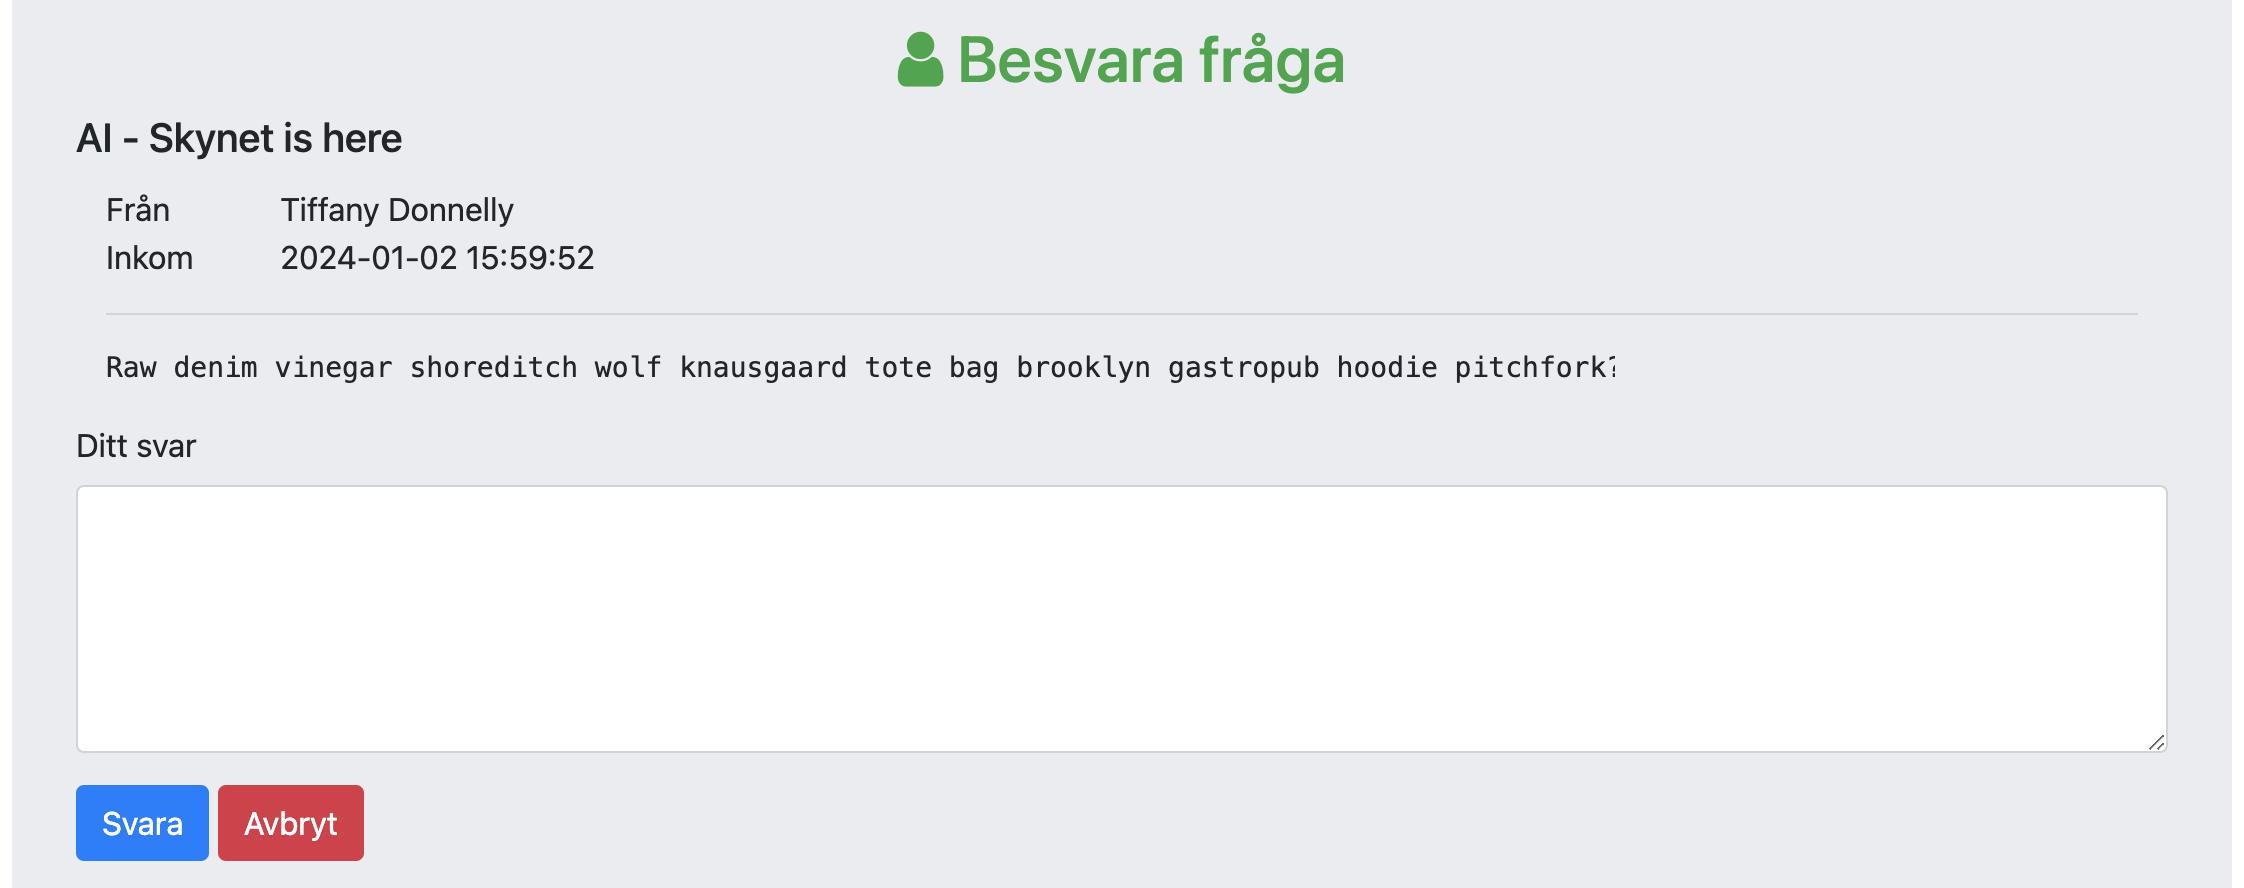
The answer template uses a HTML <form> and some htmx. Here’s the form part:
        <form>
             <div class="form-group">
                <label for="answerTextarea1">Ditt svar</label>
                <textarea class="form-control" id="answerTextarea1" rows="5" name="answertext"></textarea>
              </div>
            <button type="submit" class="btn btn-primary"
                    hx-post={ "/answerquestion?id=" + question.ID }
                    hx-target="body">Svara
            </button>
            <button type="submit" class="btn btn-danger"
                    hx-get="/"
                    hx-confirm="Är du säker på att du vill avbryta?"
                    hx-target="body">Avbryt
            </button>
        </form>
When clicking the submit button, we use hx-post with the question ID. htmx will take care of transferring the value of the <textarea> to the server. In the handler, the relevant code is:
		questionID := r.FormValue("id")
		answerText := r.FormValue("answertext")
		err := db.SaveAnswer(questionID, answerText, email)
The “Avbryt” (cancel) button uses hx-confirm to show an HTML alert dialog prior to redirecting to /.
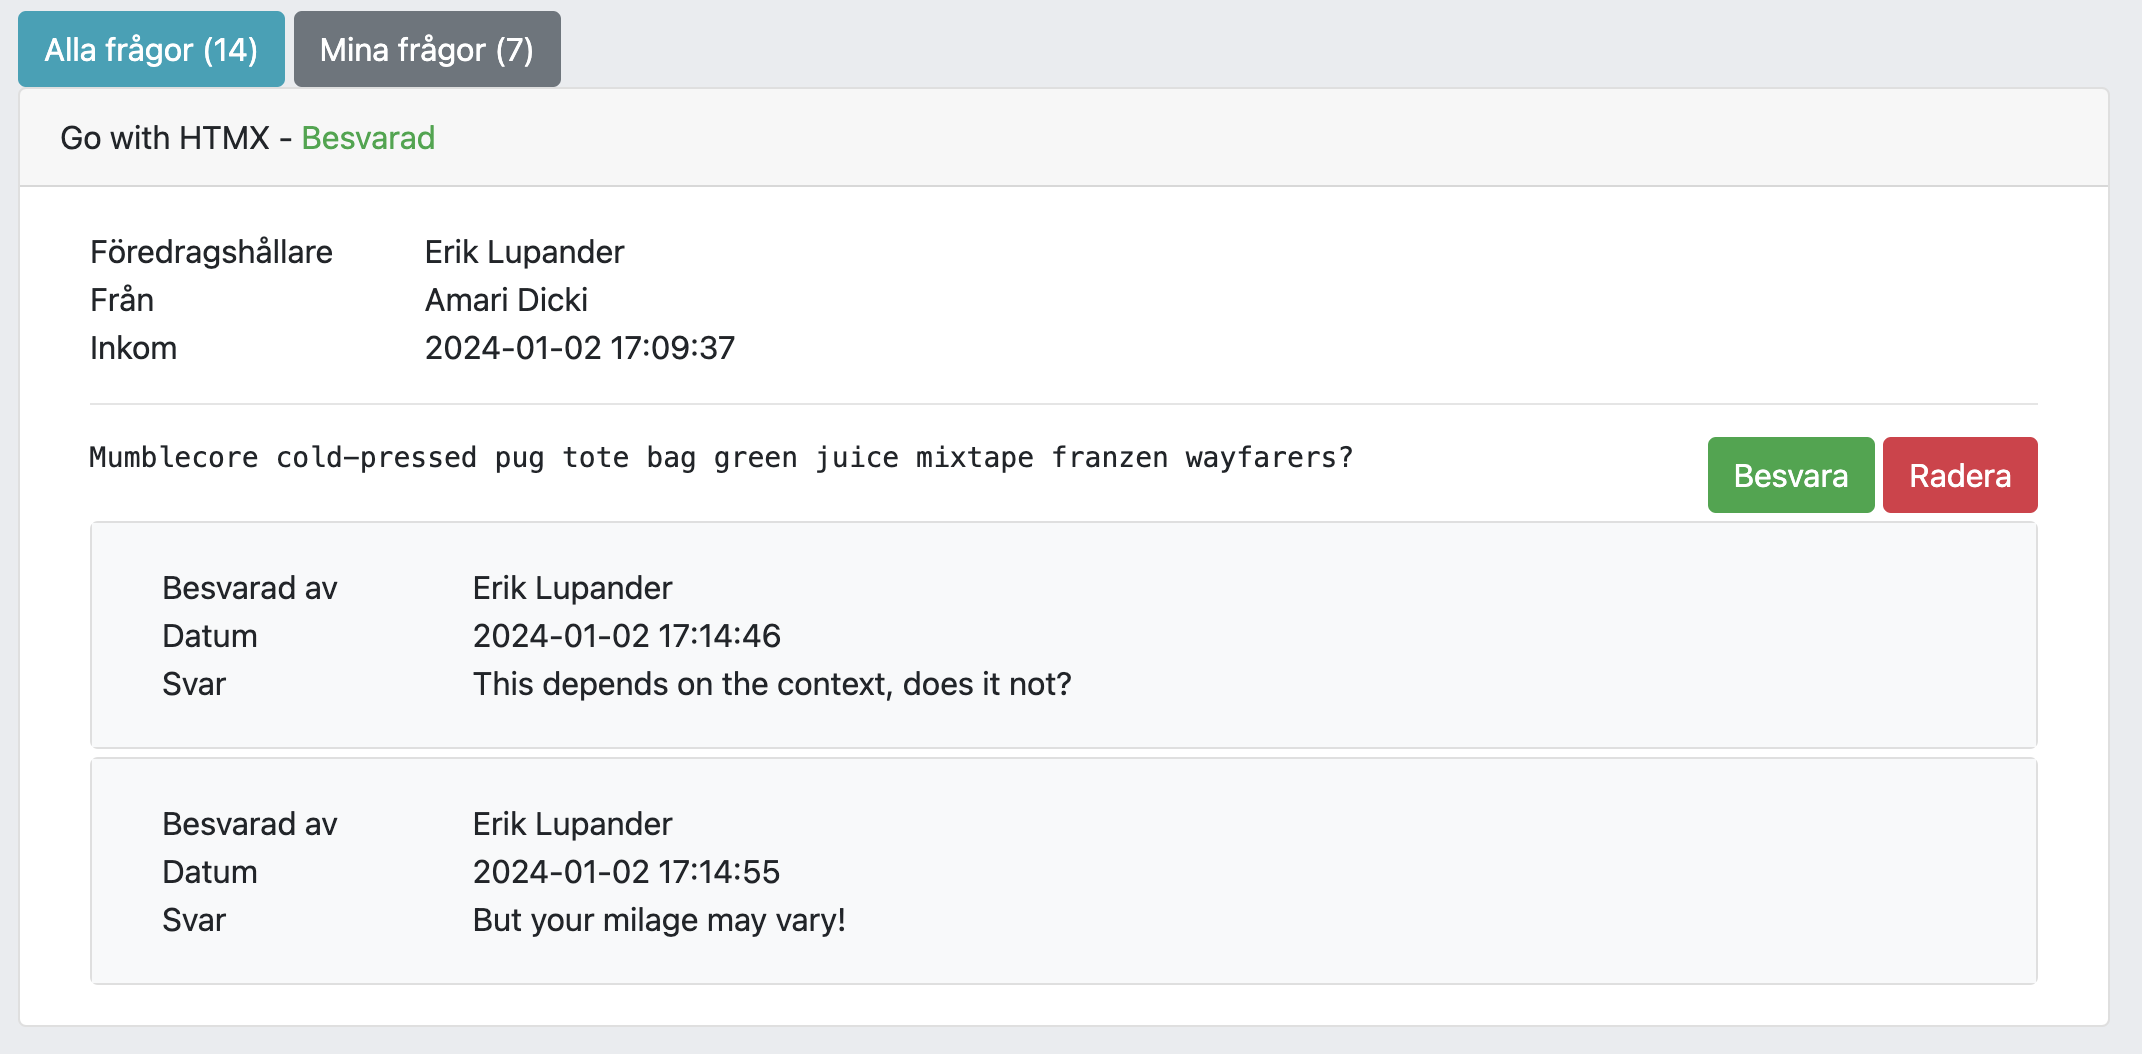
After submitting an answer, we’ll see the answer in the Dashboard view since our Card template includes an Answers template for each question.
I think we’re getting the hang of it now. The Answers template gets its answers from the parent template (@Answers(question.Answers)) and then uses a for statement to render each answer, resulting in:
A cool little thing I mentioned before is that you can call any Go code that returns a string directly from your template. In order to print “Firstname Lastname” instead of the email address “firstname.lastname@ourdomain.com”, I defined a little Go function directly in my card.templ file:
import "strings"

import   "golang.org/x/text/cases"
import   "golang.org/x/text/language"

func formatEmail(in string) string {
	in = strings.Split(in, "@")[0]
	in = strings.ReplaceAll(in, ".", " ")
	return cases.Title(language.Und).String(in)
}
This formatEmail function can then be used directly in templates such as the Answers template:
<div class="row">
    <div class="col-2">Besvarad av</div>
    <div class="col-10">{ formatEmail(answer.AnsweredBy) }</div>
</div>
Testing is an important topic, one that is missing from the official htmx docs.
Testing templ templates is at least very easy. Let’s test the Answers template in isolation:
func TestAnswersTemplateRendersNameCorrectly(t *testing.T) {
	answers := []app.Answer{
		{"1", "Answer text 1", "kalle.karlsson@domain.com", time.Now()},
		{"2", "Answer text 2", "hanna.hansson@domain.com", time.Now()},
	}
	buffer := new(strings.Builder)
	assert.NoError(t, Answers(answers).Render(context.Background(), buffer))

	assert.Contains(t, buffer.String(), "<div class=\"col-10\">Kalle Karlsson</div>")
	assert.Contains(t, buffer.String(), "<div class=\"col-10\">Hanna Hansson</div>")
}
Not super-pretty, but it does it’s job.
Testing handlers in Go is also quite easy, though it takes some extra work making session.GetString("email") work properly in a unit-test. A full example can be found here.
I’m not sure how to best test htmx-specific functionality. Perhaps a good option could be to do proper end-to-end testing early on using a suitable framework such as Cypress.
All in all, I think htmx is a really nice take on frontend development, especially from the viewpoint of a backend-oriented dev who did the bulk of his/her frontend work before Angular, React and other frameworks became the de-facto standard.
I’m sure there’s issues and quirks with htmx, especially for more complex use cases - but this far I’m soundly impressed at how things “just work”, allowing me to focus more on business logic as opposed to having to deal with npm, node, frontend package managers and the full complexity of something like React with all its useEffect, useHook - all in Javascript/typescript, languages many backend devs aren’t that fond of. (For the record, I think typescript is pretty nice).
As for templ - well, without it and its developer tooling, I would have probably said something like “htmx is cool, but don’t do it with Go”. Now, I will probably recommend our team to use htmx with templ for all simple use cases. Not having to deal with Vue, React or Angular is almost a godsend. I’m sure I’m missing significant pieces that htmx doesn’t offer available in the mainstream frontend frameworks, but I would absolutely give htmx a try. In addition, htmx does support scripting.
The demo app should be seen as a little foray into the possibilities of HTMX in particular, with the novelty(?) of Go-based server-side rendering. Perhaps I’ll revisit this later on, adding more reactivity with SSE events, i18n support, CSS transitions when answering questions etc. instead of replacing <body> etc.
Thanks for reading! // Erik Lupander