Blogg
Här finns tekniska artiklar, presentationer och nyheter om arkitektur och systemutveckling. Håll dig uppdaterad, följ oss på LinkedIn
Här finns tekniska artiklar, presentationer och nyheter om arkitektur och systemutveckling. Håll dig uppdaterad, följ oss på LinkedIn

As a personal exercise learning AWS Lambda and CDK, I developed a solution that helps me monitor how much electricity my house uses.
The solution is built around the Watty energy monitor, the Tibber API and various AWS services.
The full CDK and Go source code for this project can be found here: https://github.com/eriklupander/powertracker
You can skip ahead to part 2 right here.
Note: I am in no way affiliated with or working for Tibber, Easee, AWS or any other company or service provider mentioned in this blog post. I’m only doing this for educational purposes and personal enjoyment.
![]()
The heart of the solution is the Watty energy meter, which continuously transmits my house’s current electricity usage (per phase) to a cloud service in Sweden called Tibber. Tibber then uses the data to control the max output power of my EV charger from Easee, so none of the 3 phases draw more than the maximum 20A of current the main circuit breaker allows per phase.
I plan to return to the actual EV charging in an upcoming blog post - this one’s about how I used various AWS services to connect to Tibber’s API, take snapshots every 5 minutes of how much electricity (kWh) my house has used and store that information in a suitable format for keeping track of when and how much electricity my house uses. The final output looks like this:
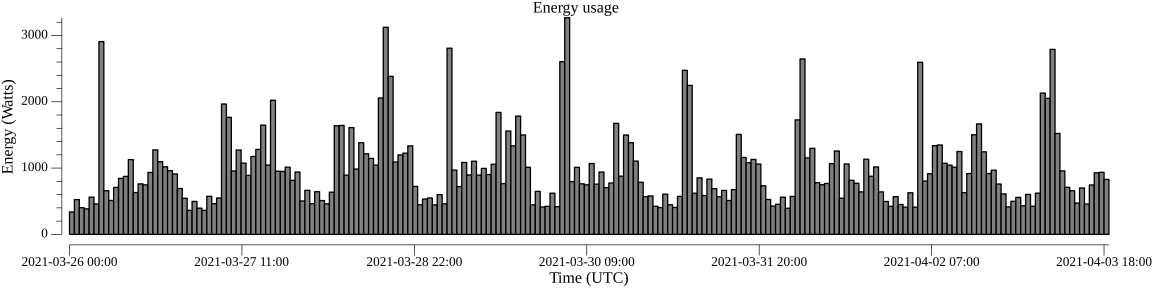
This blog post is definitely one of those where “the journey is the reward”, so the rest of the blog post will focus mostly on how I used CDK (Cloud Development Toolkit) and a number of AWS services to wire everything up in order to produce graphs such as the one above. In part 2 of this blog series, we’ll take a closer look at the golang-based AWS Lambdas I’ve developed.
Overall, the solution works like this:
PowerRecorder AWS Lambda every 5 minutes.PowerRecorder lambda fetches the pre-stored Tibber API key from AWS Secrets Manager.PowerRecorder creates a GraphQL subscription against Tibber’s API using the API key, where a number of metrics are made available in real-time from the Watty device in my house as a liveMeasurement. I haven’t looked into how Tibber is communicating with my Watty device, but I suspect the solution is also based around Web Sockets or a similar mechanism for continuously serving telemetry to a cloud service.PowerRecorder collects exactly one liveMeasurement before closing the subscription.PowerRecorder opens a connection to a AWS Timestream time-series database (using the Go AWS SDK) and writes a single entry with homeId, accumulatedUsage (of day) and the current timestamp.PowerRecorder is now finished, and the lambda exits.exporter lambda receives a HTTP request through the provisioned AWS API Gateway.exporter looks at a number of query parameters in order to determine from date, to date, output format (csv or png), aggregation level (per 5 min, per hour, per day, per month) and if png - type of graph (hist or lineplot)exporter uses the timestreamquery to execute a simple SQL-like query to get all records between the two dates.exporter optionally aggregates the 5-minute records into hourly, daily or monthly entries and outputs the result as csv or as a png rendered by go-num plots.One of the major objectives was to try out the provisioning of AWS resources using Amazon’s Cloud Development Kit (CDK). I’m by no means an expert on DevOps practices, but I’ve used various tools over the years such as Ansible, CloudFormation, Terraform, shell-scripts - and in all honesty - most of those solutions kind of suck in one way or another. All have their pros and cons of course. I’m not saying CDK is the magic silver bullet - especially since it’s not provider agnostic - but for someone more rooted in imperative programming and general software architecture, CDK is by far the smoothest experience I’ve had when it comes to working with provisioning of AWS services from a local developer laptop as well as building the code that makes up the solution with a few keystrokes. Being able to express resources, dependencies, IAM stuff etc as plain code with good editor support and even unit tests may very well be a game-changer.
As for getting started with CDK, there’s a lot of good guides for that. CDK currently supports several programming languages. While Go is my daily driver, Go support in CDK is not (yet anyway) available, so I chose to use Typescript which also seems to be commonly used in CDK examples and tutorials found online.
I bootstrapped my project using the standard cdk init app --language typescript and defined my “Powertracker” (slightly cheesy name, but what the heck…) stack in /bin/powertracker.ts:
import * as cdk from '@aws-cdk/core';
import { PowertrackerStack } from '../lib/powertracker-stack';

const app = new cdk.App();
new PowertrackerStack(app, 'PowertrackerStack');
This file is deliberately kept very simple as the most common pattern seems to be to put the actual resource provisioning of a stack in the /lib folder - in my case /lib/powertracker-stack.ts.
Defining the stack in .ts code is naturally somewhat more complex than the snippet above.
Given that CDK is a very powerful tool, outlining all the possibilities of CDK is way out of scope of this blog post. I’ll focus on this particular solutions and since I’m developing my AWS lambdas in Golang, I’ll spend a little extra time explaining the Go-specific parts of using CDK to build Go-based lambdas.
// imports above, omitted for brevity
export class PowertrackerStack extends cdk.Stack {
 constructor(scope: cdk.Construct, id: string, props?: cdk.StackProps) {
  super(scope, id, props);
  // rest of provisioning goes below here
 }
}
It’s really neat that the provisioning is performed using a (typed) programming language where one will find the various constructs familiar - in this case defining a typescript class extending a base-class from the cdk package and a constructor which we’ll shortly fill with the stuff that actually provisions something.
        // IAM policies
        const timeStreamPolicy = new iam.PolicyStatement({
            actions: ["timestream:*"],
            resources: ["*"]
        })
        const secretsPolicy = new iam.PolicyStatement({
            actions: ["secretsmanager:GetSecretValue"],
            resources: ["arn:aws:secretsmanager:*:secret:prod/tibber_config-*"]
        })
Our lambda functions will need some IAM permissions in order to access secrets and/or read/write to the Timestream DB. We define these permissions as two iam.PolicyStatements we can attach to our lambdas further down.
First off, we’ll look at the code that provisions the AWS Timestream database and table.
    const timeStreamDB = new PowerTrackerTimestreamConstruct(this, "powertracker_timestream", {
        databaseName: "powertracker",
        tableName: "power_record"
    })
The PowerTrackerTimestreamConstruct is defined in its own file /lib/powertracker-timestream.ts:
import {Construct, RemovalPolicy} from "@aws-cdk/core";
import {CfnDatabase, CfnTable} from "@aws-cdk/aws-timestream";

export interface PowerTrackerTimestreamConstructProps {
    databaseName: string;
    tableName: string;
}

export class PowerTrackerTimestreamConstruct extends Construct {
    public readonly database: CfnDatabase;
    public readonly table: CfnTable;

    constructor(scope: Construct, id: string, props: PowerTrackerTimestreamConstructProps) {
        super(scope, id);
        // Define the database using the databaseName passed from props
        this.database = new CfnDatabase(this, 'PowerTracker database', {
            databaseName: props.databaseName,
        });
        this.database.applyRemovalPolicy(RemovalPolicy.RETAIN);  // make sure DB is not deleted when stack is destroyed.

        // Then the table is created in the database which we'll write our electricity usage metrics to.
        this.table = new CfnTable(this, 'Metrics table', {
            tableName: props.tableName,
            databaseName: props.databaseName,
            retentionProperties: {
                memoryStoreRetentionPeriodInHours: (48).toString(10),      // Keep data for 48 in-mem
                magneticStoreRetentionPeriodInDays: (365 * 2).toString(10) // Keep data on disk for 2 years
            }
        });
        this.table.node.addDependency(this.database);
        this.table.applyRemovalPolicy(RemovalPolicy.RETAIN); // make sure Table is not deleted when stack is destroyed.
    }
}
As seen above, the AWS Timestream DB provisioning is very straightforward using the CfnDatabase and CfnTable classes imported from the aws-cdk/aws-timestream dependency. Note the RemovalPolicy.RETAIN which makes sure we don’t lose any data when if we, for some reason, execute cdk destroy or similar. It does however entail that, once the Timestream DB and table has been set up, the code in powertracker-stack.ts has to be commented out as the creation code isn’t idempotent, i.e. it will fail on some kind of “resource is already present” error. It’s hopefully possible to code around this issue, though it’s not something I’ve spent time figuring out yet.
Go lambdas can either be packaged as ZIP bundles or as docker images. I’ve picked the latter. Packaging one’s Go code in a lambda is very easy with a bit of typescript code:
buildGolangLambda(id: string, lambdaPath: string, timeout: number): lambda.Function {
        return new lambda.Function(this, id, {
            code: lambda.Code.fromAsset(lambdaPath, {       // lambdaPath is the relative path to the root of the go lambda code
                bundling: {
                    image: lambda.Runtime.GO_1_X.bundlingDockerImage,  // use standard AWS lambda golang builder image
                    user: "root",                                      // build as root
                    environment: {CGO_ENABLED: '0', GOOS: 'linux', GOARCH: 'amd64'}, // build env vars so we build for Linux/AMD64
                    command: [                   // This is the actual build commands that executes my own `lambda-build` make target.
                        'bash', '-c', [
                            'make lambda-build',
                        ].join(' && ')
                    ]
                }
            }),
            handler: 'main',
            runtime: lambda.Runtime.GO_1_X,         // standard AWS lambda golang runtime image
            timeout: cdk.Duration.seconds(timeout), // specify timeout in seconds. Default is 3, we want a bit more in some cases.
        });
    }
The make task is actually very simple:
lambda-build:
	GOOS=linux go build -o /asset-output/main
The make target is executed by the builder-image which places the resulting binary in the builder’s /assets-output folder as main, from where the AWS builder can move it to the final runtime image. For more details on building/running Golang lambdas see https://aws.amazon.com/blogs/devops/building-apps-with-aws-cdk/.
Moving on to the CDK code to provision this Golang-based lambda, we see how we pass the relative path to the powerRecorder lambda function using path.join in order to create the CDK lambda.Function object.
        // Build PowerRecorder lambda that reads data from Tibber and stores in Timestream DB
        const powerRecorderFunction = this.buildGolangLambda('powerRecorder', path.join(__dirname, '../functions/powerRecorder'), 10);

        // Build EventBridge rule with cron expression and bind to lambda to trigger powerRecorder lambda
        const rule = new ruleCdk.Rule(this, "collect_power_rule", {
            description: "Invoked every minute to collect current power state",
            schedule: Schedule.expression("cron(0/5 * * * ? *)")
        });
        rule.addTarget(new targets.LambdaFunction(powerRecorderFunction))

        // Add IAM for powerrecorder
        powerRecorderFunction.addToRolePolicy(timeStreamPolicy)
        powerRecorderFunction.addToRolePolicy(secretsPolicy)
We also see how we declare an [EventBridge rule] which designates our powerRecorder lambda as target. The last two lines binds our two IAM PolicyStatements so the lambda has the necessary permissions.
Next, we use very similar code to create our exporter lambda which gets access to the AWS timestream database and which then is bound to a AWS API Gateway running in HTTP API mode.
        // Build Exporter API lambda and bind IAM for timestream access
        const exporterLambdaFn = this.buildGolangLambda('exporter-api', path.join(__dirname, '../functions/exporter'), 30);
        exporterLambdaFn.addToRolePolicy(timeStreamPolicy)

        // Create HTTP API Gateway in front of the lambda
        const apiGtw = this.createApiGatewayForLambda("exporter-api-endpoint", exporterLambdaFn, 'Powertracker endpoints')

        // Output the hostname of your the API gateway
        new cdk.CfnOutput(this, 'lambda-url', {value: apiGtw.url!})
The createApiGatewayForLambda looks like this:
    createApiGatewayForLambda(id: string, handler: lambda.Function, desc: string): HttpApi {

        const httpApi = new HttpApi(this, id, {description: desc})
        const lambdaProxyIntegration = new LambdaProxyIntegration({handler: handler})
        httpApi.addRoutes({
            integration: lambdaProxyIntegration,
            methods: [HttpMethod.GET],
            path: '/',
        })
        return httpApi
    }
The code above will create an API gateway which will forward GET requests for / to the exporter lambda. A real such URL looks something like:
https://some-random-id.execute-api.eu-west-1.amazonaws.com/
As seen, we’re using the HTTP API flavour of AWS API Gateway. Aside from costing a lot less, it gives us much better control of content encoding, especially for binary-type data such as PNG images. In my first iteration of this solution, I used the REST API flavor for the exporter lambda. This worked fine for my initial CSV-export, but once I tried to write image/png or application/octet-stream, the API gateway kept Base64-encoding my response data which wasn’t what I wanted. While I believe this may be possibly to remedy, it was a lot easier to just switch to using the HTTP API. Do note that HTTP vs REST APIs treats inbound requests somewhat differently when it comes to accepting subpaths etc, but that’s a topic for another time.
CDK is wonderfully easy to work with from the command-line. After running aws configure with your AWS account’s API tokens and cdk bootstrap in order to deploy the necessary CDK Bootstrap CloudFormation stack in your account, we’re ready to deploy!
However, it’s always a good idea to use cdk synth first in order to make sure your CDK code is sound. cdk synth actually outputs the CloudFormation template your CDK code results in, so it’s of course possible to use the CF template using the AWS console or aws CLI as well as using cdk deploy.
When running cdk deploy, CDK will compile and build our lambda’s as well as preparing the CloudFormation document that gets deployed to your account. By default, one needs to manually inspect and approve any changes involving IAM so you may need to answer a Yes/No prompt. For details on each cdk command such as deploy, run cdk deploy --help or refer to the official documentation.
Once we’ve executed cdk deploy, the new cdk.CfnOutput(this, 'lambda-url', {value: apiGtw.url!}) line of code will output the URL to the API Gateway that has been created and that should be ready to accept requests!
In this part we focused on the overall solution and how to use CDK to build Go-based lambdas and provision AWS resources. In the next part we’ll look closer at how we used Golang to implement our PowerRecorder and exporter lambdas.